Network quick setup guide, Network user's guide chapter map, Print configuration page for the administrator – Brother HL-1850 User Manual
Page 2: Setting your language on the control panel, Setting your printer ip address and subnet mask, Factory default setting
Reprint
Data
Go
Job cancel
Back
Set
Back
Set
Back
Set
Back
Set
Back
Set
Go
Back
Set
Back
Set
Reprint
Data
Go
Job cancel
Go
Back
Set
Back
Set
Back
Set
Back
Set
Install the BRAdmin Professional Configuration utility
Network Quick Setup Guide
For HL-1850 users: If you are going to connect the printer to your network, purchase the optional Network board (NC-4100h).
If you are going to connect the printer to your network, we recommend that you contact your system administrator prior to
installation.
If you are an Administrator: Configure your network printer settings referring to the following instructions.
The default password for the print server is 'access'. You can use the BRAdmin Professional software or a web browser to change
this password.
To configure the print server refer to the Network User's Guide.
To change the language settings of the printer do the following.
Peer-to-Peer Printing
NetBIOS Peer-to-Peer Printing
How to Configure Internet Printing
Novell Netware Printing
TCP/IP Printing
NetBIOS Peer-to-Peer Printing
DLC Printing
How to Configure Internet Printing
Novell Netware Printing
TCP/IP Printing
NetBIOS Peer-to-Peer Printing
DLC Printing
TCP/IP Printing
How to Configure Internet Printing
Novell Netware Printing
UNIX Printing
Macintosh Printing
Macintosh Printing
TCP/IP Printing
NetBIOS Peer-to-Peer Printing
Chapter 3
Chapter 4
Chapter 5
Chapter 6
Chapter 2
Chapter 4
Chapter 8
Chapter 5
Chapter 6
Chapter 2
Chapter 4
Chapter 8
Chapter 2
Chapter 5
Chapter 6
Chapter 1
Chapter 7
Chapter 7
Chapter 2
Chapter 4
TCP/IP
NetBIOS
TCP/IP
IPX/SPX
TCP/IP
NetBIOS
DLC/LLC
TCP/IP
IPX/SPX
TCP/IP
NetBIOS
DLC/LLC
TCP/IP
TCP/IP
IPX/SPX
TCP/IP
AppleTalk
TCP/IP
TCP/IP
NetBIOS
Peer-to-Peer
Brother Internet Print
Netware
Peer-to-Peer
Brother Internet Print (NT
®
4.0 only)
Netware
Peer-to-Peer
(Windows
®
2000 only)
IPP (Internet Printing Protocol)
Brother Internet Print
Netware
Windows
®
95/98/Me
Windows NT
®
Windows
®
2000/XP
UNIX/Linux
Macintosh
®
OS2 Warp Server
LAN Server
Macintosh
®
Windows
®
The BRAdmin Professional software is designed to manage your Brother network connected devices. For example, Brother network
ready printers and Brother network ready Multifunction devices can be managed using the BRAdmin Professional software. The
BRAdmin Professional software can also be used to manage devices from other manufacturers whose products support the SNMP
(Simple Network Management Protocol).
For more information on the BRAdmin Professional utility go to http://solutions.brother.com
Network User's Guide Chapter Map
To print a configuration page, use a fine ball point pen to hold down the
Network Test Button for less than 5 seconds.
If you wish to reset the print server back to its default factory settings
(resetting all information such as the password and IP address information),
use a fine ball point pen to hold down the Network Test Button for more than 5
seconds.
Insert the CD-ROM into your CD-ROM drive.
The opening screen will appear automatically.
Follow the instructions on the screen.
Click the Install Software icon
on the Menu screen.
Click "BRAdmin Professional."
Follow the instructions on the screen.
Print Configuration Page
For the Administrator
(For Windows
®
Users Only)
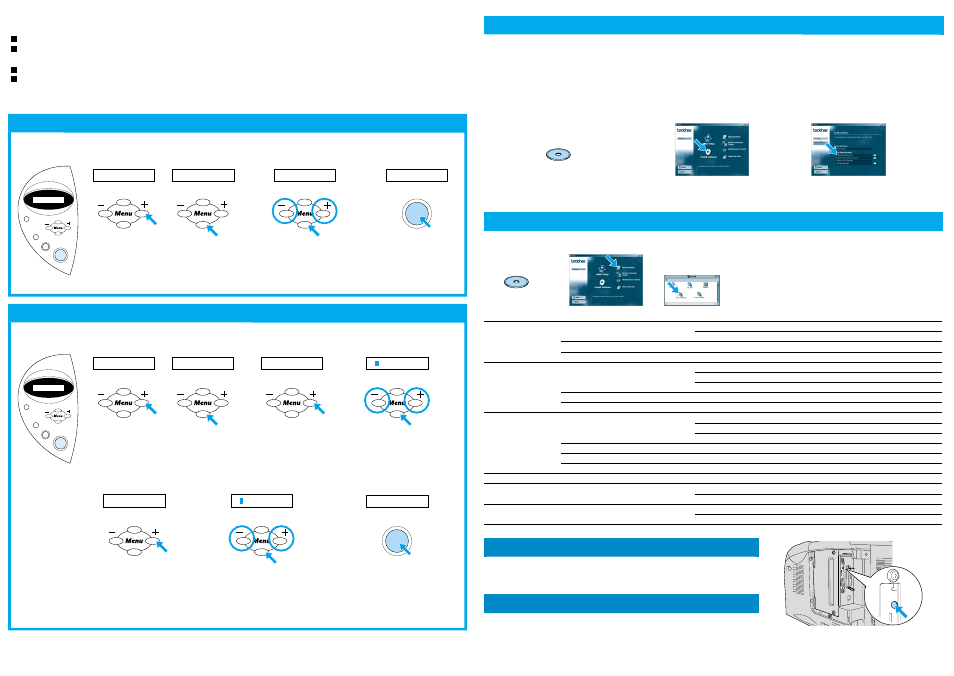
Setting Your Language on the Control Panel
To set the printer IP address using the printer control panel do the following.
Setting Your Printer IP Address and Subnet Mask
(Using the Control Panel)
Factory Default Setting
Press the Set button
again.
TCP/IP ENABLE will
be displayed.
READY
READY
1 9
2
.
0 .
0 . 1 9 2
*
I P ADDRESS=
TCP / I P
NETWORK
=ENGL I SH
*
LANGUAGE
SETUP
0
.
0 .
0 .
0
*
SUBNET MASK=
READY
READY
Press the Go button to put
the printer back into its
READY state.
Press the + button until
SETUP is displayed.
Press the Set button.
Press the Set button
again.
Scroll through the available languages by
pressing the + or - buttons. Press the Set
button to accept the appropriate language.
An asterisk mark (*) appears on the LCD.
Enter your IP address of the printer using
the + and - buttons. Press the Set button
to go to next digit. Press the Set button to
complete the IP address.
An asterisk mark (*) appears on the LCD.
Press the + button until
NETWORK is displayed.
Press the Set button.
Press the + button until
IP ADDRESS= is displayed.
Press the Set button.
Press the + button until
SUBNET MASK= is displayed.
Press the Set button.
Enter your subnet mask settings in the same
way that you entered the IP address.
An asterisk mark (*) appears on the LCD.
Press the Go button to put the printer
back into its READY state.
For more information, refer to the Network User's Guide on the supplied CD-ROM or go to http://solutions.brother.com
©2002 Brother Industries, Ltd. ©1998-2002 TROY XCD Inc. ©1983-1998 PACIFIC SOFTWORKS INC. ALL RIGHTS RESERVED
Windows and Windows NT are registered trademarks of Microsoft Corporation in the U.S. and other countries. HP, HP/UX, JetDirect and JetAdmin are trademarks of Hewllet-Packard Company. UNIX is a trademark
of UNIX Systems Laboratories. Adobe PostScript and PostScript3 are trademarks of Adobe Systems Incorporated. Netware is a trademark of Novell, Inc. Apple Macintosh, iMac, LaserWriter, and AppleTalk are
trademarks of Apple Computer, Inc.
All other brand and product names are trademarks or registereted trademarks of their respective holders.
Test Button
1
1
5
6
7
2
3
4
2
3
4
1
2
3