Timeguard LEDX30FLB User Manual
Page 3
1
2
3
4
1. Designated Use
• LEDX10FL, LEDX20FL and LEDX30FL are an outdoor LED light.
• Mainly for wall installation.
• Simple plug in wall plate for easy & safe connection.
• Suitable for a wide range of locations: corridors, gardens, staircases,
entrances, garages, outdoor parking areas etc.
Index :
Page 2
Contents and Tools required
Page 3
Connection and Installation procedure
Page 4
Installation procedure
Page 5
Lamp adjust and Warning
2. Basic Safety Instruction
Danger of death through electric shock or fi re!
• Must only be installed by qualifi ed electricians.
• Avoid the metal parts of the device due to potentially high temperature.
LEDX10/20/30FLB.1_Instructs_147x105.indd -R3 1-4
17/01/2014 10.35am
Prepared by Sally
Page 6
Technical specifications
WARNING
LEDX10FL LEDX20FL LEDX30FL - N1
• Designed for use in normal environments
• Intended for outdoor installation.
• Energy saving.
• Long LED lamp life time.
• Conforms to current EC Directives.
Connect the cable to the terminal block as follows
(see connection diagram):
Ensure the connections are secure. Refit wall plate ensuring it clicks
firmly into place.
5. Connection:
Switch off the electricity at the fuse box by removing the relevant fuse or
switching off the circuit breaker before proceeding with the installation.
*** IMPORTANT ***
2
3
1
230V
4
Mounting Screws: (M4x32mm) X 2
φ 6mm
Fix the U bracket to the wall.
Switch off the power.
Drill and push the screw
peg into the hole.
Marking the screw hole.
6. Installation Procedure:
LIVE
NEUTRAL
EARTH
BLUE
GREEN / YELLOW
BROWN
Mains
Supply
Isolation Switch
N
L
E
Screws: (M4x12mm) X 2
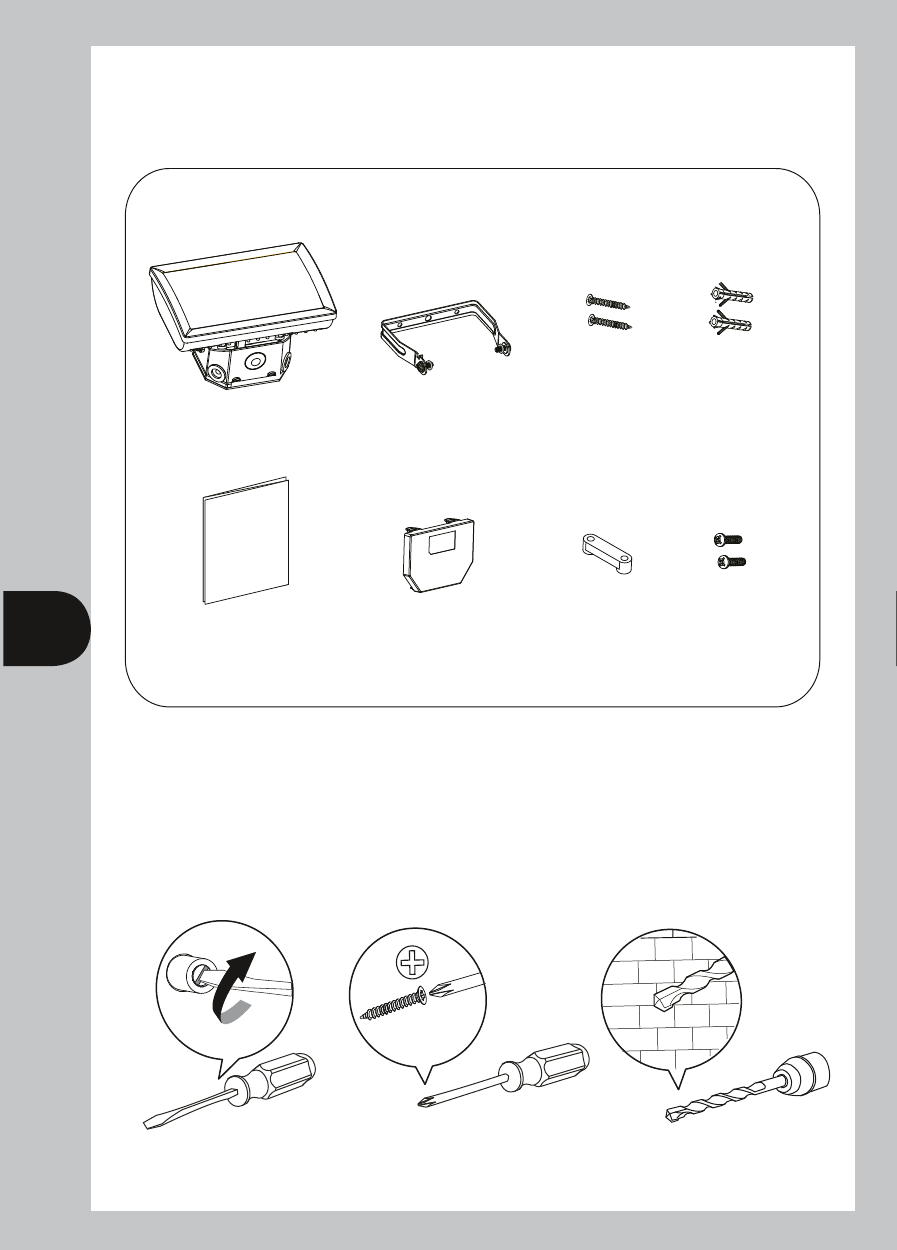
3. Contents:
What’s in the box?
4. Tools required:
Tools / Equipment need for installation.
INSTRUCTIONS
MANUAL
X 1
X 1
X 1
X 2
X 2
X 1
Screw:
M4x32mm
Screw peg:
6x30mm
X 1
X 2
Screw: M3x12mm
X 1
X 1
X 1
Flat blade screw driver
Suitable for screw head
Drill bit with diameter 6mm
5
Connect device
to mains.
Connect the mains supply
cable to the on the terminal
block backplate as follows.
( See connection diagram )
CONNECTION
10
Loosen the screws.
Attach the
wallplate
to the device.
12
8
Connect the individual wires to the appropriate terminal then tighten
the screws.
First, feed the cable through the
rubber gasket of the junction box.
“Click”
Push
9
11
Attach the strain relief to the
device and screw in.
Tighten the screws.
6
7
EARTH
Attach the device to the U
bracket then tighten the
screws on both sides.
LIVE
NEUTRAL
EARTH
BLUE
GREEN / YELLOW
BROWN
Product’s weight
LEDX10FL: 0.42kg, LEDX20FL: 0.60kg, LEDX30FL: 0.85kg
Max wire
1 x 2.5mm per way