Installation procedure, Off on – Timeguard LED100PIRWH User Manual
Page 5
4
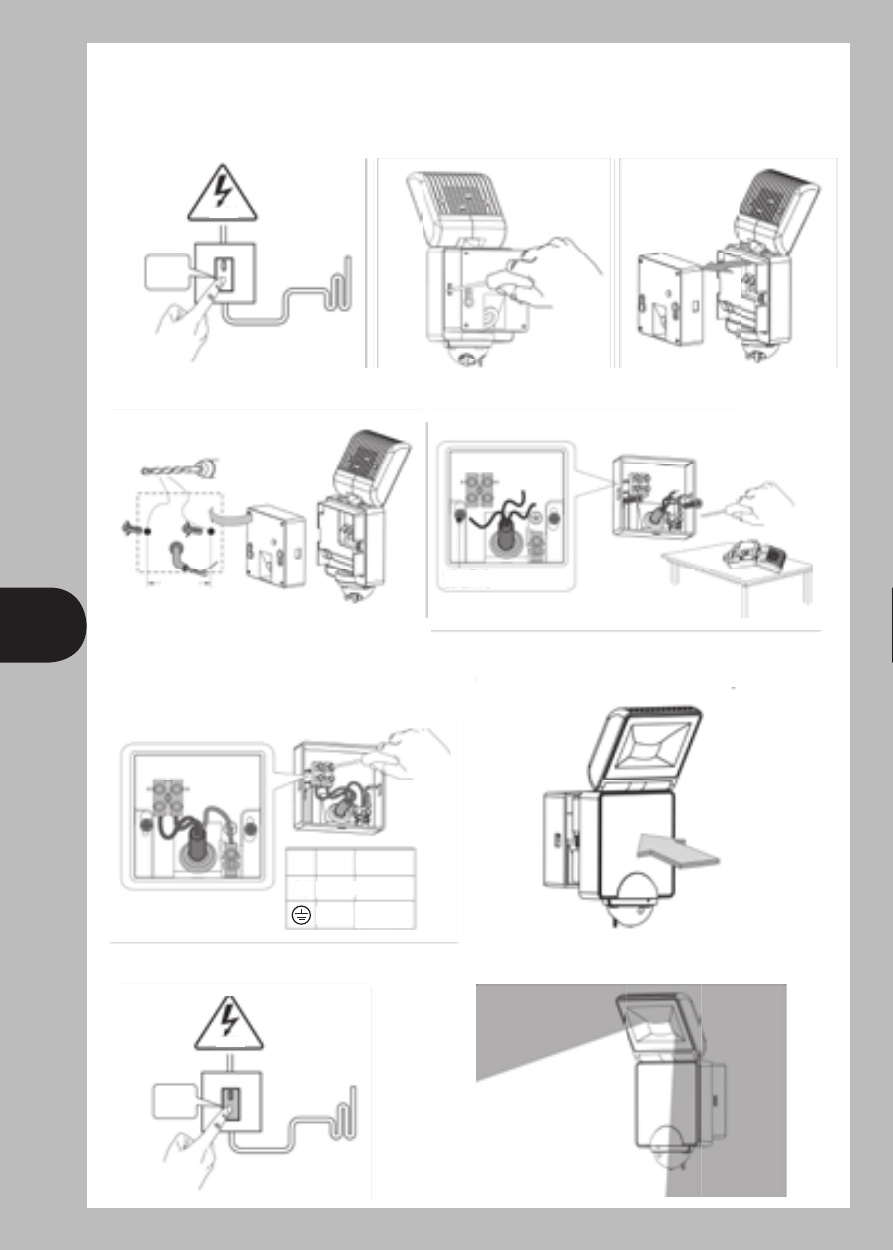
6. Installation Procedure:
Switch off the power.
Twist-open the wall plate.
Fix the wall plate to the wall.
Feed the wires through rubber
gasket of the wall plate and attach
to corresponding terminal.
Attach the device to the wall plate.
Switch On the power.
Unit goes into warm-up period for 40 sec.
OFF
ON
Ø5mm
60mm
240V
Mounting Screws x2
L N
L N
L
N
LIVE BROWN
BLUE
EARTH GREEN/
YELLOW
NEUTRAL
240V
See also other documents in the category Timeguard Clock:
- TS800B (8 pages)
- TG64B (8 pages)
- ETU17 (12 pages)
- TG77 (12 pages)
- NTT01 (6 pages)
- NTT02 (6 pages)
- NTT03 (12 pages)
- NTT05 (6 pages)
- NTT06 (12 pages)
- NTT08 (12 pages)
- TGBT4 (6 pages)
- TGBT5 (6 pages)
- TGBT6 (6 pages)
- FST11A (12 pages)
- TS900B (6 pages)
- NTM01 (6 pages)
- NTM02 (12 pages)
- TR 671 top (12 pages)
- MEU11 (7 pages)
- EL11 (12 pages)
- PB05 (8 pages)
- EMU56 (12 pages)
- TR 608 top2 (24 pages)
- TR 611 top2 (14 pages)
- TR 612 top2 (7 pages)
- SELEKTA 170 top2 (24 pages)
- TR 641 top2 (36 pages)
- LUNA 109 (8 pages)
- LUNA 110 (8 pages)
- LUNA 112 top2 (14 pages)
- LUNA 120 top2 (14 pages)
- E169S (1 page)
- E269H (2 pages)
- ELU56 (2 pages)
- ELU5620 (2 pages)
- TR 635 top2 (16 pages)
- RTS113 (8 pages)
- ZV700 (12 pages)
- ZV210 (2 pages)
- ZV810 (14 pages)
- DS1 (16 pages)
- DS4 (2 pages)
- DS3HD (10 pages)
- RLS010 (2 pages)
- ECO36PIR (8 pages)