Milescraft 1310 - JointCrafter User Manual
Page 11
© 2013 Milescraft, Inc. • Patent Pending • www.milescraft.com
CINQUIÈME PARTIE - DEUXIÈME PLANCHE / JOINTS DE SURFACE
PARTE 5: SEGUNDA TABLA / JUNTAS DE SUPERFICIE
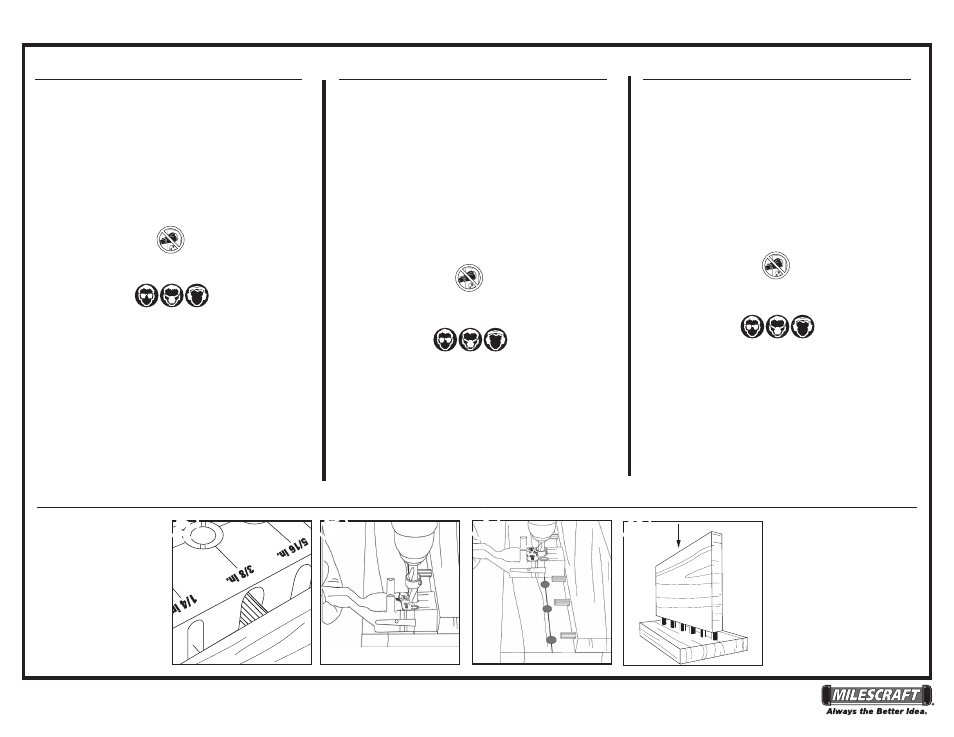
PART 5 - SECOND BOARD/SURFACE JOINTS
5
Starting at one end of the board, using the appropriate Dowel
Alignment Slot, position the JointCrafter™ over installed pin, with
the Guide Fence resting firmly against the edge of the second
board.
Note: Adjust drill stop depth for second board if necessary.
6
Firmly holding the JointCrafter™ with the power off, insert
the drill bit into the appropriate Drill Guide Bushing, switch power
on and drill a hole to its proper depth.
7
Repeat Steps 5-7 to match all remaining dowel positions in
the first board.
8
You are now ready to glue and assemble your joint.
5
6
7
8
11
1
1
1
1
2
2
2
5
En commençant à une extrémité de la planche, et en utilisant
la fente d’alignement de goujon appropriée, positionnez le gabarit
JointCrafter™ au-dessus de la goupille installée, de façon que
le guide longitudinal repose fermement contre le bord de la
deuxième planche.
Remarque : ajustez la profondeur de la butée de perçage pour la
deuxième planche si nécessaire.
6
Tout en tenant fermement le gabarit JointCrafter™ après
l’avoir mis hors tension, insérez la mèche dans la douille de guid-
age du perçage appropriée, mettez l’outil sous tension et percez
un trou à la profondeur appropriée.
7
Recommencez les étapes 5-7 pour aligner avec toutes les
autres positions de goujons dans la première planche.
8
Vous êtes maintenant prêt à coller et assembler votre joint.
5
Comenzando en un extremo de la tabla, utilizando la ranura
de alineación de espiga apropiada, posicione la JointCrafter™ so-
bre el pasador de espiga instalado, con el tope-guía descansando
firmemente contra el borde de la segunda tabla.
Nota: Si es necesario, ajuste la profundidad del tope de taladro
para la segunda tabla.
6
Sujetando firmemente la JointCrafter™, con la unidad
apagada, inserte la broca taladradora en el casquillo de guía de
taladro apropiado, encienda la herramienta y taladre un agujero
hasta su profundidad apropiada.
7
Repita los Pasos 5-7 para hacer coincidir todas las posiciones
de espiga restantes en la primera tabla.
8
Ahora usted estará listo para pegar y ensamblar su junta.