Metpar Polly Solid Plastic(HDPE) User Manual
Page 5
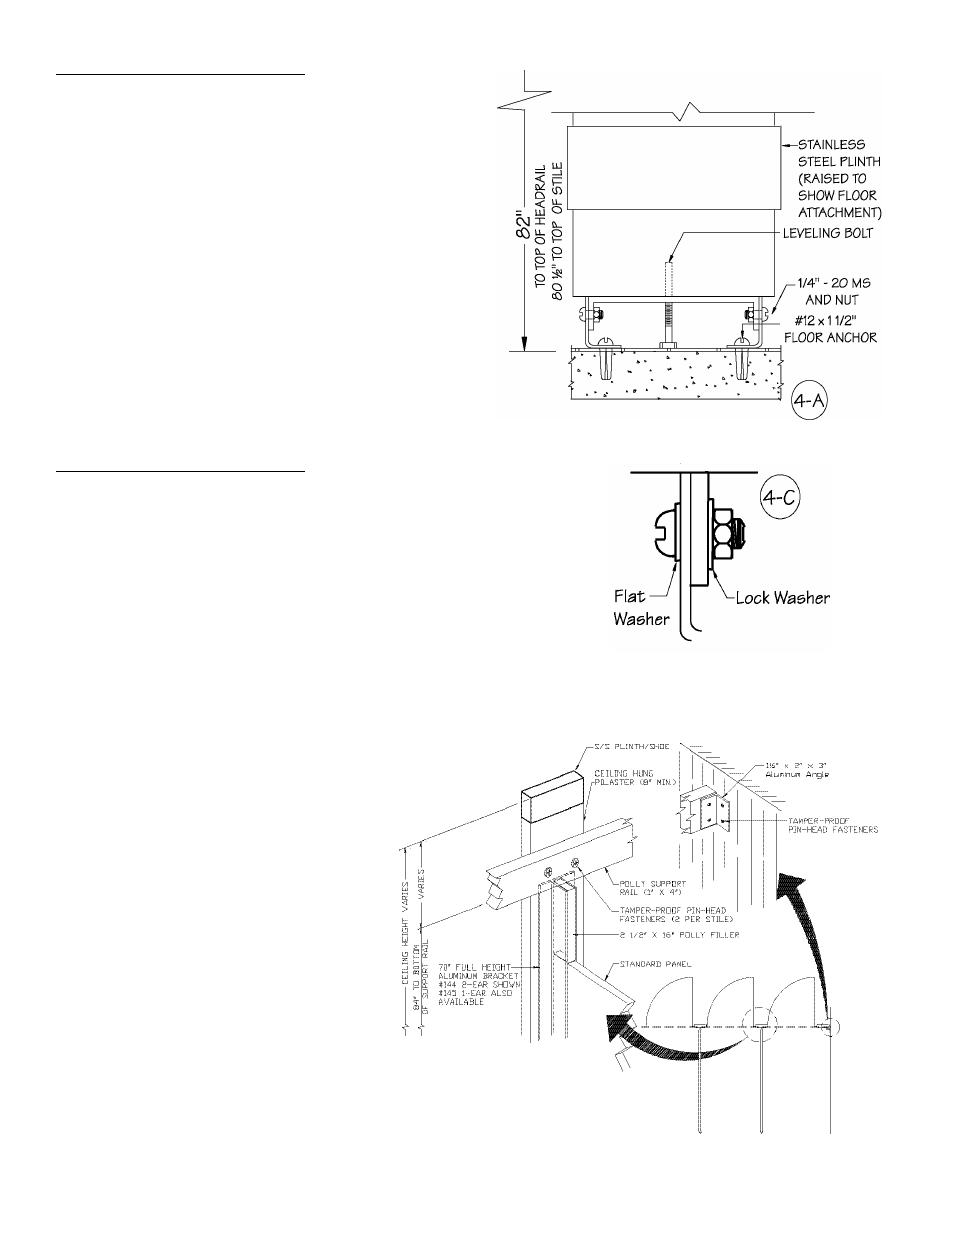
STEP 4A
STEP 4A -- Attach Stile FP500
Attach Stile FP500
A. Place plastic anchors into the floor holes.
B. Over each floor anchor place these items in the
following order; one (1) shoe clip and one (1) bracket.
Fasten into anchor with #12 x 1½” screw.
C. Loosely install ¼-20 nuts and bolts thru each bracket
on bottom of stiles. Note the use of washers on either
side of each L-bracket. See detail 4C.
D. Place stile over L-brackets and push panel into “1-ear”
or “2-ear” brackets (previously installed onto the back
of each stile) and push up to screw heads.
E. Plumb the stile, place a wedge at top rear between
panel and wall. Leave panel support at floor.
STEP 4B
STEP 4B -- Attach Stile CH700
Attach Stile CH700
A. On each 3/8” diameter ceiling stud, place these items
in the following order; one (1) shoe clip, one (1)
rectangular washer, two (2) nuts and one (1) washer.
B. Place stile over studs and place on each stud one (1)
clamp, one (1) round washer and one (1) nut.
F. Bottom of panel and bottom of stile should align and
be even. Push panel into “1-ear” or “2-ear” 70” long
brackets (previously installed onto the back of each
stile) and push up to screw heads.
C. Plumb stile, place wedge at top rear between panel and
wall. Leave the panel support at floor beneath panel.
D. Insert and fasten in place a 2½” x 16” “filler piece” into
the cavity of the bracket above the panel (see detail).
E. Locate the Polly Support Rail along the
length of the stalls, behind the pilasters
as shown, just above the bracket. This
should extend to the side wall(s).
Fasten to the back of the pilasters with
sheet metal screws and mount to the
wall with angle bracket as shown.
F. The Polly Support Rail is used as shown
solely on the CH700 ceiling hung style
to provide reinforcement and stability.
The extended 70” full height bracket with
a “Polly filler” is also unique to CH700.
Metpar’s Polly
®
Installation Manual ~ February 2003