Crystal GaugeCalHP Pressure Comparator User Manual
Page 9
GaugeCalHP Rebuild Kit Instructions
7
PN
5139
PN
5141
PN
5145
PN
5129
PN
5142
PN
5142
—
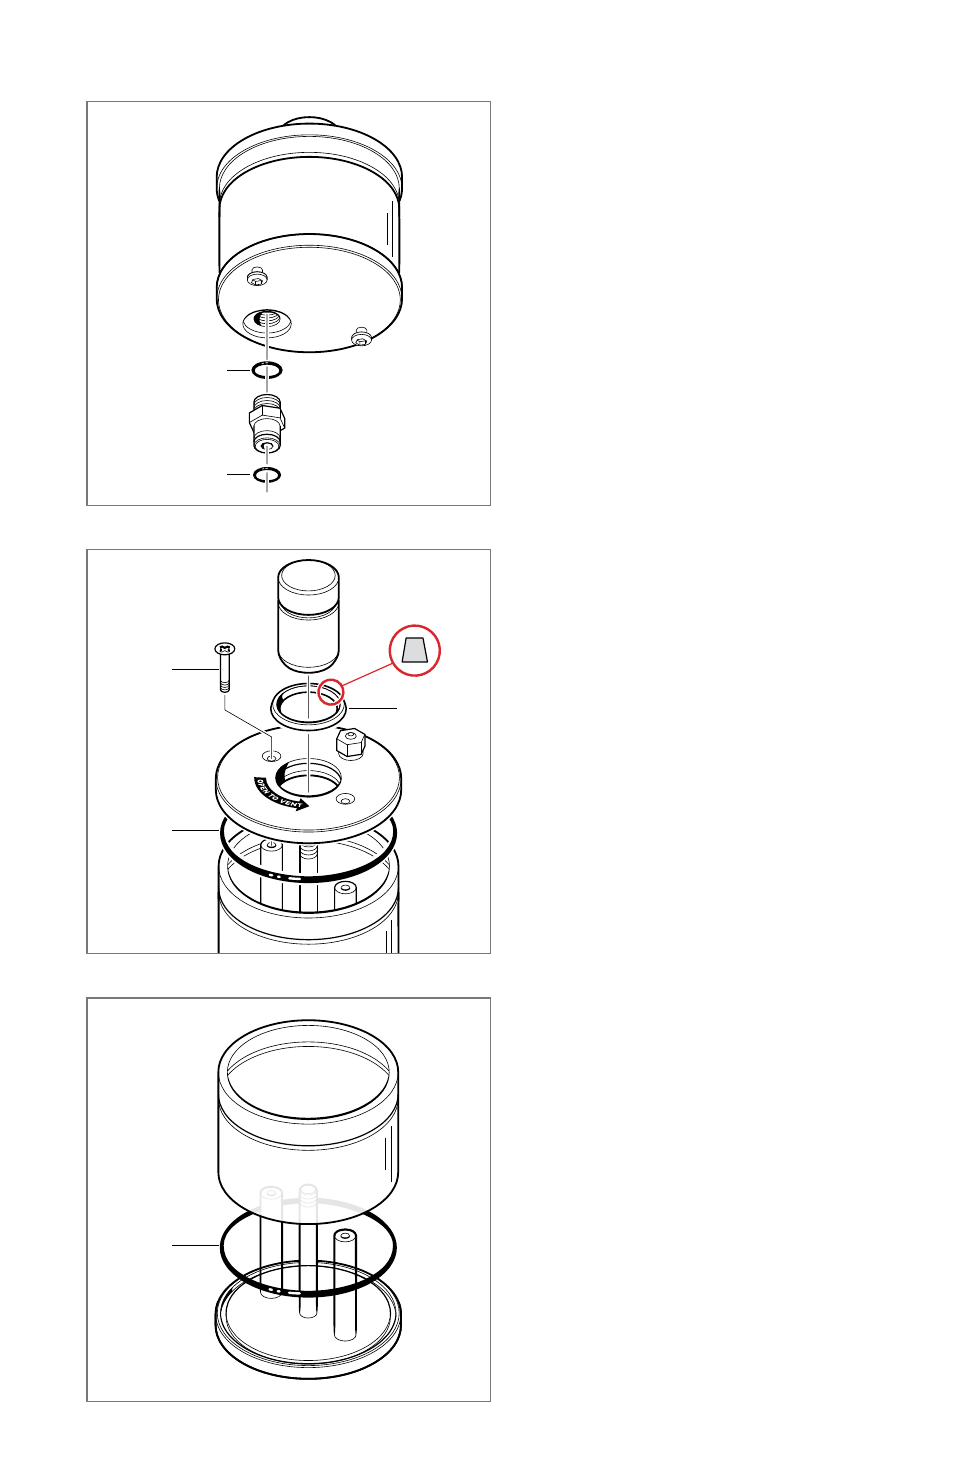
Reservoir Assembly
1
From the underside of the Reser-
voir, remove the Fitting from the
Reservoir Base.
2
Remove the Reservoir Fitting and
replace the two O-rings (
P N
5139
)
and (
P N
5141
).
3
From the topside of the Reservoir,
remove the Reservoir Knob.
4
Using a Phillips-head screwdriver,
remove the two Reservoir Cap
Sealing Screws (
P N
5145
), and then
remove the Reservoir Cap.
5
Remove the Reservoir Knob Seal
(
P N
5129
) and the large O-ring
(
P N
5142
) from the Reservoir Cap.
Note that the wider surface of the
Reservoir Knob Seal is facing down.
6
Remove the Reservoir Tube from
the Reservoir Base.
7
Remove the large O-ring (
P N
5142
)
from the Reservoir Base.
8
Rebuild the Reservoir Assembly by
following the preceding steps in
reverse order.
Note that the reservoir tube should
be oriented so that the etched fill
line is near the top.
- XP2i Digital Pressure Gauge (11 pages)
- XP2i Digital Pressure Gauge (13 pages)
- XP2i Digital Pressure Gauge (8 pages)
- XP2i-DP Digital Differential Pressure Gauge (14 pages)
- XP2i Digital Pressure Gauge (7 pages)
- WT Series Panel Mount Digital Pressure Gauge (21 pages)
- M1 Digital Test Gauge (4 pages)
- CrystalCalHP Pressure Gauge Calibration System (43 pages)
- CrystalCalHP Pressure Gauge Calibration System (15 pages)
- 30 Series Digital Pressure Calibrator (7 pages)
- 30 Series Digital Pressure Calibrator (11 pages)
- 30 Series Digital Pressure Calibrator (22 pages)
- 30 Series Digital Pressure Calibrator (15 pages)
- CrystalCalHP Pressure Gauge Calibration System (20 pages)
- GaugeCalHP Pressure Comparator (4 pages)
- CrystalCalHP Pressure Gauge Calibration System (59 pages)
- MultiCal Pressure Module (12 pages)
- nVision Reference Recorder (2 pages)
- nVision Reference Recorder (18 pages)
- nVision Reference Recorder (12 pages)
- nVision Reference Recorder (4 pages)
- nVision Reference Recorder (54 pages)
- nVision Lab Reference (2 pages)
- nVision Reference Recorder (2 pages)
- APM Advanced Pressure Module (16 pages)
- Pump Systems (16 pages)
- Pump Systems (17 pages)
- Pump Systems (16 pages)
- P-018-CPF Hydraulic Screw Pump (2 pages)
- Pump Systems (15 pages)
- Pump Systems (20 pages)
- T-1-CPF Hydraulic Comparator (25 pages)
- 24VDC Loop Power Supply (7 pages)
- CPF High Pressure Hose and Fittings (12 pages)
- 2100 Series (8 pages)
- DTG (8 pages)
- XP2i 2nd Generation (30 pages)
- GaugeCalXP (12 pages)
- GaugeCalXP Rebuild Kit (8 pages)
- MultiCal BAR/PSI (7 pages)
- MultiCal KPA/PSI (8 pages)
- DiffXP (2 pages)
- DataLoggerXP (21 pages)
- HydraulicPump (9 pages)