Air distribution valve assembly, Air distribution valve servicing, Important – SANDPIPER T15 User Manual
Page 13: Air end
t15mdl1sm-rev0614
sandpiperpump
.
com
Model T15 Metallic •
10
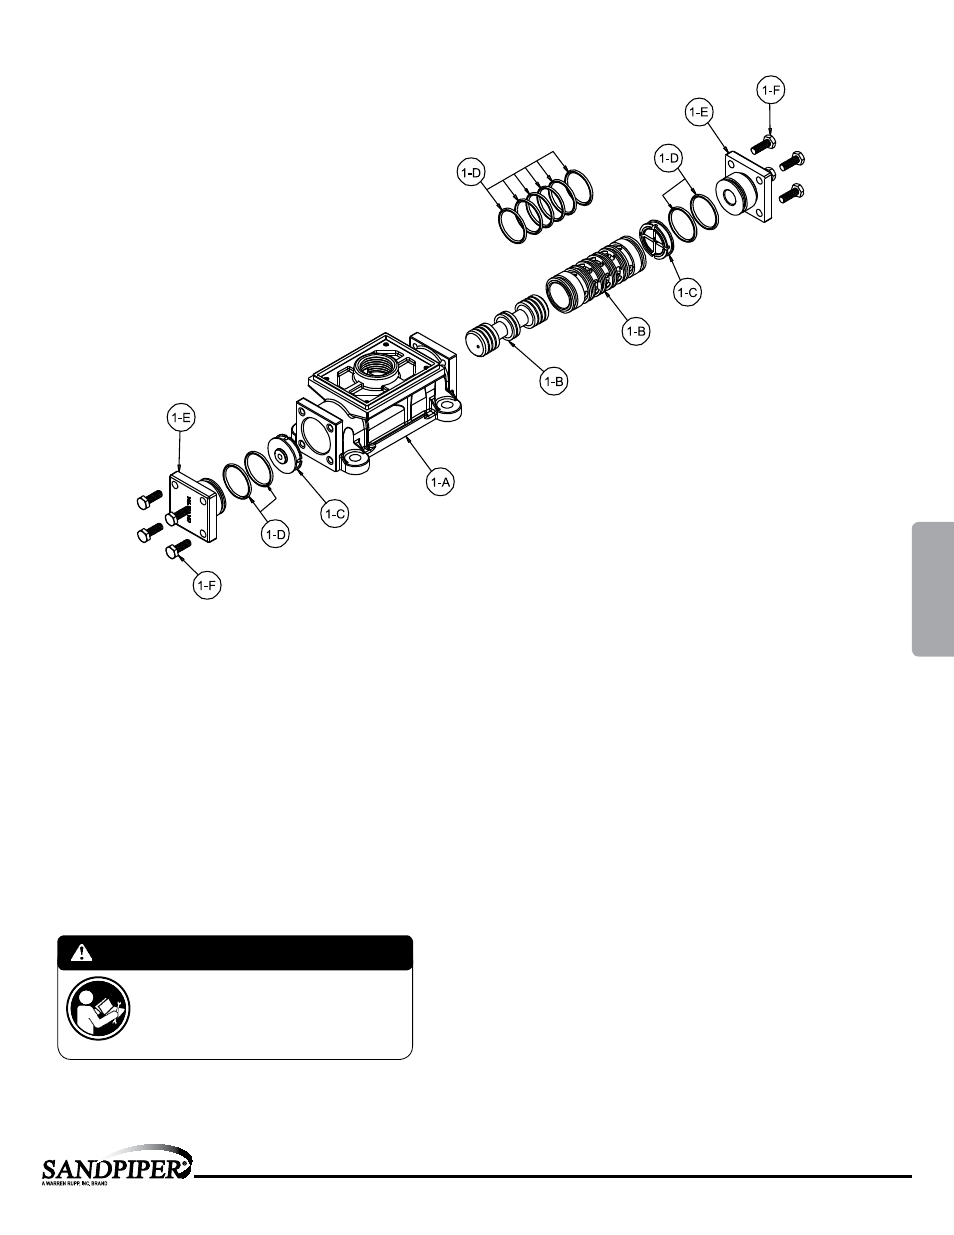
Air Distribution Valve Assembly
Air Distribution Valve Servicing
See repair parts drawing, remove screws.
Step 1: Remove Hex Head Cap Screws (1-F).
Step 2: Remove end cap (1-E).
Step 3: Remove spool part of (1-B) (caution: do not scratch).
Step 4: Press sleeve (1-B) from body (1-A).
Step 5: Inspect O-Ring (1-D) and replace if necessary.
Step 6: Lightly lubricate O-Rings (1-D) on sleeve (1-B).
Step 7: Press sleeve (1-B) into body (1-A).
Step 8: Reassemble in reverse order, starting with step 3.
Note: Sleeve and spool (1-B) set is match ground to a specified clearance
sleeve and spools (1-B) cannot be interchanged.
IMPORTANT
Read these instructions completely, before installation
and start-up. It is the responsibility of the purchaser
to retain this manual for reference. Failure to comply
with the recommendations stated in this manual will
damage the pump, and void factory warranty.
Air Valve Assembly Parts List
(Use w/Aluminum centers only)
Item
Part Number
Description
Qty
1
031.183.313
Air Valve Assembly
1
1-A
095.109.313
Body, Air Valve
1
1-B
031.139.000
Sleeve and Spool Set
1
1-C
132.029.357
Bumper
2
1-D
560.020.360
O-Ring
10
1-E
165.127.313
Cap, End
2
1-F
170.032.115
Hex Head Capscrew 1/4-20 x .75
8
1-G
901.037.115
Flat Washer
8
Air Valve Assembly Parts List
(Use w/Stainless Steel centers only)
Item
Part Number
Description
Qty
1
031.179.000
Air Valve Assembly
1
1-A
095.109.110
Body, Air Valve
1
1-B
031.139.000
Sleeve and Spool Set
1
1-C
132.029.357
Bumper
2
1-D
560.020.360
O-Ring
10
1-E
165.127.110
Cap, End
2
1-F
170.032.115
Hex Head Capscrew 1/4-20 x .75
8
4: AIR
END