Assembly instructions, Shed house style 8 x 8 x 8 – Rhino Shelter SHED-8W X 8L X 8H User Manual
Page 6
Assembly Instructions
Shed House Style 8 x 8 x 8
V1.0
Do NOT Return Assembly To Dealer or Store. For All Questions or Shortages Please Call MDM Products Directly
Customer Service 800-447-7079 or 203-877-7070
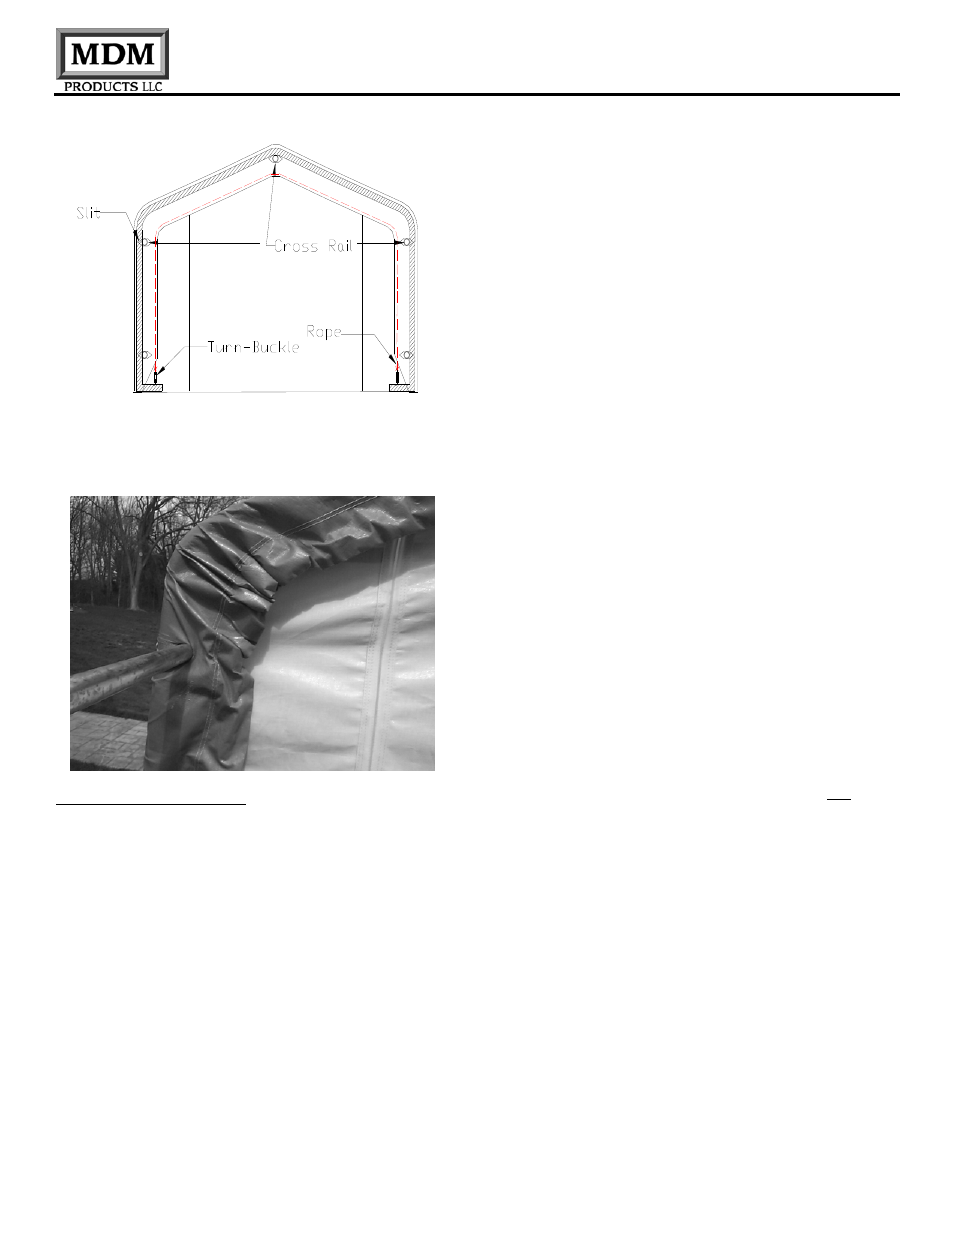
Note: Adjust/Snug the end panel by turning the
turnbuckles or repeating step 3 on a regular basis
Main Cover Installation
Step 1. To elongate the life of Main Cover, put a small
2” square of duct tape (field supplied) over each bolt
head on frame that comes in contact with cover. The
tape acts as a cushion to avoid rubbing damage to the
cover over years.
Unpack the Main Cover #21 from the protective plastic
packaging. The line of grommets on the inside (white) of
the cover on the tie down Flap run parallel to the sides of
the frame assembly for positioning. Once cover is
oriented properly to the Frame Assembly, pull Main
Cover over frame assembly from the side, being careful
not to snag the cover on any member, bolt, or other
obstruction. Center the Main Cover over the Frame
Assembly with the Main Cover colored side showing
from the outside of the unit.
Step 2. Loosen the 4 remaining turnbuckles #22
completely. Place the turnbuckles into outer hole in the
foot of each end arch. Tie off the rope coming out of the
Main Cover rope slot on either side to the turnbuckles.
After securing one end of the rope in the Main Cover,
gently pull the excess slack out of the rope and cover to
tighten. Hold the end of the unsecured rope and apply
pressure downward with a foot to remove excess.
Temporarily tie the end of the rope to the turnbuckle. Go
over the entire outer edge of the cover and adjust the
excess material around the end so it is not bunched up.
Spread excess material evenly along the outer edge.
Once cover is pulled tight and even, tie off the rope end
to the turnbuckle. All slack should be out of the rope at
this time. Repeat this step on both ends of the cover.
Tighten the turnbuckle to tighten the cover. This step
may need to be repeated to ensure a snug and centered
fit.
Step 3. When the cover is completely aligned secure
the cover to the bottom tie-down cross rail using the rope
provided. Start at one end and tie off the rope to the
cross rail. Lace the rope through the grommets in the
cover and back under the tie-down cross rail. Repeat
this on the opposite side
Pay close attention to how tight the cover is put onto the
frame. It should be tight enough so it does not flap
around in the wind, but not so tight that it tears the
material cover. The fabric backed PE fabric of MDM
Products units does not stretch. If you pull it so tight that
the fabric is stretched, a small amount of additional
stress from wind or contact can cause premature tears
and material failure. Only tighten cover enough to
remove valleys between arch assemblies. Do Not over
tighten.
Step 4. Retighten the turnbuckles on both the cover and
end panels. Retighten the rope holding the main cover
to the bottom cross rail. Both the cover and the end
panels should be checked and tightened on a
monthly basis.