Description of front panel, Setting parameters, List of parameters – Yokogawa JUXTA VJSS User Manual
Page 3: 1 front panel, 2 connector for communication
3
IM 77J01S11-01E 2nd Edition Mar, 02. 2012-00
4. DESCRIPTION OF FRONT PANEL
4.1 Front Panel
The communications connector in the front panel is used for
setting up parameters through a PC (VJ77 PC-based Parameters
Setting Tool) or the Handy Terminal.
Connector for
communication
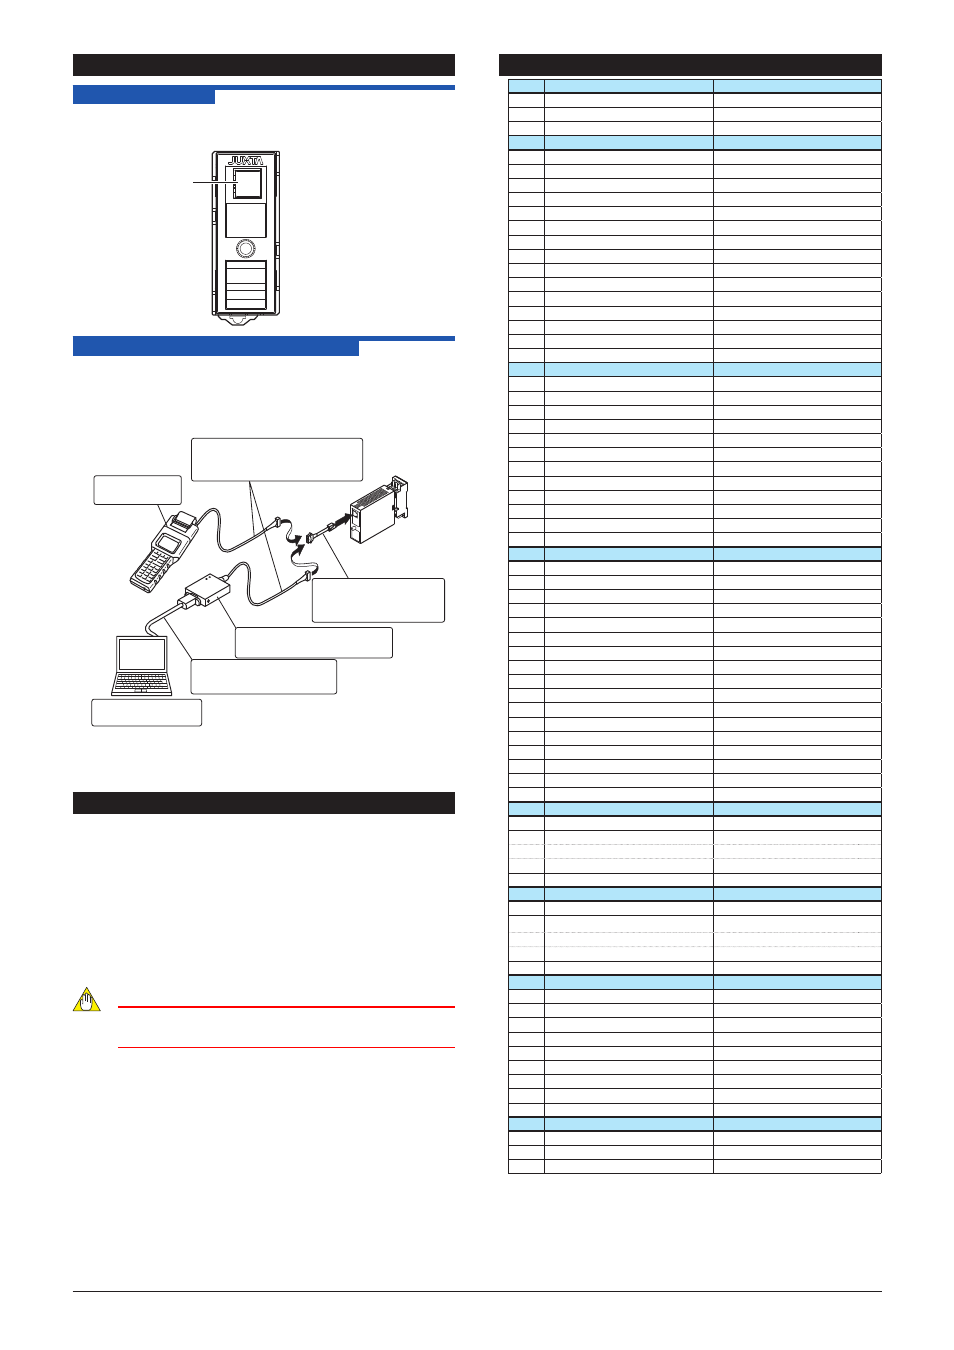
4.2 Connector for Communication
Use the connector for communication when setting the
parameters using a PC (VJ77 Parameters Setting Tool) or the
Handy Terminal
How to connect with the setting tool
Modular jack conversion
adapter (E9786WH)
[Provided with VJ77]
JHT200
Handy Terminal
JUXTA communication cable
with 5-pin connector (F9182EE)
[Provided with VJ77 and JHT200]
Dedicated adapter (E9789HA)
[Provided with VJ77]
PC which is installed
with the VJ77
Dedicated cable (E9786WK)
[Provided with VJ77]
• Use the VJ77 of version R1.04 or later.
• The modular jack conversion adapter does not come with the
JHT200 Handy Terminal. It is sold separately.
5. SETTING PARAMETERS
Set the parameters using a PC (VJ77 Parameter Setting Tool) or
the Handy Terminal. Refer to
“6. LIST OF PARAMETERS” in this
manual and the User’s Manual for VJ77 PC-based Parameters
Setting Tool (IM 77J01J77-01E) or the User’s Manual for JHT200
Handy Terminal (IM JF81-02E). Parameters are indicated inside
the
[ ].
Setting High Selector/Low Selector
•
Set the high selector or low selector in the fixed constant
[H01:CONST].
•
High selector: H01=100.0
•
Low selector: H01=0.000
Note
Do not change the parameter set value of the other
than above.
6. LIST OF PARAMETERS
Parameter Display
Item
MODEL
Model
TAG NO
Tag No.
SELF CHK
Self-check result
A
DISPLAY1
Display 1
*1
A01
INPUT1
Input value 1
A02
INPUT2
Input value 2
A05
OUTPUT1
Output value 1
A06
OUTPUT2
Output value 2
A11
T1
Temporary memory 1
A12
T2
Temporary memory 2
A13
T3
Temporary memory 3
A14
T4
Temporary memory 4
A15
DI
Digital input
A16
DO
Digital output
A17
LOAD
Load factor
A54
STATUS
Status
*2
A56
REV NO
REV No.
A58
MENU REV
MENU REV
A60
SELF CHK
Self-check result
B
DISPLAY2
Display2
*1
B01
INPUT1
Input value 1
B02
INPUT2
Input value 2
B05
OUTPUT1
Output value 1
B06
OUTPUT2
Output value 2
B11
T1
Temporary memory 1
B12
T2
Temporary memory 2
B13
T3
Temporary memory 3
B14
T4
Temporary memory 4
B15
DI
Digital input
B16
DO
Digital output
B17
LOAD
Load factor
B60
SELF CHK
Self-check result
D
SET (I/O)
Setting (I/O)
*1
D01
TAG NO.1
Tag No.-1
D02
TAG NO.2
Tag No.-2
D03
COMMENT1
Comment-1
D04
COMMENT2
Comment-2
D20
INP TYPE
Input type
*3
D22
IN RESIST
Input resistor
*3
D27
INPUT1 L_RNG
Input-1 low range
*3
D28
INPUT1 H_RNG
Input-1 high range
*3
D29
INPUT2 L_RNG
Input-2 low range
*3
D30
INPUT2 H_RNG
Input-2 high range
*3
D38
OUT1 L_RNG
Output-1 low range
*3
D39
OUT1 H_RNG
Output-1 high range
*3
D40
OUT2 L_RNG
Output-2 low range
*3
D41
OUT2 H_RNG
Output-2 high range
*3
D46
PRGM SELECT
Program selection
*3
D47
CYCLE TIME
Computation cycle
*3
D60
SELF CHK
Self-check result
G
PROGRAM
Program
G01
PROGRAM
Program
*3
G02
PROGRAM
Program
*3
↓
↓
↓
*3
G59
PROGRAM
Program
*3
G60
SELF CHK
Self-check result
H
CONST
Fixed constant
H01
CONST
Fixed constant
H02
CONST
Fixed constant
*3
↓
↓
↓
*3
H59
CONST
Fixed constant
*3
H60
SELF CHK
Self-check result
P
ADJUST
Adjustment
P08
IN1 ZERO ADJ
Input-1 zero adjustment
P09
IN1 SPAN ADJ
Input-1 span adjustment
P10
IN2 ZERO ADJ
Input-2 zero adjustment
P11
IN2 SPAN ADJ
Input-2 span adjustment
P26
OUT1ZERO ADJ
Output-1 zero adjustment
P27
OUT1SPAN ADJ
Output-1 span adjustment
P28
OUT2ZERO ADJ
Output-2 zero adjustment
P29
OUT2SPAN ADJ
Output-2 span adjustment
P60
SELF CHK
Self-check result
Q
TEST
Test
Q03
OUT1 TEST
Forced output-1
Q04
OUT2 TEST
Forced output-2
Q60
SELF CHK
Self-check result
*1 The displayed status is to let the service staff know the past
records of the product.
*2 There are items not displayed depending on what output-2 is
specified.
*3 The parameters are the items to be set at the factory.