Heating cable installation, Sr heating cable selection and design (continued), Figure 1: cable placement on pipe – King Electric SR self-reg, cut to length User Manual
Page 5
CALCULATE THE TOTAL HEATING CABLE LENGTH
Cable length = A+B+C+D+E+F
A Pipe length x number of cables
B 4 ft. x number of valves
C 2 ft. x number of flanges, supports, etc.
D 1
ft. for each power connection
E 2 ft. for each splice connection
F 3 ft. for each tee connection
= Total heating cable length (ft)
EXAMPLE
Pipe size: 2” metal pipe
Lowest air temp: -20°F
Insulation thickness: 1”
Cable selection: (1) 5w/ft. (From table 1, pg 3)
Pipe length: 80 ft.
Valves: 2
Pipe supports: 12
Power connections: 1
Splice connections: 1
HEATING CABLE REQUIRED
A Pipe length x number of cables
80 ft. x 1 = 80 ft.
B 4 ft. x number of valves
4 ft. x 2 = 8 ft.
C 2 ft. x number of flanges, supports, etc. 2 ft. x 12 = 24 ft.
D 1
ft. for each power connection
1 ft. x 1 = 1 ft.
E 2 ft. for each splice connection.
1 ft. x 1 = 1 ft.
F 3 ft. for each tee connection
3 ft. x 0 = 0 ft.
= Total heating cable length (ft)
114 ft.
MAXIMUM CIRCUIT LENGTH ALLOWED
Ensure that your circuits do not exceed the maximum
circuit length listed in Table 3, page 4. If necessary,
use additional shorter circuits.
GENERAL NOTES
1. Verify that the heating cable is the correct length, wattage
and voltage prior to installation.
2. All welding, hydrostatic testing, and painting of the pipe
should be completed before the heating cable installation.
3. The piping system must be inspected to ensure that it is
clean, dry and has no sharp or jagged edges that could
potentially damage the heating cable.
4. Do not install the heat tracing before completion of the entire
piping system.
5. The cables must be installed a minimum of 10 inches away
from wood or any other combustible materials.
6. The minimum cable bending radius is 1/2 inch.
STEP 1: PREPARE FOR INSTALLATION
1.
Store the heating cable in a clean, dry place.
2.
Perform a pressure test on the pipe prior to cable installation.
3. Remove any sharp surfaces on the pipe that could potentially
damage the outer jacket of the heating cable.
4. Walk the pipe system and plan the routing of the heating
cable on the pipe.
STEP2: CUT THE HEATING CABLE TO LENGTH
1.
Cut the heating cable to length required. This can be done
before or after the cable is attached to the pipe.
2. Leave a minimum of 1 foot extra heating cable for connection
to the supply power.
3. For splice and tee connections, leave a minimum of 1 foot for
each section of heating cable.
4. King SR heating cable can to length without affecting its heat
output per foot.
5. When splicing and terminating be sure to protect the cable
ends from moisture, contaminants and mechanical damage.
Heating Cable Installation
STEP 3: ATTACH THE CABLE TO THE PIPE
1
. Verify pipe to be traced is completely dry.
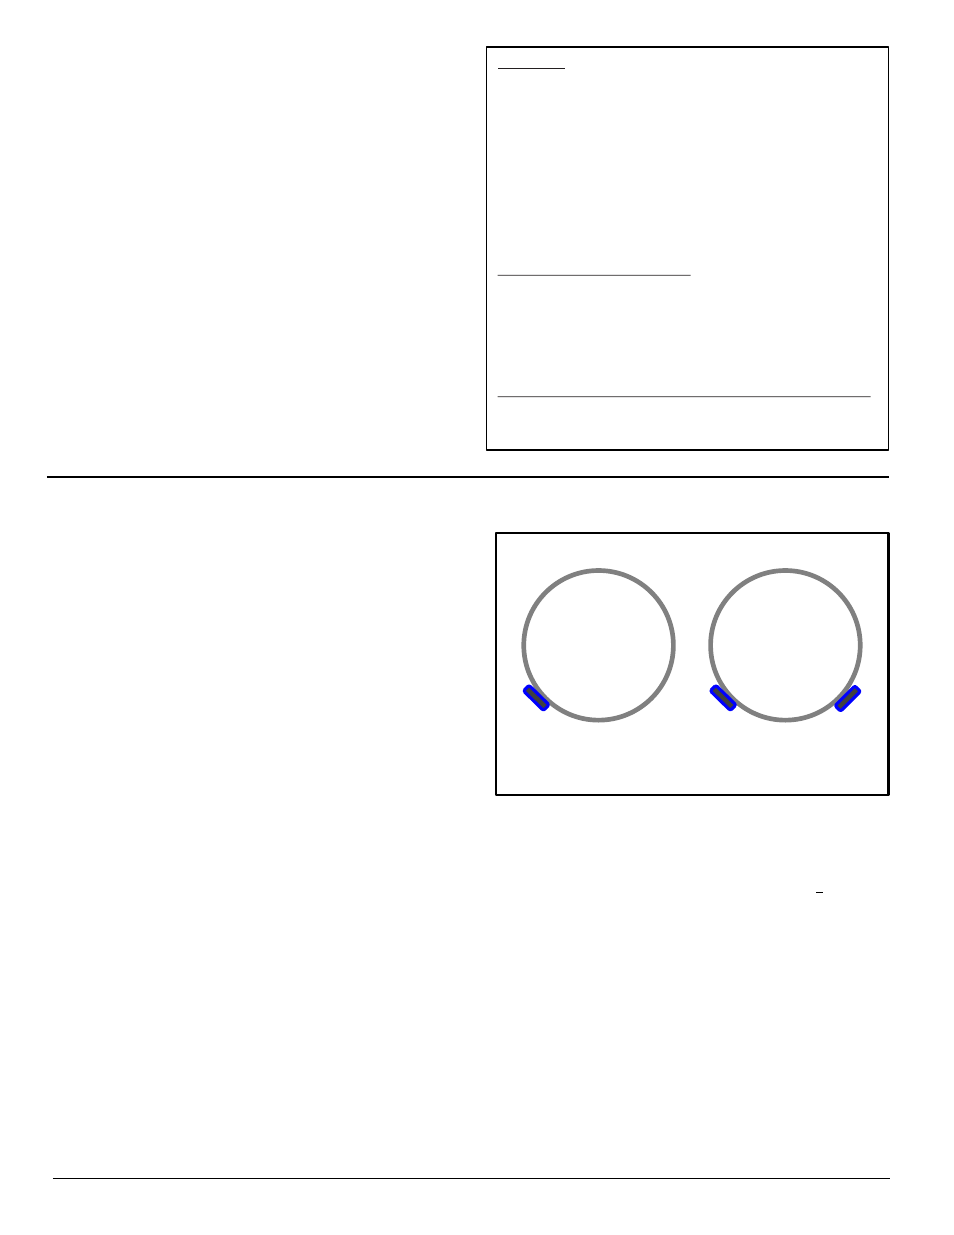
2. For straight tracing, install the heating cable on a the lower
half of the pipe; for example, in the 4 o’clock
or 8 o’clock
position as shown
in Figure
1.
3. Install the extra heating cable as required for valves,
flanges, etc.
4. Spiral tracing is not recommended as it is labor intensive
.
5. If applying spiral tracing, begin by suspending a loop
of cable every 10 feet as shown. To determine the loop
length, divide the length of pipe length and multiply by
10.
6. Fasten
the heating cable to the pipe at 2 foot intervals
using SRK03 fiberglass tape or nylon cable ties. Do not
use vinyl electrical tape, duct tape, metal bands or wire.
7. If there is excess cable at the end of the pipe, double
remaining cable back
along the pipe.
Single Cable
Double Cable
Figure 1: Cable Placement on Pipe
SR Heating Cable Selection and
Design (continued)
Rev 11.04.12
www.king-electric.com
5