Rea iii 100kv automatic applicator - maintenance, Troubleshooting guide (cont.) – Ransburg REA III Auto Applicator 70393 User Manual
Page 37
AA-82-01.3
3 4
3 4
3 4
3 4
3 4
REA III 100kV Automatic Applicator - Maintenance
TROUBLESHOOTING GUIDE (Cont.)
TROUBLESHOOTING GUIDE (Cont.)
TROUBLESHOOTING GUIDE (Cont.)
TROUBLESHOOTING GUIDE (Cont.)
TROUBLESHOOTING GUIDE (Cont.)
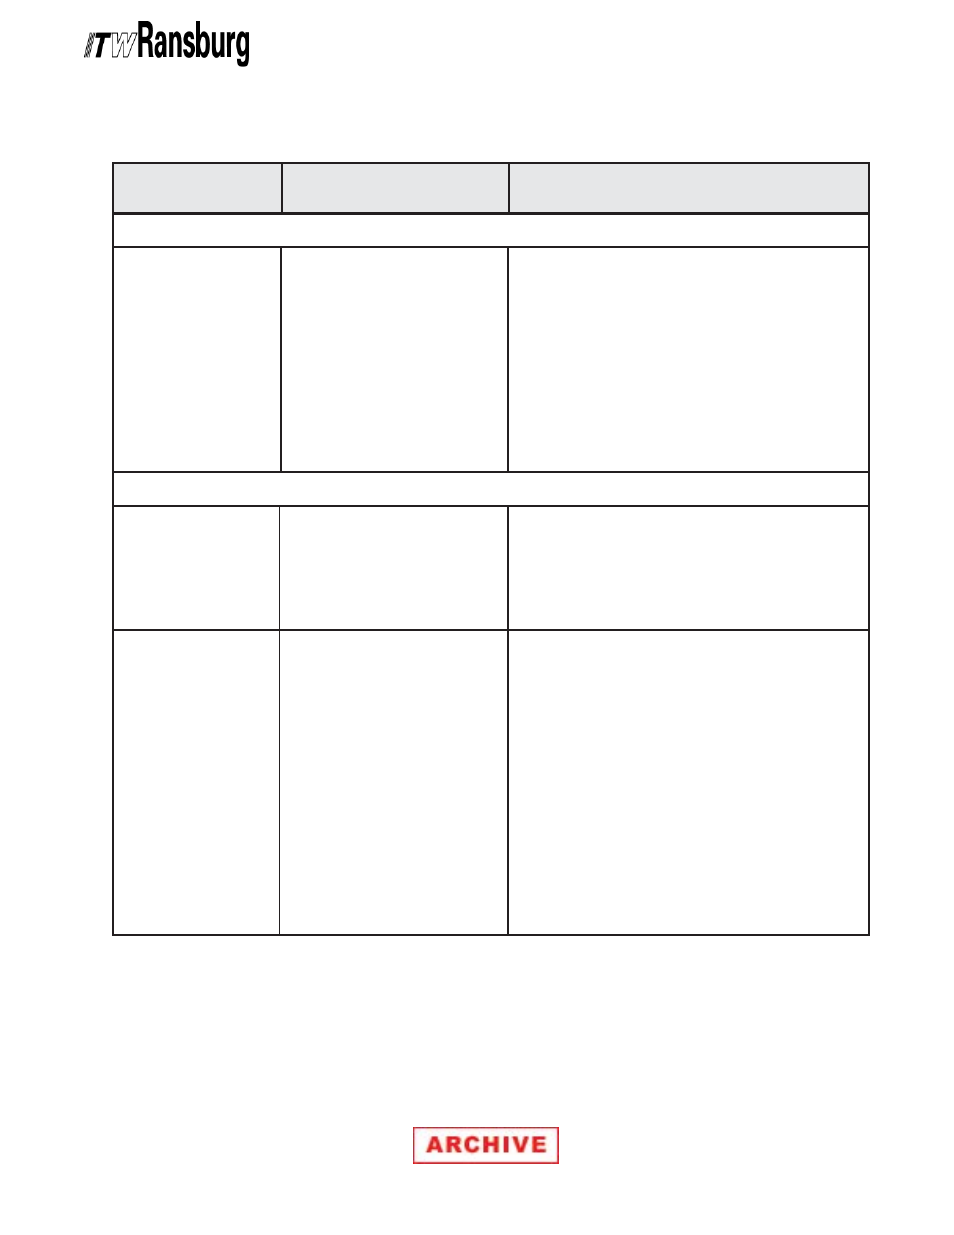
General Problem
General Problem
General Problem
General Problem
General Problem
Possible Causes
Possible Causes
Possible Causes
Possible Causes
Possible Causes
Corrective Action
Corrective Action
Corrective Action
Corrective Action
Corrective Action
Fluid: Constant
Fluid: Constant
Fluid: Constant
Fluid: Constant
Fluid: Constant
at Nozzle
at Nozzle
at Nozzle
at Nozzle
at Nozzle
Wrap-back
Wrap-back
Wrap-back
Wrap-back
Wrap-back
Improper or No
Improper or No
Improper or No
Improper or No
Improper or No
High Voltage Flow
High Voltage Flow
High Voltage Flow
High Voltage Flow
High Voltage Flow
1. Worn or damaged needle
valve seat
2. Worn or damaged needle
valve
3. Fluid nozzle not secure
4. Fluid valve needle does not
close when trigger is re-
leased
1. Improper grounding
2. Improper spray technique
3. Improper booth exhaust
1. Dirty of faulty connections
2. Missing or faulty conductive
plugs at either end of the
resistor housing
3. Improper or no ground
4. Faulty resistor
5. Faulty high voltage cable
6. Faulty power supply
7. Is the power turned ON?
1. Replace fluid nozzle.
2. Replace needle valve.
3. Tighten fluid nozzle.
4. Adjust fluid valve needle travel.
1. Trace and correct.
2. Trace and correct. *
3. Trace and correct.
1. Clean and check for proper contact at the con-
ductive plugs and power supply.
2. Replace plugs.
3. Trace and correct.
4. Replace resistor.
5. Replace high voltage cable.
6. See the Power Supply Service Manual.
7. Turn power ON.
ELECTRICAL:
ELECTRICAL:
ELECTRICAL:
ELECTRICAL:
ELECTRICAL:
LEAKAGE (C
LEAKAGE (C
LEAKAGE (C
LEAKAGE (C
LEAKAGE (Cont.)
ont.)
ont.)
ont.)
ont.):::::
* See REA Applicator Spray Techniques.