Farm Star HK-1132 User Manual
Page 8
7
4
T R A C T O R P R E PA R AT I O N
Be sure tires and rims are in good condition. Inflate tires
to the proper recommended air pressure.
Check the tractor’s hydraulic system. Refer to your
tractor operator’s manual or dealer for any adjustments
necessary to put the hydraulic system in good working
order. (I&T shop manuals will list most specifications and
adjustment instructions – available from most farm
equipment dealers.)
Check the shield over the PTO stub shaft. Make sure it
is in good condition and bolted securely to the tractor.
Purchase a new shield if old shield is damaged or
missing. (You may have to use a tractor salvage yard for
replacement parts on older tractors.)
It is recommended that a ROPS (Roll-Over Protection
Structure) be installed on all tractors. Contact your local
dealer for ROPS for your tractor.
Check the threaded holes that go into the rear tractor
housing and make sure the threads are in good condition
and that the holes are clean.
NOTE: The hole in the differential housing may have
painted cork plugs in them. It is necessary to remove the
cork and clean the holes.
A S S E M B LY
For instruction reference, the terms front or rear are
based on the operator facing forward on the tractor, thus
front is toward the front of the tractor and the rear is to
the rear of the tractor.
It is suggested that all the instructions be read before
beginning assembly.
Check the view of the toplink bracket for your tractor
model in this manual to see the relationship of the parts.
The prong assemblies slip into the prong sockets on
your tractor. If you have ordered a kit for a 32” drawbar
spacing (Category II), then there is a right-hand and a
left-hand prong assembly.
The 2-way ball sockets on the end of the prongs will
allow you to connect to either Category I or Category II
implements. If the drawbar or implement you mount has
Category I (
7
/
8
” dia.) pins, then make sure the balls are
turned so that the
7
/
8
” dia. holes are used.
IMPORTANT: If the larger 1
1
/
8
” dia. holes are used
with the smaller
7
/
8
” dia. pins, the ball holes will wear
rapidly in an uneven pattern and make the entire
ball socket eventually unusable.
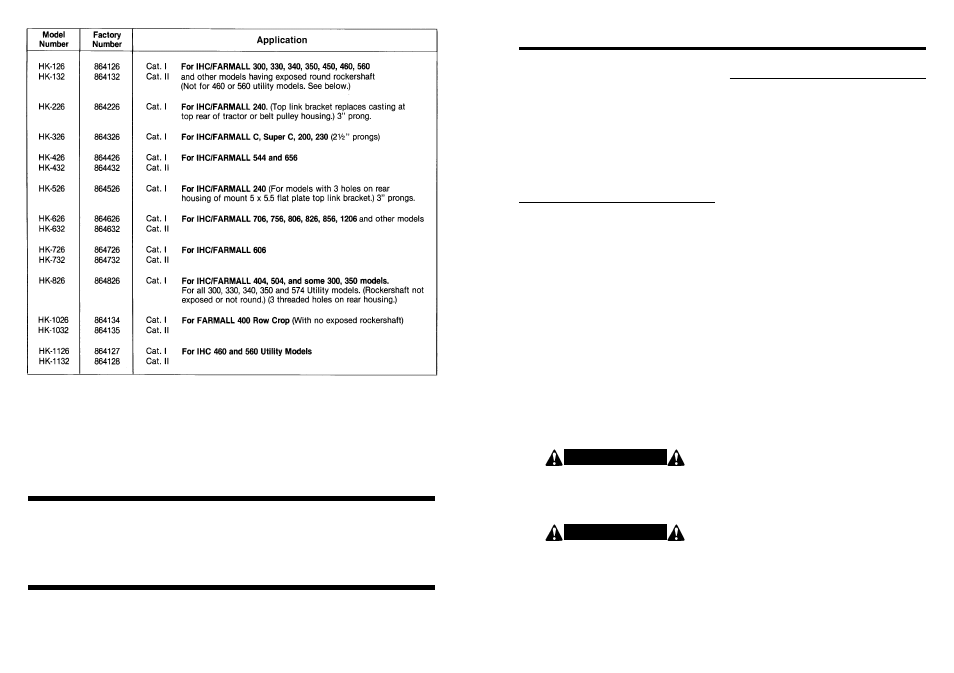
Fig. 2 for HK-126 & HK-132
Remove the top link clevises from the top link bracket.
Place the top link clevises over the tractor’s exposed
rocker arm shaft and pivot them until they are parallel
with the ground. Then slide the top link bracket assembly
between the clevises and bolt back together. Attach the
top link to the top link bracket.
NOTE: IHC/Farmall model 300 and 350 tractors were
made with at least three different hitch configurations.
Some have the exposed rockershaft, some have holes
drilled and threaded in the rear differential, and the 300
rowcrop models cannot be fitted with a toplink bracket.
Check your tractor for which adapter kit is required.
NOTE: A few IHC model 460 and 560 tractors with an
exposed rockershaft were made with a larger 2
1
/
8
”
diameter rockershaft (normal rockershaft diameter is 2.0
inches). If you have one of these tractors with the larger
2
1
/
8
” shaft, contact Worksaver, Inc. and ask for a pair of
860129 clevis brackets that will accommodate the larger
shaft diameter.
Fig. 3 for HK-226 & HK-326
Remove the belt pulley shaft cover, taking care not to
damage the gasket. If the gasket is damaged, make a
new one or use a good gasket sealing compound. Place
the top link bracket against the gasket and housing of the
tractor and secure it in place with the
7
/
16
” - 14 x 4
1
/
2
” bolts
and
7
/
16
” lockwashers provided. Attach the top link to the
top link bracket using the pin and linchpin provided.
The 2 pt. to 3 pt. adapter kits are designed for
International Harvester/Farmall tractors that are
equipped with the IHC “fast-hitch.”
These kits allow 3 pt. equipment to be used on tractors
that were for 2 pt. fast hitch equipment only.
NOTE: International Harvester Company (IHC) made
the “fast-hitch” for a wide variety of tractors and in a few
cases made variations on the hitch for the same model
tractors.
NOTE: Cat. I = 26” Spacing
Cat. II = 32” Spacing
I N S T R U C T I O N S
Be sure your tractor is in good condition and
properly equipped with counterweights. Read all the
safety precautions and make sure all tractor
operators are familiar with the safety rules of tractor
operation.
C A U T I O N !
If an air hose is used to blow any loose rust or dirt
from the holes, be sure safety glasses are used to
prevent particles from entering an eye.
C A U T I O N !
O B E Y A L L
S A F E T Y WA R N I N G S !