Pump maintenance – SPP Pumps Auto Prime Hydraulic Submersibles - S4VHL User Manual
Page 7
Operators Instructions for
HYDRAFLOW S4VHL Hydraulic Submersible Pump
Manual No/Rev
W79-003E / 4
Our policy is one of continuous improvement and we reserve the right to alter specifications at any time
Page 7 of
12
6. PUMP MAINTENANCE
6.1 Oil Specifications:
6.1.1 Hydraulic Oil:
Sterling Fluid Systems recommend the use
of
Bio-degradable
Hydraulic
46
Oil.
However, the pump will run satisfactorily on
good quality hydraulic oils of viscosity below
150SSU @ 38°C (100°F) or equivalent
specification.
Note: When using vegetable (Rape Seed) based
bio-degradable oil it is important to check
the condition of the oil frequently as it tends
to breakdown more quickly than the more
expensive
mineral
or
synthetic
bio-
degradable oils.
NOTE – DO NOT MIX OILS
Look especially for a darkening in colour as
an
indicator
of
reduced
lubrication
performance or contamination and arrange
to drain the system, clean the tank and
replace with new oil.
6.1.2 Lubricating Oil:
Use clean Bio-degradable Hydraulic 46 Oil
or 20W Hydraulic Oil or Mobil 10W30
Synthetic Oil.
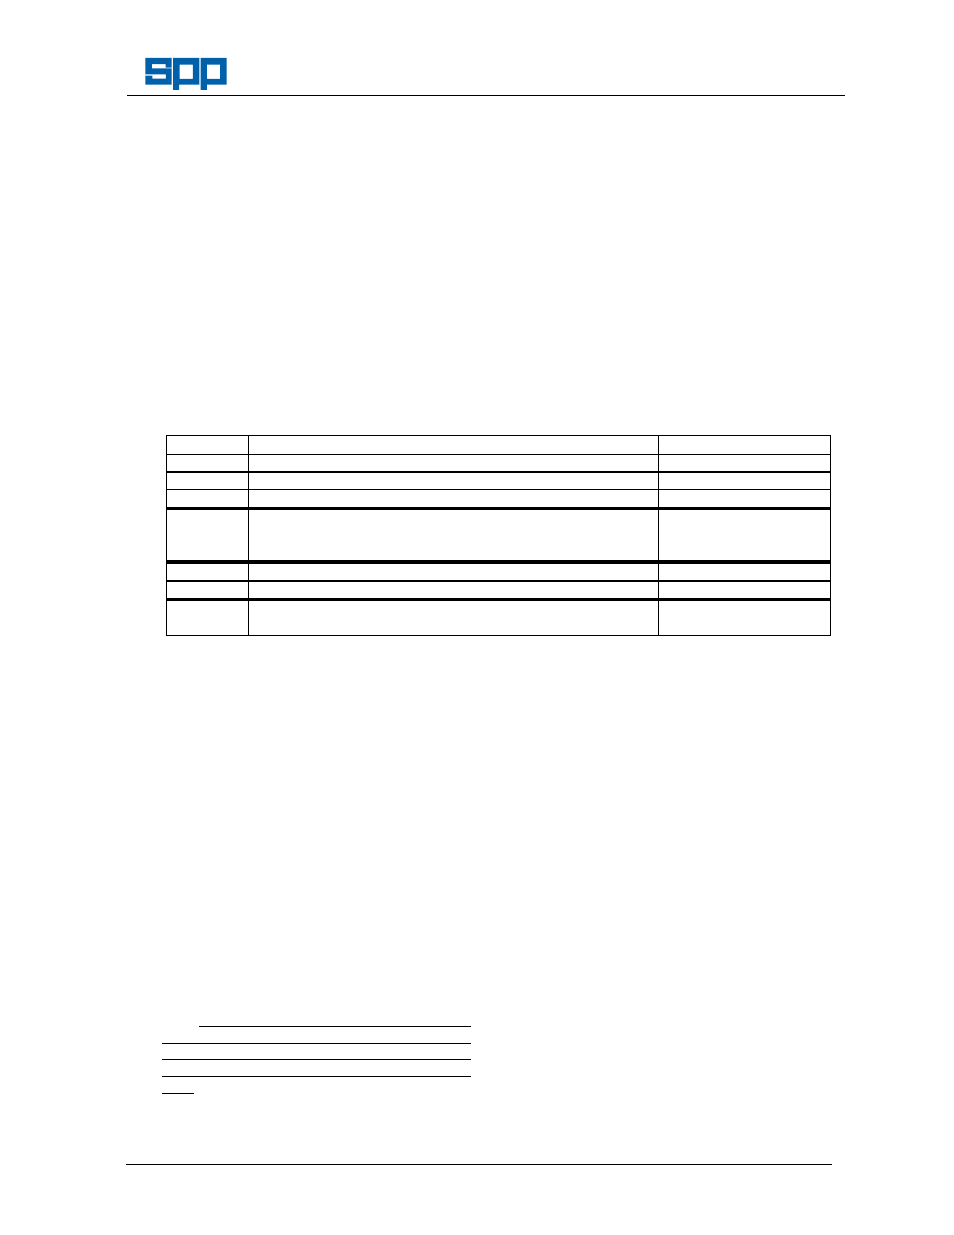
6.2 Maintenance Chart
Period
Maintenance
Items Required
Daily
Check hydraulic hoses for damage and replace as required.
Spare hydraulic hoses
Check Diesel fuel level, top-up as required.
Diesel Fuel
Check Hydraulic oil level, top-up as required.
Hydraulic Oil
250 hours Check the oil level in the pump bearing housing:
The level should be at the spill point of the fill plug (#18).
The pump holds about 1440ml do NOT overfill.
Lubricating Oil
500 hours Replace the oil in the pump bearing housing
Lubricating Oil (1440ml)
Replace hydraulic oil filter element. (10 micron filter)
Oil Filter Element.
1000 hours Drain hydraulic oil, clean the reservoir tank and replace with
new oil.
Hydraulic Oil (100 l)
Cleaning Solvent
6.3 Pump Disassembly:
6.4.1
Remove (6) bolts (#19) from lifting bracket (#3).
6.4.2
Remove the remaining (2) bolts holding the
bearing housing (#22) to the volute. Use
jacking bolts to separate if necessary. The
bolts holding the volute and bearing housing
together are the same thread as the jacking
bolts.
6.4.3
Check the volute wear ring (#27) for wear. If
worn excessively (deeply grooved), remove ring
by using a puller or by tapping ring upward from
inside the volute. Replace the ring if required.
6.4.4
Check condition of "O" rings (#24 and #28) and
replace if necessary.
6.4.5
Remove (4) bolts (#9) from hydraulic motor
(#5). Because of it's extremely long life, close
tolerances, high efficiency and the relatively low
cost of a new motor, it is more economical to
replace the hydraulic motor than to rebuild if
worn. Inspect "O" ring (#10).
6.4.6
Place a drain pan on flat surface and turn
bearing housing upside down to drain oil from
housing.
6.4.7
Secure the shaft from turning by locking
it with shaft retaining tool (part #
HT0609001) or suitable alternative tool.
6.4.8
Remove impeller locking screw (#30)
and retaining washer (#29) and unscrew
impeller (#26) counter-clockwise.
6.4.9
Inspect impeller for wear and inspect
wear plate (#23) for excessive wear.
Replace if severely worn.
6.4.10
Remove shaft seal cartridge (#25) and
inspect for wear. Seal should be replaced
whenever disassembling for repair.
6.4.11
Remove snap ring (#11) and remove
shaft (#13) and bearings (#12 and #14)
as in assembly. Applying heat evenly
over the bearing housing will facilitate
easy removal of shaft and bearing
assembly.
6.4.12
Visually inspect shaft, bearings and
inside of bearing housing. Replace if any
of these show signs of wear.
6.4.13
If bearing replacement is necessary, use
adequate bearing puller or press to