Assembly/installation, Montaje/instalación – Level Mount DMC85W User Manual
Page 8
8
8
www.levelmount.com
1-888-229-1459
EU: +0044 844 567 2657
UK: 0844 567 2657
©2011 Level Mount - Patents Pending
Step 5 – Attaching the Wall Plate to the Wall
Option A – If the Wall is Drywall
To attach the Wall Plate to drywall, locate two wooden studs using the Stud
Finder as shown in Figure 12. After you have determined the spot where you
believe the center of each stud to be (using the Stud Finder), hammer a small
nail into that spot far enough to confirm that you are hammering into solid wood
(and not something less dense, like particle board); remove the nail when done.
Line up the right top hole of the Wall Plate with the stud center marked on the
wall at the desired height. Then, use a pencil to mark the wall through the top
right hole in the Wall Plate over the center of the stud on the right side of the
Wall Plate as shown in Figure 13.
To attach the Wall Plate to the wall, drill a 3mm pilot hole where the top right
pencil mark was made. Using a Socket Wrench, drive 1 Hex Screw with Washer
(Bag 6) through the one of the top right slots in the Wall Plate and through the
drywall into the stud as shown in Figure 14.
Once the top right screw is secure, adjust the Wall Plate until it is level using the
Built-in Bubble Level/Spirit Level as shown in Figure 15. With a pencil, mark the
desired location for the 2 remaining holes in the center of the stud on the right
side of the Wall Plate. Repeat the procedure in the center of the stud on the
left side of the Wall Plate. Drill the 5 remaining holes with a 3mm drill bit where
marked.
Using a Socket Wrench, drive in the additional 5 Hex Screws and Washers
(Bag 6) to secure the Wall Plate to the wall as shown in Figure 16. Screw tightly
enough to produce a strong bond, but do not over-tighten or there may be
damage to the mount or screws.
Caution: Due to the weight of the TV it is essential to mount the Wall Plate to at
least 2 wooden studs and that all 6 screws be used when mounting the
Wall Plate to the wall.
Figure 12
Drywall with Exposed Studs
Stud Finder
Assembly/Installation
Figure 13
Drywall Stud
Figure 14
Drywall Stud
Figure 16
Socket
Wrench
Figure 15
Built-in
Built-in
Bubble Level/
Spirit Level
Spirit Level
Drywall Stud
Drywall
Wall Plate
Wall Plate
Wall Plate
Wall Plate
Socket
Wrench
Wall Plate
Wall Plate
Hex
Screws
Washer
a
sh
Hex
Screw
Washers
S
W
W
W
W
W
W
W
W
W
W
W
W
W
s
sh
h
er
Wall Plate
Wall Plate
Washers
Hex
Screws
Hex
Screws
ud
et
29
29
www.levelmount.com
1-888-229-1459
EU: +0044 844 567 2657
UK: 0844 567 2657
©2011 Level Mount - Patents Pending
Nota: La instalación de la Placa de Soporte se requieren
dos personas.
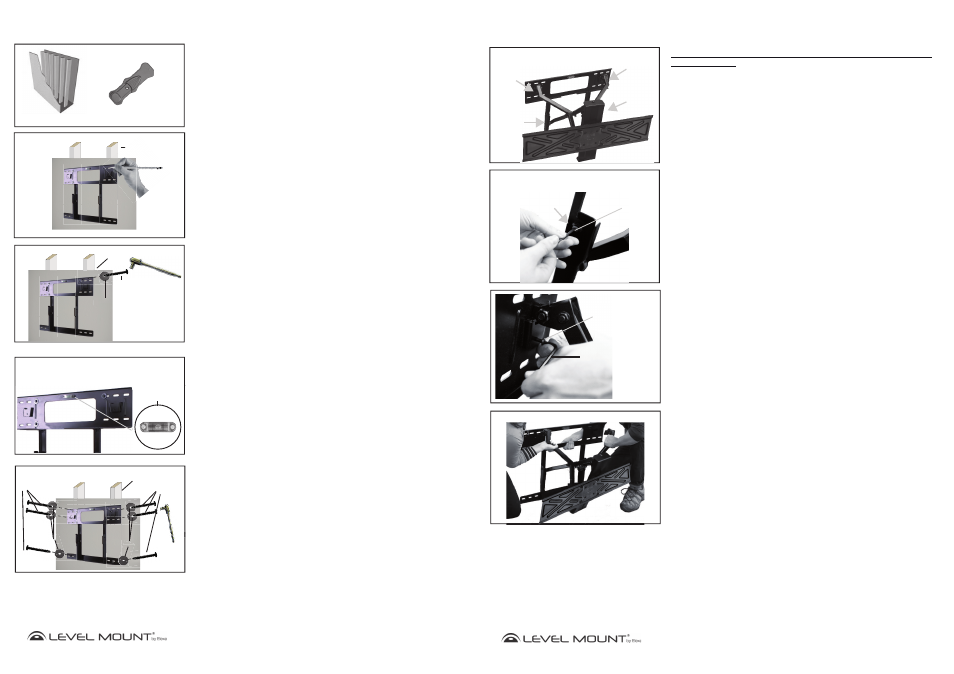
Paso 4 - La separación de la Placa de Soporte
Para hacer el Placa de Soporte más fácil de instalar, puede separar en dos
partes.
Comienza por eliminar el soporte de la caja y de pie para arriba en el piso para
que los tornillos a los lados y la parte superior se puede acceder (Figura 8)
Imagen 8
los tornillos
de los canales
laterales
Imagen 9
Quite los tornillos de los canales laterales del soporte de pared utilizando la llave
Allen (Bag.6) como se muestra en la Figura 9.
Llave Allen
Imagen 10
Imag
A continuación, retire los tornillos de los bolsillos laterales superiores de la placa
de pared con la llave Allen como se muestra en la Figura 10.
Imagen 11
g
Con una persona que tenga la placa de pared, levantar el conjunto de la placa de
montaje y desprenderse del soporte de pared como se muestra en la Figura 11.
La placa de pared puede ahora ser unido a la pared.
los tornillos de los
bolsillos laterales
superiores
Montaje/Instalación
los tornillos
de los canales
laterales
los tornillos
de los canales
laterales
los tornillos de los
bolsillos laterales
superiores
los tornillos de los
bolsillos laterales
superiores
Llave Allen
Placa de soporte
Placa de soporte
Placa de pared
Placa de pared