Montaje/instalación, Assembly/installation – Level Mount LM30LP User Manual
Page 7
22
www.levelmount.com
1-888-229-1459
EU: +0044 844 567 2657
UK: 0844 567 2657
©2012 Level Mount - Patents Pending
Montaje/Instalación
Paso 2 – Instalación del Brazo de Extensión (en caso
necesario)
Si los agujeros en el soporte de TV no se alinean con los agujeros en la
parte posterior de la TV, no perforar. En su lugar, siga estas instrucciones
para la instalación del brazo de extensión. De lo contrario, vaya al Paso
3.
Nota: Los brazos de extensión se puede utilizar para televisores
con VESA 400mm x 400mm x 400mm x 200mm, 200mm x 200mm o
distancia de 200 mm agujero de 100 mm.
El televisor manual / producto etiquetas deben especificar el espacio
entre los orificios VESA.
Televisión Soporte
M5 Tornillo
Brazos de extensión
Arandela
16mm x 5.3mm x
1.2mm
Tornillo Phillips M5
Paso 2a – Fijar el Brazo de Extensión a los Brazos Fijos
o Giratorios
Fije el Brazo de Extensión a los Brazos Fijos o Giratorios utilizándolas
siguientes herramientas, tal y como muestra la Imagen 2:
• Tornillos M5 (Bolsa 7)
• Arandelas 16 mm x 5.3 mm x 1.2 mm (Bolsa 7)
• Televisión
Soporte
• Brazo de extensión
• Tuerca antirrobo M5 (Bolsa 7)
Ajuste el tornillo de la Imagen 2 para mover los brazos de extensión de
manera que queden alineados con los agujeros de la parte trasera de su
televisor de pantalla plana.
Si los orificios VESA son siempre más grande que el primer conjunto de
brazos de extensión, asegure el segundo juego de brazos de extensión
se extiende el brazo con el siguiente equipo como se muestra en la
Figura 3
• Tornillo M4 (Bolsa 7)
• Primero Brazos de Extensión
• Segundo Brazos de Extensión
• Arandelas de presión M4 (Bolsa 7)
• Tuercas M4 (Bolsa 7)
Ajuste el tornillo de la Imagen 2 para mover los brazos de extensión de
manera que queden alineados con los agujeros de la parte trasera de su
televisor de pantalla plana.
Imagen 4
Televisión
Soporte
Brazo de
extensión
Brazo de
extensión
Brazo de
extensión
M4 Tornillos
M4 Tuercas
Primero Brazos
de Extensión
Segundo Brazos de
Extensión
M4 Arandelas
de presión
(LM42DJ Muestran)
Paso 1 – Escoja el soporte correcto en función de la
parte trasera de su televisor
Antes de empezar la instalación, compruebe si la parte trasera de su tele-
visor es plana o hueca, tal y como muestra la Imagen 1. Si la parte trasera
de su televisor es hueca, es posible que necesita utilizar los separadores
(Bolsa 4), tal y como muestran las Imágenes 4 y 6. Los separadores sirven
para rellenar el hueco que queda en la parte trasera de su televisor, de
manera que el soporte quede perfectamente fijado a la parte trasera de su
televisor.
Respaldo plano
Respaldo hueco
Imagen 1
Paso 2b – Fijación completa del Brazo de Extensión
Los 4 Brazos de Extensión deberían estar fijados de la misma forma. Una
vez terminado, sus brazos fijos o giratorios junto con los brazos de extensión
deberían tener el aspecto de las Imágenes 4.
Imagen 2
Imagen 3
(LM42DJ Muestran)
7
www.levelmount.com
1-888-229-1459
EU: +0044 844 567 2657
UK: 0844 567 2657
©2012 Level Mount - Patents Pending
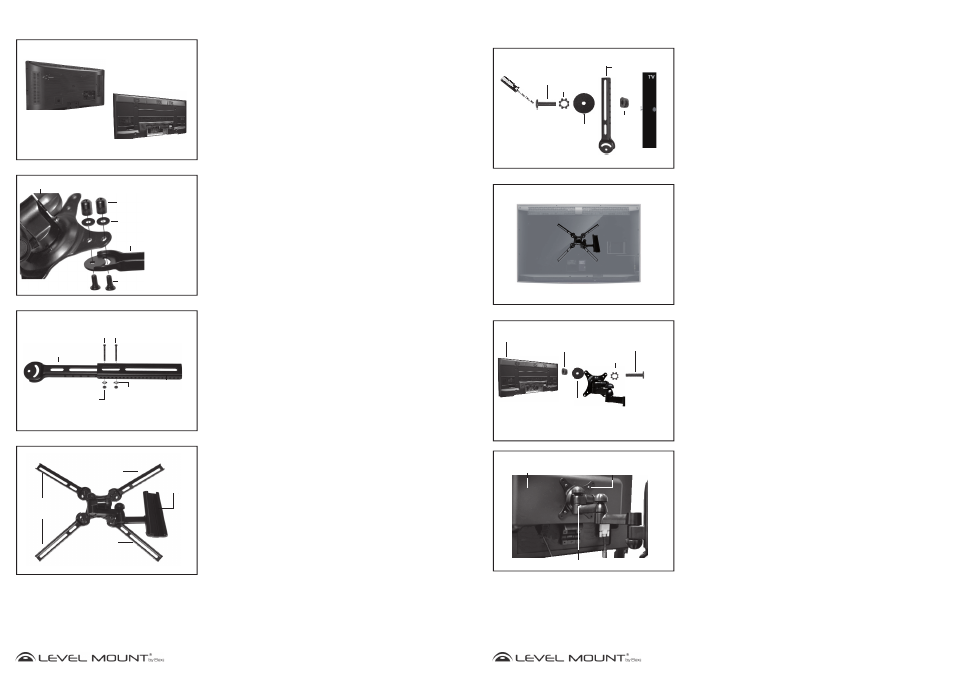
Figure 6
TV Bracket with attached Extension Arms attached
to the back of a Flat Back TV
Extension Arm Installation (if needed) Continued
Step 2c - Attaching Extension Arms to the back of
the TV
Small TVs need the following hardware: (For most TVs under 40’’ or
101cm)
• Bolt M4 (Bag 5) or Bolt M5 (Bag 4)
• Lock Washer M4 (Bag 6) or Lock Washer M5 (Bag 4)
• Washer 16mm x 5.3mm x 1.2mm (Bag 6)
• An additional Washer may be needed to prevent the bolt head from
recessing into the back of the TV
• Spacer (Bag 6) Only needed if the TV has a recessed back.
Large TVs need the following hardware: (For most TVs over 40’’ or 101cm)
• Bolt M6 (Bag 3) or Bolt M8 (Bag 2)
• Lock Washer M6 (Bag 3) or Lock Washer M8 (Bag 2)
• Washer 16mm x 6.3 x 1.2mm (Bag 6) This Washer is only needed for
use with Bolt M6 it is not needed for use with Bolt M8.
• Spacer (Bag 7) Only needed if the TV has a recessed back.
Caution: Carefully thread the bolt into the back of the TV. If there is any
resistance remove the bolt immediately and select the correctly
sized bolt that enables a secure and snug fi t.
Tighten the bolts snugly to the back of the TV as shown in Figure 6. Then
skip to Step 4.
Caution: Only tighten bolts until they are secure, do not over-tighten.
Assembly/Installation
Step 3 – Attaching TV Bracket to Back of TV
There are bolts of varying lengths included in this package, located in
(Bags 2 through 6). Please use the bolt with the appropriate length for
your TV.
Small TVs need the following hardware: (For most TVs under 40’’ or
101cm)
• Bolt M4 (Bag 5) or Bolt M5 (Bag 4)
• Lock Washer M4 (Bag 5) or Lock Washer M5 (Bag 4)
• Washer 16mm x 5.3mm x 1.2mm (Bag 6)
• An additional Washer may be needed to prevent the bolt head from
recessing into the back of the TV
• Spacer (Bag 6) The spacers are only needed if the TV has a recessed
back.
Large TVs need the following hardware: (For most TVs over 40’’ or 101cm)
• Bolt M6 (Bag 3) or Bolt M8 (Bag 2)
• Lock Washer M6 (Bag 3) or Lock Washer M8 (Bag 2)
• Washer 16mm x 6.3 x 1.2mm (Bag 6) This Washer is only needed for
use with Bolt M6 it is not needed for use with Bolt M8.
• Spacer (Bag 6) The spacers are only needed if the TV has a recessed
back.
To attach the TV Bracket to the back of the TV, place 4 Bolts through the
holes of the TV Bracket and carefully thread them into the holes in the
back of the TV as shown in Figure 7. If there is any resistance remove the
bolt immediately and select the correctly sized bolt that enables a secure
and snug fi t.
Tighten the bolts snugly to the back of the TV as shown in Figure 8.
Figure 8
Flat Back TV
TV Bracket
Bolt
Figure 5
Only use Spacer if TV has a recessed back
Extension Arm
Washer
16mm x 5.3mm x 1.2mm
or 16mm x 5.3mm x 1.2mm
M4/M5/M6
or M8 Bolt
Phillips
Screwdriver
Spacer
Washer
16mm x 5.3mm x 1.2mm
or 16mm x 5.3mm x 1.2mm
Only use Spacer if TV has a recessed back
TV Bracket
Figure 7
Spacer
M4/M5/M6 or
M8 Bolt
Recessed Back TV
M4/M5/M6 or
M8 Lock Washer
M4/M5/M6
or M8 Lock
Washer