Montaje/instalación, Warnings, Caution – Level Mount LM30LP User Manual
Page 5
24
www.levelmount.com
1-888-229-1459
EU: +0044 844 567 2657
UK: 0844 567 2657
©2012 Level Mount - Patents Pending
Montaje/Instalación
Étape 4 - Percer des trous dans le mur pour la
plaque murale
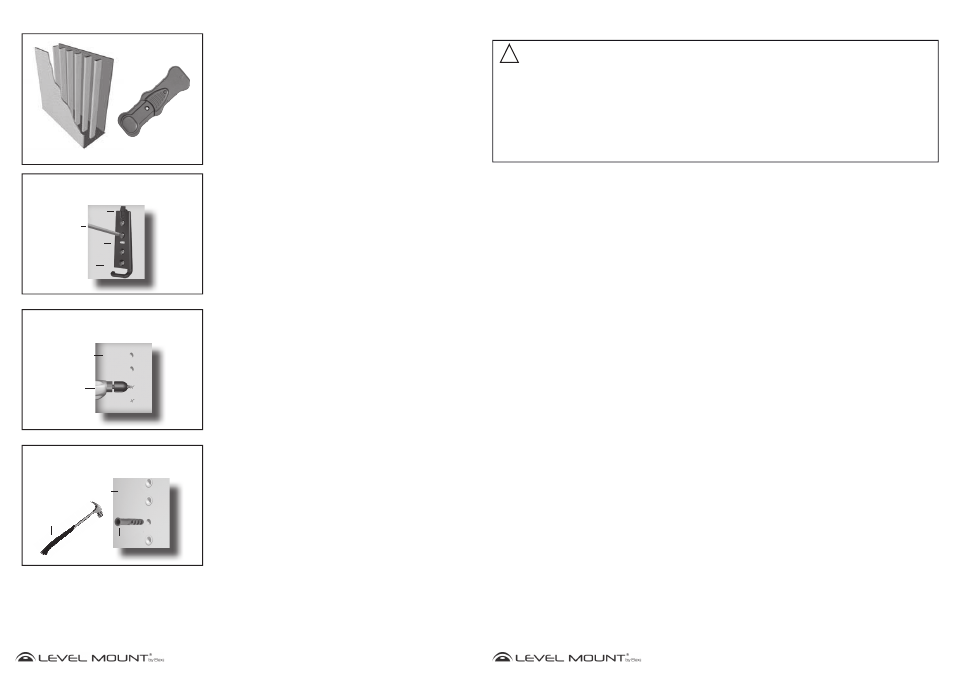
Opción A – Si las paredes son de pladur
Para fijar la placa de soporte a una pared de pladur, localice las
estructuras de madera con un detector de madera. Cuando haya
encontrado el lugar donde crea que está el centro de la estructura de
madera (utilizando el Detector de Madera), clave un clavito en el hueco
lo suficiente para confirmar que está clavando sobre madera sólida
(y no en algo menos denso, como una tabla de aglomerado); una vez
realizado, vuelva a quitar el clavito.
Alinee el agujero superior de la Placa de soporte con el centro de
la estructura de madera que haya marcado en la pared, a la altura
deseada. Utilice un lápiz para marcar la pared a través del agujero
superior izquierdo de la Placa de soporte sobre el centro de la
estructura, tal y como muestra la Imagen 10.
Imagen 11
Muro de hormigón
Imagen 12
Tacos para hormigón
T
Muro de hormigón
Martillo
Imagen 10
Placa de Soporte
Muro de hormigón
Lápiz
Nivel de burbuja incor-
porado/Nivel
Broca para
Broca para
madera 12 mm
madera 12 mm
Imagen 9
Pladur con estructuras visibles
Detector
de Madera
Opción B – Si las paredes son de hormigón
Para fijar la Placa de soporte al hormigón, colóquela a la altura deseada.
Marque los agujeros con un lápiz cuando haya nivelado la Placa de
Soporte usando el Nivel de burbuja que viene incorporado o el nivel, tal y
como muestra la Imagen 10.
Deje la Placa de soporte a un lado. Taladre agujeros en el hormigón, en
el lugar marcado, tal y como muestran las Imágenes 11. Para taladrar los
agujeros de los tacos para hormigón en el hormigón, utilice un taladro
eléctrico con una broca de 12 mm para madera.
Cuidado:
No utilice un martillo neumático, pues rompería y debilitaría el
hormigón.
Inserte los tacos para hormigón en los agujeros, tal y como muestra la
Imagen 12, e introdúzcalos con un martillo hasta que queden a ras de la
pared de hormigón, como muestra la Imagen 12.
5
www.levelmount.com
1-888-229-1459
EU: +0044 844 567 2657
UK: 0844 567 2657
©2012 Level Mount - Patents Pending
Warnings
The Small TV Wall Mounts were designed specifically to hold: 10”-32” (254 mm-812,8 mm) Flat
Panel Displays - up to 45 lbs (21kg) (AISTA, BSFMD, DC30DJ & LM30DJ) or 50 lbs (22,68kg)
(AISOA, DC30LP, LM30LP, LM30LPW, DC30T, LM30T, DC30SJ, LM30SJ, LM30SJW, RSMSL
& RSMSS), The Medium TV Wall Mounts were designed specifically to hold: 10”-47” (254
mm - 1194,8 mm) Flat Panel Displays up to 70 lb (31,75kg) (AIMOA, AIMTA, BLSFD, DC37DJ,
LM37DJ, LM37DJW, DC37LP, LM37LP, DC37SJ, LM37SJ, RSMML & RSMMS) or up to 80 lb
(37kg) (DC42DJ & LM42DJ). Using this product with a TV heavier than the maximum weight, or
that exceeds these dimensions, may result in serious personal injury and damage to equipment
and property.
!
CAUTION!
1. Do not begin the installation of the TV Wall Mount until you have read and understood the instructions and
warnings contained in these Installation Instructions. Failure to read, thoroughly understand and follow the
instructions can result in serious personal injury and damage to equipment and property. It is the installer’s
responsibility to make sure all components are properly assembled and installed using the instructions
provided.
2. If you have questions that do not appear to be covered in these Installation Instructions, please refer to the
“Helpful Hints” section of the detail page for the TV Wall Mount or contact us as described under the “Need
Help” section. If you are at all unsure about any step in these instructions or your ability to install the TV Wall
Mount safely and securely, you should seek professional help from a qualified contractor.
3. This TV Wall Mount contains small items that could be a hazard if swallowed. Keep these items away from
children.
4. The TV Wall Mount must be attached to wood studs or to properly installed anchors in concrete. Do
not install the TV Wall Mount only to drywall or plasterboard. If mounting to wood studs, make sure that
mounting screws are anchored into the center of the studs. See Stud Finder Instructions, included below.
Do not use the TV Wall Mount for devices other than as specified in these instructions.
5. Make sure all screws and bolts are tightened before allowing the TV Wall Mount to bear the full weight of
the TV. Tighten screws and bolts firmly but do not over-tighten them. Once the screw is flush against the TV
and the screwdriver is more difficult to turn and will not turn further, stop; otherwise there is a risk of over-
tightening the bolt. Over-tightening the screws or bolts could damage the TV Wall Mount, greatly reducing
its holding power. Periodic tightening may be required.
6. Screws should easily and completely thread into the TV mounting holes. If any of the screws provided are
not suitable for the TV Wall Mount system, the installer must not under any circumstances drill holes into the
TV or into the TV Wall Mount components. Using screws of improper size can damage the TV.
7. Do not lift more weight than you can handle. Use at least two people when lifting and positioning the TV on
the TV Wall Mount.
8. Before installing, check to make sure all parts of the TV Wall Mount indicated in these Installation Instructions
are included and undamaged. Never use damaged parts or try to install the TV Wall Mount if you do not have
all needed parts.
9. It is the installer’s responsibility to select the appropriate installation location and the supporting surface on
which to mount this TV Wall Mount and to ensure that the TV Wall Mount is anchored properly to the wall.
It is also the installer’s responsibility to ensure that the TV is properly and securely attached to the TV Wall
Mount using only the enclosed fasteners and components and to verify that the screws and power cords do
not touch wires, pipes, or metal parts within the wall (since this could cause damage to these items or cause
electrical shock).
10. Level Mount has made every effort to make these Installation Instructions accurate and complete. However,
Level Mount makes no claim that the information contained herein covers all details, conditions or variations,
nor does it provide for every possible contingency in connection with the installation, assembly or use of
this product. Level Mount makes no representation or warranty, express or implied, regarding the accuracy,
completeness or sufficiency of the information contained in this document. Level Mount is not responsible
for any damage or injury caused by incorrect mounting, assembly, installation or use.