KT&C KPC-LD(V)i40 User Manual
Megapixel network camera, Install the hardware, Product description
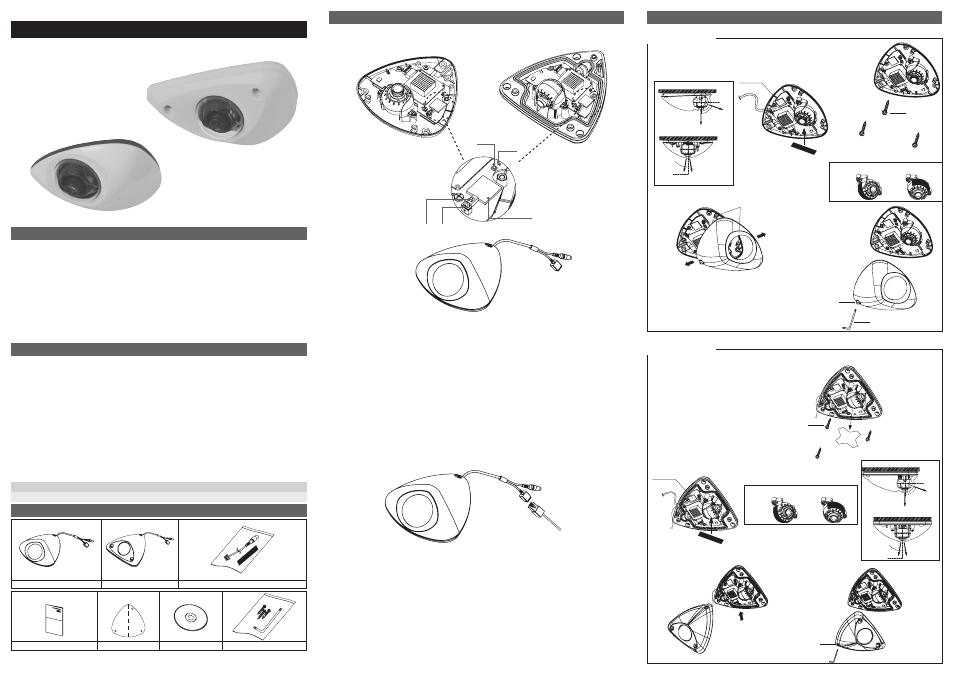
4. Install the hardware
IP camera are designed to be installed using a template as shown below.
Plastic Dome Type
1. Attach the FLAT DOME on the ceiling with using the screws provided, considering the camera
angle required for the surveillance function.
2. Adjust the LENS ANGLE to the desired location by hand.
3. Connect the VIDEO OUT CABLE and check the video image. Change the SETTINGS accordingly
using the OSD controller.
4. After the LENS SETTING is completed, install the TOP COVER.
Vandal Dome Type
1. Attach the FLAT DOME on the ceiling with using the screws provided, considering the camera
angle required for the surveillance function.
2. Adjust the LENS ANGLE to the desired ocation by hand.
3. Please remove the protective film when installing.
4. Connect the VIDEO OUT CABLE and check the video image.
Change the SETTINGS accordingly using the OSD controller.
5 . A f t e r t h e L E N S S E T T I N G i s c o m p l e t e d , i n s t a l l t h e T O P C O V E R .
3. Product Description
Description and function
Plastic Dome Type:
Vandal Dome Type:
1. Reset Button – Press the reset switch for more than 10 seconds,
the restore the camera to the function default settings.
2. Service Video Connector – Outputs video to the monitor.
3. Status LED
4. Micro SD Card Socket.
5. NTSC / PAL Toggle Switch.
6. Power Input(DC12V) – Connect DC 12V power.
7. Network Connector –
The Network Camera connects to the network via a standard network cable, and
automatically detects the speed of the local network segment
(10BaseT/100BaseTX Ethernet). PoE Supported
Connection
1. Connect the camera to the network using a UTP cable (CAT.5), Power can be supplied via
the network cable (PoE)
2. Connect DC 12V to the power terminal. This is not necessary if the Network Camera is
connected to PoE hub or midspan.
3. Check that the indicator LEDs indicates the correct conditions.
4. Connect the analog monitor to the service video connector for adjusting focus and press and quickly
release the reset switch for focus assistant mode.
Then you can select normal view or focus view mode using the reset switch.
Caution: When you use focus assistant mode, “Focus View” mode is recommended for more exact focus.
Caution: Focus assistant mode will be automatically exited after 3 minutes for normal operation.
M174-LD(V)i40-001
Megapixel Network Camera
Installation Guide
Table of Contents
1.INTRODUCTION
2.PACKAGE CONTENTS
3.PRODUCT DESCRIPTION
4.INSTALL THE HARDWARE
5.ASSIGN AN IP ADDRESS
6.PRODUCT SPECIFICATIONS
1. Introduction
IP Dome Camera Installation Guide
This installation guide provides instructions for installing the Network Camera on your
network. For all other aspects of using the product, please see the User’s Manual,
available on the CD included in this package.
Installation steps
1. Check the package contents against the list below.
2. Product description.
3. Install the hardware.
4. Set an IP address.
5. Set the admin and user ID and password, See User’s Manual.
I m p o r t a n t !
This product must be used in compliance with local laws and regulations.
2. Package Contents
Plastic Dome Type
Vandal Dome Type
Video Output Test Cable / Fixed Tape
Installation Guide
Template
Software CD
Screws / L-Wrench
➏
➐
TAPPING SCREW
(4 x 20L) - 3EA
Micro SD Slot
ASSEMBLY HOOK
(2 point)
M4 STAR SCREW
L-WRENCH(T-20)
TILT: +90°
TILT: 0°
TILT: +20°
PAN: ±10°
PAN: 0°
* FIXED TAPE: It attached when you install the
product in areas where vibration occurs.
FIXED TAPE attached examples.
TILT 45° when attaching
TILT 90° when attaching
TOP HOUSING
(Assembly direction)
TOP HOUSING
(Separation Direction)
*CASE RUBBER:
Before assembling the top housing,
Be sure the Rubber correctly positioned.
M4 STAR SCREW
L-WRENCH(T-20)
TILT: +90°
TILT: 0°
TILT: +20°
PAN: ±10°
PAN: 0°
* Protective film
TAPPING SCREW
(4 x 20L)-3EA
* FIXED TAPE: It attached when you install the
product in areas where vibration occurs.
FIXED TAPE attached examples.
TILT 45° when attaching
TILT 90° when attaching
* FIXED TAPE
Micro SD Slot
VANDAL DOME
PLASTIC DOME
➊
➌
➋
➍
➎