KT&C KPC-Xi210HD User Manual
Megapixel network camera, Knc-xi210hd
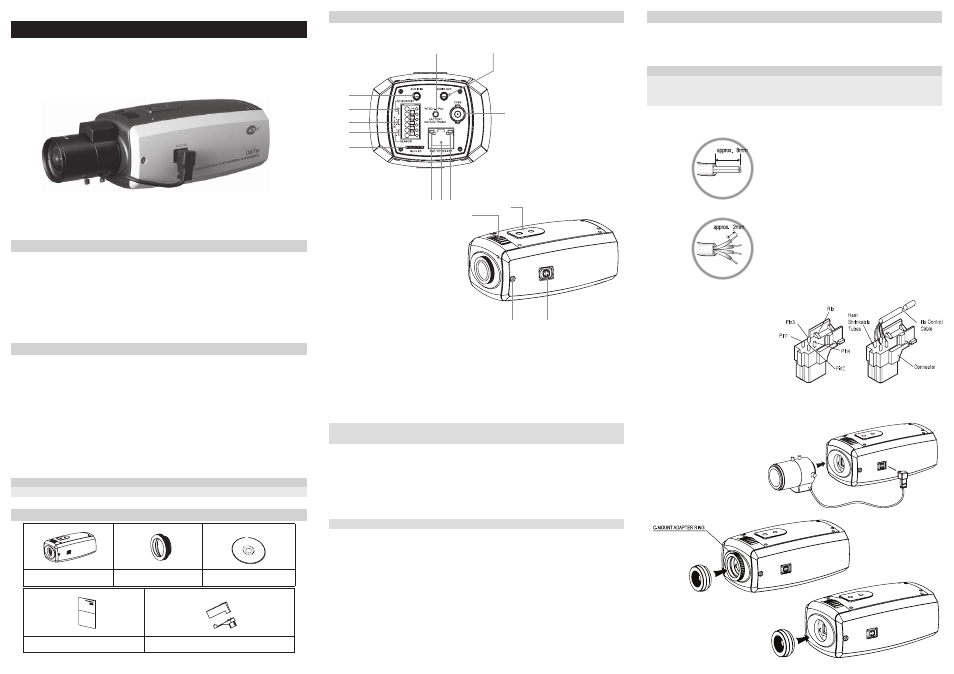
3. Product Description
Description and function
1. Micro SD/SDHC Memory Slot – Insert Micro SD o Micro SDHC memory card for recording videos
and saving images.
2. Line / MIC In – Connect 3.5mm jack from line level audio source or MIC.
3. Line Out – Connect 3.5mm jack from speaker.
4. Reset Switch/NTSC or PAL select – Push and hold the reset button for more than 10 second to
reset the Network Camera. Push this switch to use analog
video of NTSC or PAL format on installing.
5. Digital Input – Connect signal from external sensor.
CAUTION
: This feature will reset all settings to the original factory default settings.
CAUTION
: This button has two functions(factory default settings or selecting analog video).
6. Digital Output – Connect signal to external alarm. (Max. current - DC 12V, 40mA)
7. Network LED – Network LED indicates network connection status.
8. Network Connector – The Network Camera connects to the network via a standard network cable,
and automatically detects the speed of the local network segment (10BaseT/
100BaseTX Ethernet).PoE Supported.
9. Status LED – Status LED indicates the Network Camera operation status.
10. Power Input(DC12V/AC24V) – Connect DC 12V or AC 24V power.
11. Service Video Connector – For checking the view of the camera on a portable monitor when the
camera is being installed.
CAUTION
:
The analog video can be viewed only in 1280x1024 resolution.
12. Auto Iris Jack – Connect DC Iris cable.
13. Back Focus Adjustment Level – Use to adjust focus.
14. Focus Fixing Screw – Use to fi x back focus adjustment level.
15. Tripod Mounting Hole – Use to connect standing bracket.
4. Install the hardware
KNC-Xi210HD is designed to be installed using standing bracket on the wall or ceiling.
Lens connection
Lens are sold separately. Lenses such as an auto iris lens, CS-Mount and C-Mount lens can be used.
Note:
• It is recommended that megapixel lens are used to optimize performance.
• Please keep the lens clean.
• Any foreign objects and fi nger marks on the lens can cause inferior image quality in low light level
conditions
When using an auto iris lens
1. Please peel off about 8mm of the outer skin of the auto iris lens cable.
2. Please peel off about 2mm of the outer skin of the insulated conductor inside the lens cable.
3. Please remove the cover of the auto iris connection plug and solder
The lens cable to the connector pin in plug.
* PIN ASSIGNMENT OF THE LENS CONNECTOR
DC auto iris lens
Pin 1 : DAMP-(CTL-)
Pin 2 : DAMP+(CTL+)
Pin 3 : DRV+
Pin 4 : DRV-(GND)
4. Please replace the auto iris lens connection plug cover and take off the CIS protection cap and then
attach the auto iris to the camera by Screwing it in clockwise.
5. Please insert the connection plug that is connected to the auto iris lens Cable into the auto lens
connector, which is located on the side of the Camera.
M111-Xi210HD-001
MegaPixel Network Camera
KNC-Xi210HD
Installation Guide
Table of Contents
1.INTRODUCTION
2.PACKAGE CONTENTS
3.PRODUCT DESCRIPTION
4.INSTALL THE HARDWARE
5.ASSIGN AN IP ADDRESS
6.TERMINAL BLOCK CONNECTORS
1. Introduction
KNC-Xi210HD Installation Guide
This installation guide provides instructions for installing the Network Camera on
your network. For all other aspects of using the product, please see the User’s
Manual, available on the CD included in this package, or from http://www.ktnc.co.kr
Installation steps
1. Check the package contents against the list below.
2. Product description
3. Install the hardware
4. Set an IP address
5. Set the admin and user ID and password, See User’s Manual.
instructions in further usage.
Important!
This product must be used in compliance with local laws and regulations.
2. Package Contents
KNC-Xi210HD
C-Mount
Adaptor ring
Software CD
Installation Guide
Auto Iris Lens
Connection Plug
⑦ ⑧ ⑨
①
②
③
④
⑤
⑥
⑪
⑩
⑫
⑬
⑭
⑮
Installation of C-Mount Lens
Installation of CS-Mount Lens