Off-line installation - model 960, Off-line installation – model 960 – King Technology Perform-Max Feeders User Manual
Page 13
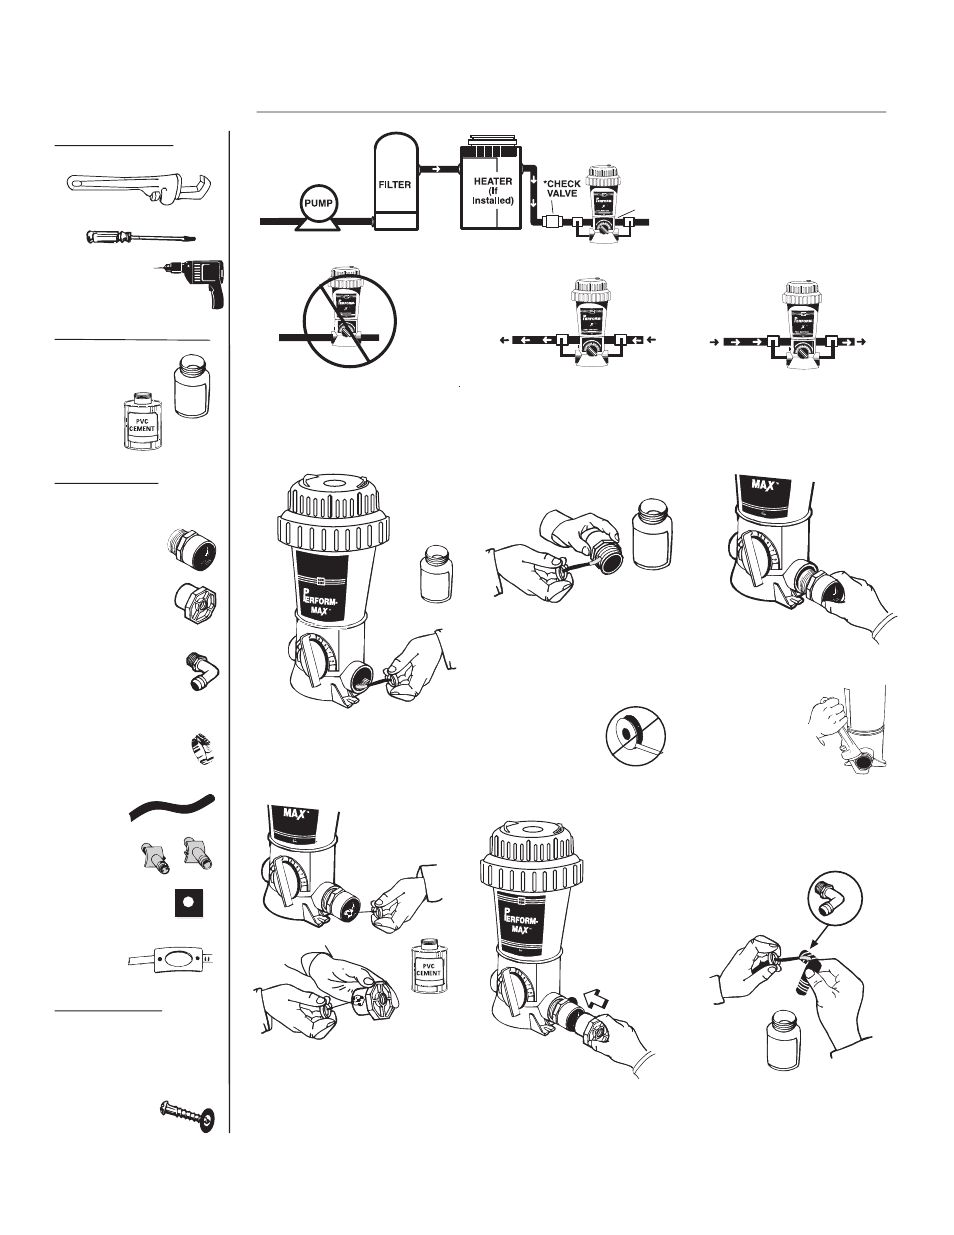
Off-line Installation – Model 960
PIPE
THREAD
SEALANT
PIPE
THREAD
SEALANT
PIPE
THREAD
SEALANT
PIPE
THREAD
SEALANT
POOL S
ANITIZER
POOL S
ANITIZER
1
3
4
5 6
7
9
BROMINE
P
O
O
L
S
2
TRICHLOR
MIN
MAX
8
L
A
R
G
E
R
S
P
A
S
S
M
A
L
L
E
R
PO
O
LS
L A
RG
ER
P
O
O
L
S
MA
OR
SCOOPS
2” - 36”
APART
13
POOL
SANITIZER
1
3
4
5 6
7
9
BROMINE
P
O
O
L
S
2
TRICHLOR
MIN
MAX
8
L
A
R
G
E
R
S
P
A
S
S
M
A
LL
E
R
P
OO
L S
LA
R
G
ER
P
O
O
L
S
MA
1
3
4
5 6
7
9
BROMINE
P
O
O
L
S
2
TRICHLOR
MIN
MAX
8
L
A
R
G
E
R
S
P
A
S
S
M
A
L
L
E
R
PO
O
LS
L
AR
GE
R
P
O
O
L
S
MA
Two
Scoops
RECOMMENDED
Corrosion Resistant
Check Valve
MATERIALS NEEDED
Pipe Thread
Sealant
PVC
Cement
POOL
SANITIZER
1
3
4
5 6
7
9
BROMINE
P
O
O
L
S
2
TRICHLOR
MIN
MAX
8
L
A
R
G
E
R
S
P
A
S
S
M
A
LL
E
R
P
OO
L S
LA
R
G
E
R
P
O
O
L
S
MA
Two
90 Degree Elbows
Two Male
Adapters
Two Reducer
Bushings
Four Hose Clamps
#10 x 1 1/4" Phillips Pan
Head Screws with Washers
OFF-LINE KIT
6' of Tubing
Two Scoop
Gaskets
Two Scoop
Clamps
Included with 960
Do NOT install an off-line Perform-
Max in-line as this Perform-Max
is different than an in-line unit.
When insufficient room for an in-
line application, install off-line in
straight pipe with scoops
between 2” - 36” apart. Install as
far from heater as possible.
1.
2.
3.
4.
5.
6.
Bi-flow valve design allows water flow in either direction.
TOOLS NEEDED
Pipe Wrench
Screwdriver
Battery
Operated Drill
with 5/8" or 19/32" Bit.
Following pipe thread sealant
directions, brush sealant onto
elbow threads.
Following pipe thread sealant
directions, brush sealant onto
Perform-Max threads in both ports.
Brush sealant on threads of both
male adapters.
DO NOT USE PIPE THREAD
TAPE as the threads on
these units are
not suitable for
this use and
leaking or bushing
failure could result.
Screw a male
adapter into each
port of Perform-Max and
hand tighten.
Finish tightening
by turning 1 to 2
revolutions
with a wrench.
DO NOT
OVERTIGHTEN.
Following PVC cement
directions, brush PVC cement
on reducer bushings and inside
of male adapters.
I
nsert reducer bushing into male
adapter on both sides. Hold in
place 5 to 10 seconds to bond.