Work sequence: sc controller – Hach-Lange LINK2SC User Manual
Page 46
English 46
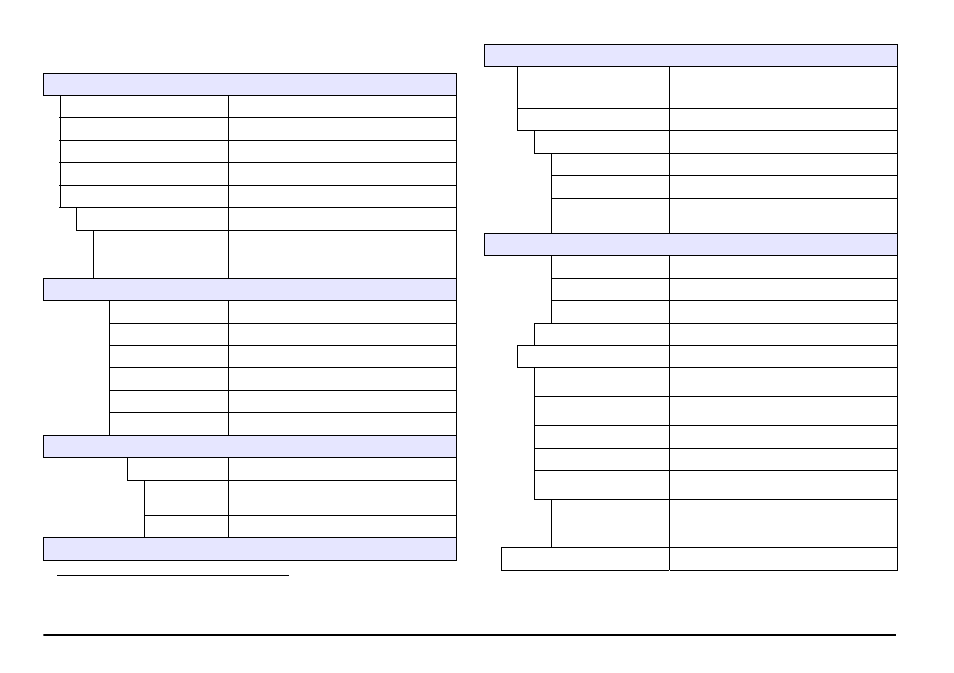
Work sequence: sc controller
1
MENU
SENSOR STATUS
Refer to sc controller user manual
SENSOR SETUP
Refer to sc controller user manual
SYSTEM SETUP
Refer to sc controller user manual
SERVICE
Refer to sc controller user manual
LINK2SC
Select to call up the LINK2SC menu
CREATE JOB
Create a new job
SENSOR NAME
(in this case:
ANISE SC)
Select the required probe
(e.g. AN-ISE SC)
Submenu: parameter selection
Parameter 1
Here: NH
4
-N + NO
3
-N
Parameter 2
Here: NH
4
Parameter 3
Here: NO
3
Parameter 4
Here: NH
4
-N + K
Parameter 5
Here: NO
3
-N + Cl
Parameter 6
Here: NH
4
-N+ K + NO
3
-N + Cl
Once the parameter is selected, a request for a sample is generated
LINK2SC
Job displayed in job status menu with:
SAMPLE
NUMBER
Sample number
JOB->LAB
Select and confirm
Confirmation is displayed once the job has been sent.
1. Menu structure based on sc1000 controller; the menu structure for the sc200
may differ slightly.
JOBS FROM CARD
Only active when processed jobs from the
laboratory are present on the SD memory
card
JOB LIST
Job list containing all jobs
JOB 1
Job with number and date
ANISE SC
Probe information
JOB INFORMATION
Job number
NEW
MEASUREMENT
Trigger new measurement for MATRIX2
correction
Submenu: parameter selection
JOB->LAB
Send job to laboratory
ACTIVATE JOB
Activate job entered via SD memory card
ERASE JOB
Delete the job from the list
JOB N
Job with number and date
CONFIGURE
LINK2SC configuration
TRANSMISSION
1
Transfer type selection: SD memory card or
network
IP ADDRESS
a
IP address or network name for the
instrument to which the job is to be sent
JOB ID MIN
Lower limit for job number range
JOB ID MAX
Upper limit for job number range
AUTO JOB
Select whether a job returned by the
photometer is activated automatically.
SENSOR NAME
(in this case:
AN-ISE)
If this is selected, the job is activated
automatically. Uncheck to deactivate.
PROGNOSYS
Refer to sc controller user manual
1 Only valid for sc1000 controllers
MENU