Installation, Storage tank preparation, Figure 7 – Hydrotech PURA QCRO Series Quick Change Reverse Osmosis Drinking Water System User Manual
Page 13
11
3/8” White Tubing
Storage tank Preparation
Note: Changing the air pressure will
alter the amount of water
stored in the tank. Increasing
the pressure will decrease
capacity while decreasing
pressure will increase
capacity.
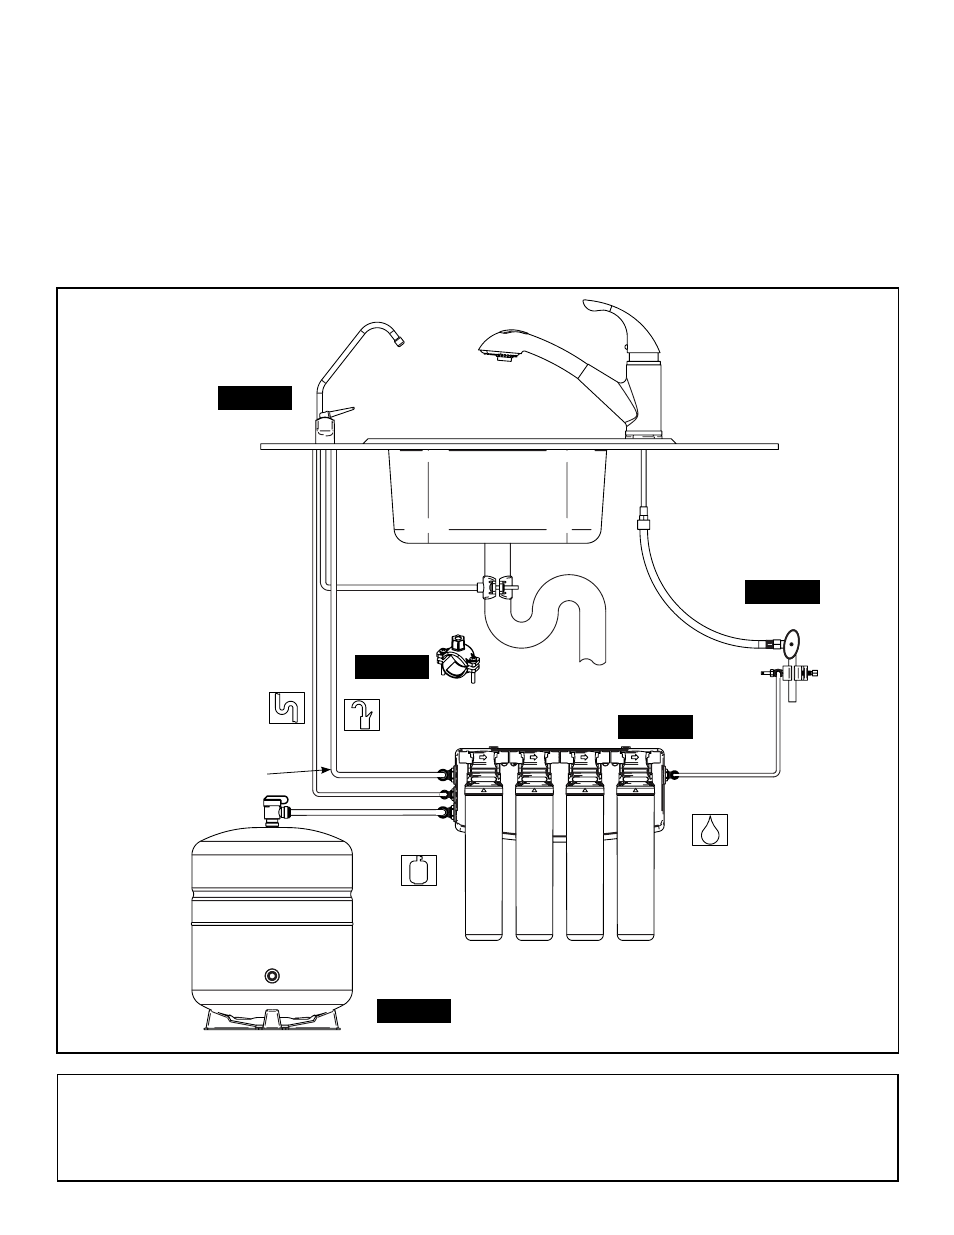
Figure 7
The exact placement of the components will vary by installation. Although shown beneath a sink, it may be installed
in a basement, crawl space, or in an adjacent cabinet. Regardless of where the system is installed, the flow sequence
described by (figure 7) must be observed.
The PURA drinking water system is designed to be mounted near a sink for easy access to cold water and drain lines.
Lengths of 1/4-inch and 3/8-inch OD plastic tubing will be required to make this installation.
Evaluate the installation site to determine the easiest path for the plumbing to follow. Take care to make the installation as
neat as possible.
Note: Install the 3/8” red drain line from the air gap faucet to the drain adapter so that it runs downward with
no loops or low spots. Otherwise the unit will overflow at the air gap siphon break built into the faucet, or make
irritating gurgling sounds.
For standard faucet (non-air gap) installations simply route the drain line directly to the drain connection.
Installation
Pura Faucet
RO Manifold
1/4” Feed Line (White)
Pressure Tank
Cold Water Supply
3/8” Product
Water Line (Blue)
3/8” Tank
Line (White)
Drain
Connection
1/4” Drain Line to Air Gap (Red)
3/8” Drain Line
from Air Gap (Red)
The additional Point of use connection
(Icemakers etc) can be tapped from
here with the use of reducing Quick
Connect Tee (14” X 3/8” X 3/8”)
(Part # PP30121208W).
SteP 2
SteP 3
SteP 4
SteP 5
SteP 6