Programming wiring, Ec20, Saf1/saf2/saf3 – Flowline LU20 EchoTouch User Manual
Page 4: Fast/slow, Alin, Maxr, Minr, Step four step five
Step Four
Step Five
PROGRAMMING
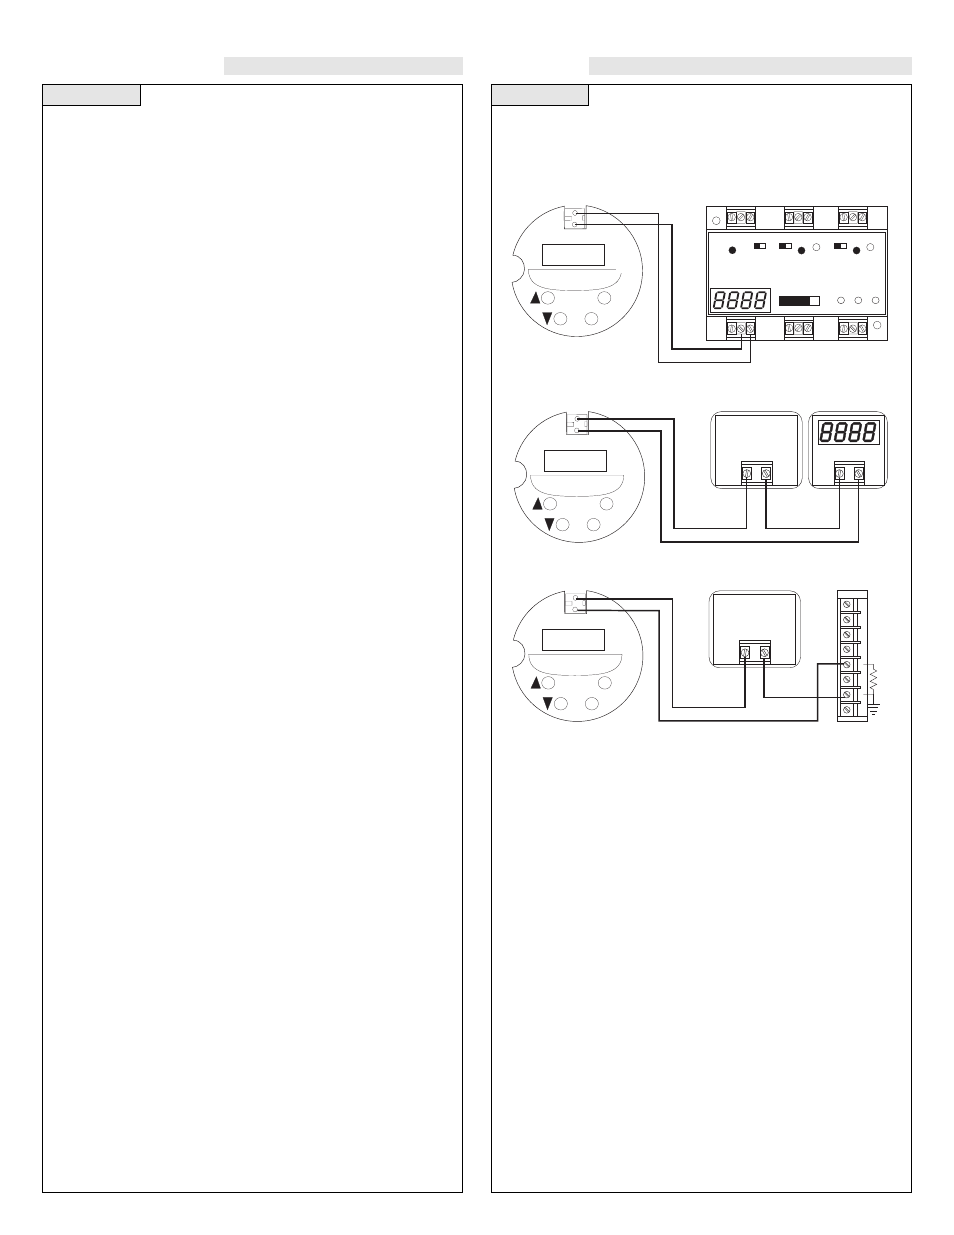
WIRING
EC4:
1. Hold [MENU] key until EC4 appears in display.
2. Release [MENU] key and wait until a value appears. This value is
the current measured level value.
3. If this is acceptable, press [SET] to lock the value as the new EC4
set point. If not, press either the [
s] or [t] keys once and the old
setting for the EC4 will appear.
4. From here, use the [
s] or [t] keys to raise or lower the value to
the desired value.
5. Press the [SET] key to enter this value as the new EC4 set point.
EC20:
1. Hold [MENU] key until EC20 appears in display.
2. Release [MENU] key and wait until a value appears. This value is
the current measured level value.
3. If this is acceptable, press [SET] to lock the value as the new EC20
set point. If not, press either the [
s] or [t] keys once and the old
setting for the EC4 will appear.
4. From here, use the [
s] or [t] keys to raise or lower the value to
the desired value.
5. Press the [SET] key to enter this value as the new EC20 set point.
SAF1/SAF2/SAF3:
1. Hold [MENU] key until SAF1, SAF2 or SAF3 appears in the dis-
play.
2. Release [MENU] key and hold [SET] key to toggle between SAF1,
SAF2 and SAF3.
3. When desired setting is reached, release [SET] key. The last dis-
played setting will be locked into memory. To change, start again
at step 1.
FAST/SLOW:
1. Hold [MENU] key until FAST or SLOW appears in the display.
2. Release [MENU] key and hold [SET] key to toggle between FAST
and SLOW.
3. When desired setting is reached, release [SET] key. The last dis-
played setting will be locked into memory. To change, start again
at step 1.
ALIN:
1. Hold [MENU] key until ALIN appears in the display.
2. Continue to hold [MENU] key until OFF appears in the display.
3. Release [MENU] key and hold [SET] key to toggle from OFF to
ON.
4. Release [SET] key. The LU20 is now in ALIN mode.
5. To exit ALIN mode, repeat steps 1-4 changing from ON to OFF.
MAXR:
1. Hold [MENU] key until MAXR appears in the display.
2. Continue to hold [MENU] key until a value appears in the display.
This value is the current MAXR setting.
3. If this is acceptable, press [SET] to lock the value as the MAXR
setting. If not, use the [
s] or [t] keys to raise or lower the value
to the desired setting.
4. Press the [SET] key to enter this value as the new MAXR setting.
MINR:
1. Hold [MENU] key until MINR appears in the display.
2. Continue to hold [MENU] key until a value appears in the display.
This value is the current MINR setting.
3. If this is acceptable, press [SET] to lock the value as the MINR set-
ting. If not, use the [
s] or [t] keys to raise or lower the value to
the desired value.
4. Press the [SET] key to enter this value as the new MINR setting.
The LU20-50_1 requires 12-36 VDC power with at least 25 mA sup-
ply in order to operate.
1. Wiring to a Flowline Continuous Controller (Model LC52):
2. Wiring to a Two-Wire Loop Indicator (Model LU20-50_1):
3. Wiring to a PLC (LU20-50_1):
MENU
SET
Echotouch
TM
Ultrasonic Level
Transmitter
(+)
(-)
LATCH
ON OFF
P W R
R E L AY 1
INVERT
DELAY
R E L AY 2
INVERT
DELAY
4
20
OP
E A S Y CAL
UP
DOWN SET
INPUT
0%
100%
OFF SET
SP
AN
RL
Y1
RL
Y2A
RL
Y2B
+
-
DC Power
Supply
18-36 VDC
MENU
SET
Echotouch
TM
Ultrasonic Level
Transmitter
(+)
(-)
-
+
+
-
DC Power
Supply
18-36 VDC
T
ypical PLC
6
5
4
3
2
1
0
A
250
Ω
MENU
SET
Echotouch
TM
Ultrasonic Level
Transmitter
(+)
(-)