ProTeam GoFree Pro User Manual
Page 11
ProTeam Owner's Manual / Manual del propietario de ProTeam /
Mode d’emploi ProTeam – 9
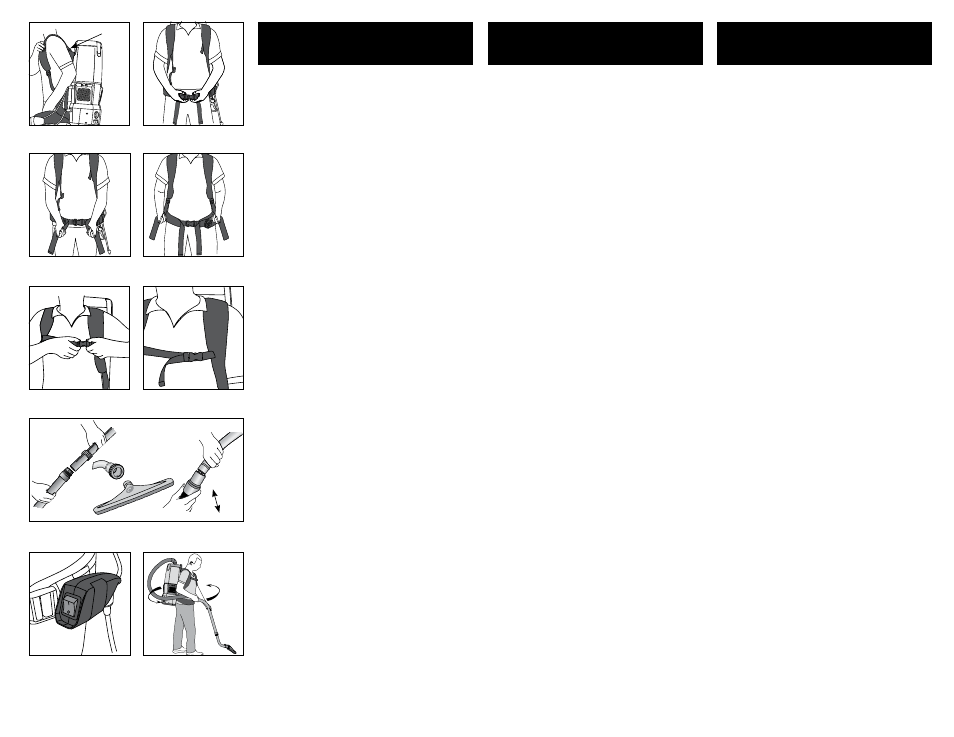
WEARING THE BACKPACK VACUUM
1. Loosen the shoulder straps and the waist belt.
Lift the vacuum and slide your arms through the
straps (Figure G). The upper harness can also be
adjusted by tightening or loosening the upper
harness buckles for a custom fit.
2. Connect the waist strap (Figure H).
3. Tighten the waist belt by grabbing the ends of
the straps and pulling each end toward each
other and then directly outward from the center
of the body. It is very important that the weight
of the unit be concentrated on your hips rather
than your shoulders (Figure I).
4. Adjust the shoulder straps so that the unit fits
comfortably, but the weight is still concentrated
on your hips (Figure J).
5. Connect the sternum strap buckle (Figure K) and
slide the strap up or down on the sewn-in wire
support for the best fit (Figure L).
OPERATING THE BACKPACK
VACUUM
1. Fasten the ends of the wands together, untwist
cuff from end of wand and slide onto other wand
half. Find the notch on the inside of the wand
and the groove on the outside of the wand - they
must align. Insert the wand end by aligning the
notch and grove. To tighten into position twist
wand cuff to the right (Figure M).
2. Attach the floor tool to end of wand. Align the
brass ring with the groove on the floor tool to
ensure a secure fit (Figure M).
3. Twist the wand into the end of the hose (Figure
M).
4. Turn the unit on, and proceed with vacuuming.
5. The on/off switch is conveniently located on the
waist belt of the backpack vacuums (Figure N).
PROPER VACUUMING MOTION FOR LARGE
AREAS
1. Begin with the wand parallel to your body.
2. Draw the top of the wand in toward your waist
and twist at the waist walking backward or
forward, in a side-to-side motion (Figure O).
3. The motion is similar to mopping and keeps the
upper body and arms from tiring.
USO DE LA ASPIRADORA
TIPO MOCHILA
1.
Afloje las correas de los hombros y las correas de
la cintura. Levante la aspiradora y meta los brazos
entre las correas (Figure G). El arnés superior
también puede ajustarse ajustando o aflojando
sus hebillas para tener un calce personalizado.
2.
Conecte las correas de la cintura (Figure H).
3. Ajuste la correa de cintura tomando los extremos
de las correas y tirando de cada extremo hacia
el otro y luego directamente hacia afuera desde
el centro del cuerpo. Es muy importante que el
peso de la unidad se concentre en sus caderas y
no en sus hombros (Figure I).
4. Ajuste las correas de los hombros para que la
unidad se acomode bien, pero con el peso
siempre concentrado en las caderas (Figure J).
5. Enganche la hebilla de la correa del esternón
(Figure K) y deslice la correa hacia arriba o abajo
sobre el soporte de alambre cosido para obtener
el mejor calce (Figure L).
FUNCIONAMIENTO DE LA
ASPIRADORA TIPO MOCHILA
1.
Sujete los extremos de los tubos, desenrosque
el puño del extremo del tubo y deslice sobre
la otra mitad del tubo. Localice la ranura en el
interior del tubo y la muesca en el exterior del
tubo – deben estar alineados. Inserte el extremo
del tubo alineando la ranura y la muesca. Para
ajustar en la posición, gire el puño del tubo hacia
la derecha (Figure M).
2.
Conecte la herramienta de piso al extremo del
tubo. Alinee el aro de bronce con la muesca en
la herramienta de piso para garantizar un ajuste
seguro (Figure M).
3. Gire el tubo en el extremo de la manguera.
(Figure M)
4. Encienda la unidad y comience a aspirar.
5.
El interruptor de encendido/apagado está
ubicado convenientemente en la correa de la
cintura de las aspiradoras tipo mochila (Figure N).
MOVIMIENTO DE ASPIRACIÓN
ADECUADO PARA ÁREAS GRANDES
1. Comience con el tubo paralelo a su cuerpo.
2. Lleve la parte superior del tubo hacia su cintura
y gire la cintura mientras camina hacia atrás o
hacia delante, con un movimiento de lado a lado
(Figure O).
3. El movimiento es similar a trapear y evita que la
parte superior del cuerpo y los brazos se cansen.
PORT DE L’ASPIRATEUR DORSAL
1. Desserrez les bandoulières et le ceinturon.
Soulevez l’aspirateur et placez les sangles sur
vos épaules (Figure G). Pour un ajustement sur
mesure, resserrez ou desserrez les boucles sur le
harnais.
2. Bouclez le ceinturon (Figure H).
3. Resserrez la ceinture en agrippant les extrémités
des courroies et en les tirant l’une vers l’autre,
puis vers l’extérieur. Il est très important que le
poids de l’appareil repose sur vos hanches plutôt
que vos épaules (Figure I).
4. Ajustez les bandoulières de manière à ce que le
port de l’appareil soit confortable, mais que son
poids soit toujours concentré sur vos hanches
(Figure J).
5. Pour un ajustement optimal, fermez la boucle
de la courroie de sternum (Figure K) et glissez
la courroie vers le haut ou le bas sur le support
métallique (Figure L).
UTILISATION DE L’ASPIRATEUR
DORSAL
1. Pour raccorder le tube-rallonge, dévissez le
manchon puis faites glisser une section du
tube-rallonge sur l’autre. La coche à l’intérieur
du manche et la fente à l’extérieur doivent être
alignées. Pour fixer en place, tournez le manchon
vers la droite (Figure M).
2. Attachez l’accessoire de plancher à l’extrémité
du tube. Alignez l’anneau en laiton sur cannelure
de l’accessoire afin d’obtenir une bonne fixation
(Figure M).
3. Avec un mouvement de torsion, fixez le tube à
l’extrémité du boyau (Figure M).
4. Mettez l’aspirateur en marche et effectuez
le travail.
5. Le commutateur marche/arrêt se situe sur le
ceinturon de l’aspirateur dorsal (Figure N).
COMMENT PASSER L’ASPIRATEUR SUR
UNE GRANDE SURFACE
1. Placez le tube d’aspiration parallèlement à votre
corps.
2. Tirez le haut du tube vers votre taille, puis tournez
votre taille pendant que vous marchez vers
l’arrière ou l’avant, en effectuant un mouvement
de va-et-vient latéral (Figure O).
3. Ce mouvement est semblable à celui utilisé pour
passer la vadrouille et diminue la fatigue du haut
du corps et des bras.
Figure G
Upper
Harness
Buckle
OPERATING
INSTRUCTIONS
INSTRUCCIONES DE
FUNCIONAMIENTO
MODE D'EMPLOI
Figure H
Figure I
Figure J
Figure K
Figure L
Figure M
Figure N
Figure O