Connecting to the network and tools, Enabling ports, Checking the installation – Net Optics Director xStream User Manual
Page 2: Configuring the director xstream, Set the ip address by typing
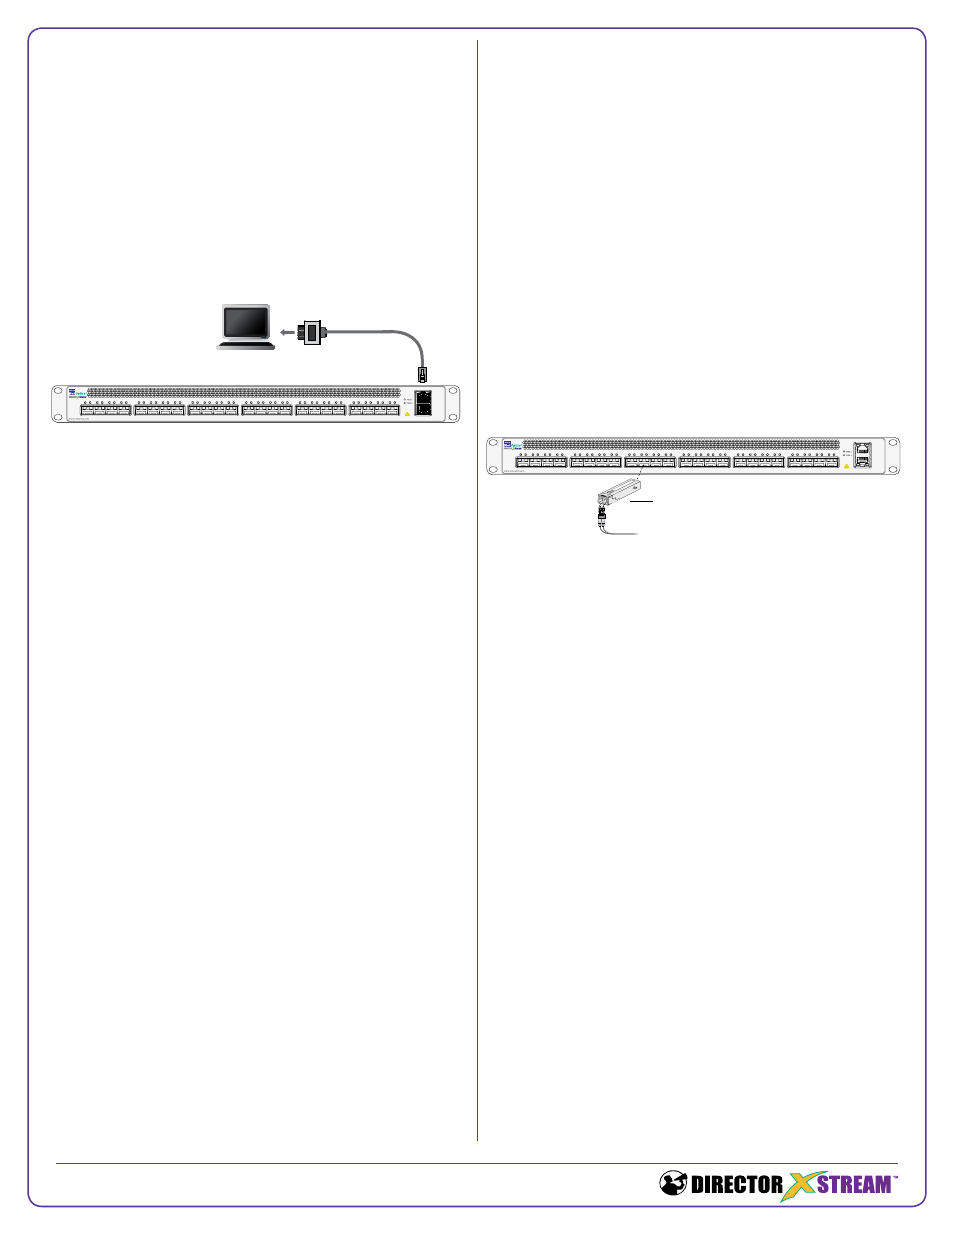
After the initial set up of the IP address through the local CLI, con-
nect the Management port with a CAT 5e cable to a switch or hub.
You can access the Director xStream CLI remotely by SSH or
access Director xStream’s web interface through a web browser.
The default username is
admin, the password is netoptics (or
use your most updated password)
Connecting to the Network and Tools
Note: SFP+ and SFP modules may be shipped separately. An
appropriate cable is shipped with each module.
To connect the Director xStream appliance to a Span port or
external Tap on your network:
1. Remove the temporary plug from any SFP+ slot and insert
the SFP+ or SFP module until it clicks into place.
2. Plug the cable supplied with the module into the port.
3. Plug the other end of the cable into a network port, Tap, or
monitoring tool.
Enabling Ports
The Director xStream appliance ships with all ports enabled
and each port speed set to
auto. When a port speed is set
to
auto, the speed is automatically configured to match the
speed of the connected SFP. When you connect an SFP with
1G speed, port auto-negotiation is enabled. You can configure
the ports individually by using the
port CLI command. For
example, configure ports 5 and 7 to 1G by typing
port 5,7
speed 1000, where 5 and 7 are the ports where 1G SFP
modules are installed.
Note: Only 1000 and 10000 Mbps speed SFP transceivers are
supported.
Checking the Installation
After you have connected the Director xStream appliance,
verify that it is functioning correctly by checking the link LEDs
for each of the connected ports. The link LEDs should be
illuminated to indicate that the links are connected and traffic is
present.
For more information, see the xStream Family User Guide and
xStream Family CLI Command Reference on the CD that is
included with the device.
If you have questions, the Net Optics technical support
team is available from 7:00 to 17:30 Pacific Time, Monday
through Friday at (408) 737-7777 and through e-mail at
[email protected]. You can also find information at
www.netoptics.com.
© 2013 by Net Optics, Inc. Net Optics® is a registered trademark of Net Optics, Inc. Director xStream
TM
is a trademark of Net Optics, Inc.
Configuring the Director xStream
The Director xStream is shipped with a default Management
port IP address. If you prepare your network to accept the
default address, you can connect the device to your network
and log into Director xStream using the default address.
IP:
10.60.4.180
Gateway:
10.0.0.1
Netmask:
255.0.0.0
If you want to assign the device a new IP address, you can
connect a terminal to the Director xStream console port, log in,
and assign a different IP address.
To get started, access the Command Line Interface:
1. Connect a PC with terminal emulation software to the
Director xStream console port with the supplied DB9 to RJ45
console cable.
2. Launch the terminal emulation software such as
HyperTerminal or minicom and set the communication
parameters to 115200 baud, 8 data bits, no parity, 1 stop bit,
no flow control.
3. At the login prompt, type
admin, and at the password prompt,
type
netoptics.
4. At the CLI prompt, type
config to go into configuration mode.
5. Change the password for the admin account:
netoptics (config) #>
passwd set password
reenterPassword
where
netoptics (config) #>
commit
6. Set the IP address by typing:
netoptics (config) #> device sysIp ipSet address
netMask
where
gateway.
7. Confirm with a ‘
yes’. The Director xStream appliance takes
on the new address immediately.
For more information on the CLI, type
help to display command
information, or see the CLI Reference. You can use the tab key
to autocomplete partially typed commands. Entering ? following
a command (and a space) displays the arguments for that
command. The up- and down-arrow keys access the CLI com-
mand history buffer.
1
2
3
4
5
6
7
8
9
10
11
12
13
14
15
16
17
18
19
20
21
22
23
24
Console
Management
To switch Span port, Tap, or monitoring tool
SFP+ or SFP module
1
2
3
4
5
6
7
8
9
10
11
12
13
14
15
16
17
18
19
20
21
22
23
24
Console
Management
Computer with terminal
emulation software
Cisco DB9 to RJ45
console cable