Net Optics Director xStream User Manual
Data monitoring switch, Quick install guide director xstream, Connect dc power
2
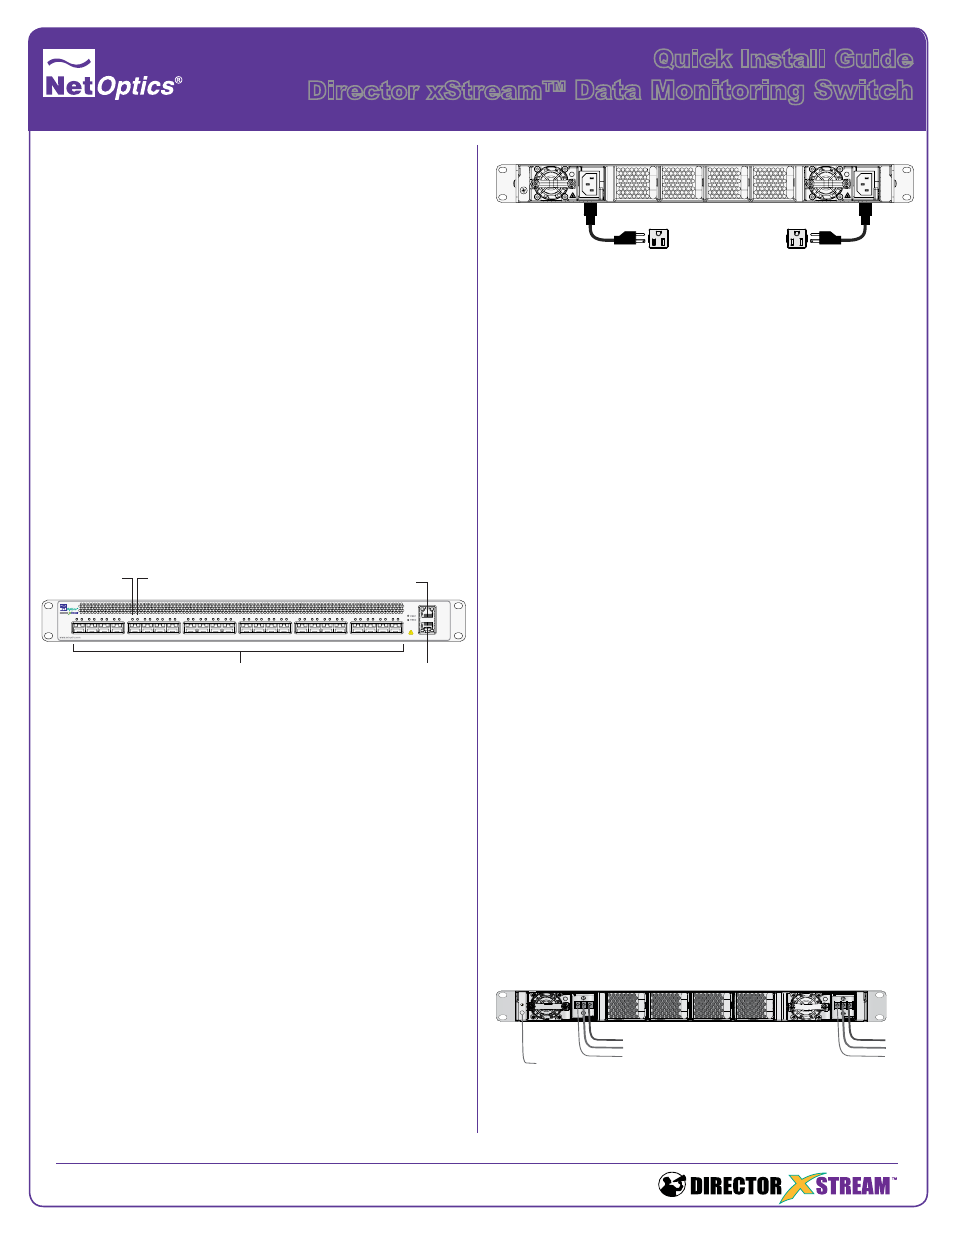
Connect DC Power
For DC powered models, you must supply your own power
cables and one Phillips screwdriver. DC power cables must
have a wire gauge of at least 16 AWG and a 72 VDC, 6A
rating. Remove the protective covers from the DC power
terminal blocks. Use the Phillips screwdriver to tighten the
connections.
Caution: Always connect the earth electrical grounds first,
and keep the earth grounds connected whenever you are
working on the device.
1. Connect a ground wire from the chassis ground to the rack.
2. Connect one end of another ground wire at the ground
connector at Power 1 on the device chassis. Then connect
the other end of the ground wire to the ground connection
at the DC power source.
3. Connect the negative (– 48VDC) side of a DC power cable
to the Power 1 terminal on the chassis, labeled with the
minus symbol (–), and connect the positive (0V) side of the
DC power cable to the Power 1 terminal labeled with the
plus symbol (+). The negative (minus symbol) terminal is
in the center, and the plus terminal is to the right.
4. Connect the other ends of the negative side and the
positive sides of the DC cable to the negative and positive
connectors of the power source.
5. If you want to connect to redundant power, repeat steps
2 and 3 for Power 2 and then connect the other ends to a
separate power source.
Caution: If possible, turn off the power to the power sources
while you are making the above connections.
Note: Be sure to connect the positive sides of the cables to
the positive sides of the power sources, and the negative
sides of the power cables to the negative sides of the power
sources. The two power LEDs on the front panel light up to
indicate that both power sources are on.
Quick Install Guide
Director xStream™
Data Monitoring Switch
Unpack and Inspect
Carefully unpack the Director xStream
TM
and retain materi-
als for later use. Check the packing slip against parts
received. If any part is missing or damaged, contact Net
Optics Customer Service. (Note: SFP and SFP+ modules
are ordered and shipped separately.)
The Director xStream product ships with the following:
• Director xStream software
• (1) xStream appliance
• (2) Power cords
• (1) Cable, 3 Meter, RJ45, CAT 5e 4-Pair
• (1) DB9 to RJ45 cable, 6 ft.
• Screws and washers for mounting the appliance
• Quick Install Guide (this document)
• (1) CD containing the xStream Family User Guide and
xStream Family CLI Command Reference
• Registration instructions
• Service Plan Reference Guide
• Extended Warranty, if purchased
Rack Mounting Director xStream
The Director xStream appliance is designed to mount in
a 19-inch rack, occupying 1U of height. Slide the chassis
into the rack and fasten it in place at the front panel ears
using the supplied screws and washers.
Ground the chassis to the rack by connecting a 14 AWG
minimum ground wire with a #8 ring lug to the ground con-
nection on the rear of the chassis. Terminate the other end
of the ground wire to the rack ground bus bar.
Connect AC Power
If you are installing the appliance with AC connectors:
1. Connect one of the AC power cords to one of the AC
power connectors on the rear panel.
2. Plug the other end of the cord into an AC power circuit.
3. For redundant power, connect the other AC power cord
to the other AC power connector on the rear panel.
4. Plug the other end of the cord into a different AC power
source.
1
2
3
4
5
6
7
8
9
10
11
12
13
14
15
16
17
18
19
20
21
22
23
24
Console
Management
24 Network/Monitor Ports
Activity LED
Activity LED
Link LED
Console Port
Management
Port
© 2013 by Net Optics, Inc. Net Optics® is a registered trademark of Net Optics, Inc. Director xStream
TM
is a trademark of Net Optics, Inc.
800-0136-002 Rev F PUBDIRXQ 06/13
P
w
r
1
P
w
r
2
Return
Ground
-48VDC
Return
Ground
-48VDC
Chassis
Ground