Connect the daisy chain, Rear 10g stacking ports – Net Optics Director Pro User Manual
Page 4
© 2013 by Net Optics, Inc. Net Optics® is a registered trademark of Net Optics, Inc. Director™ and Director Pro™ are trademark of Net Optics, Inc. 800-0038-002 Rev. E 09/13
Director Models
The following table displays all models of Director/Director Pro and a
concise description of what ports each model has. Only the stacking
ports can be used for daisy chaining the units.
Part #
Description
Front
10G
Ports
Rear 10G
Stacking
Ports
DIR-3400
Director Main Chassis with 10 SFP
monitor ports
0
0
DIR-5400
Director Main Chassis with SFP
monitor ports, 2 rear 10 Gbps XFP
(can be used for stacking) ports
0
2
DIR-7400
Director Main Chassis with 10 SFP
monitor ports, 2 front XFP 10 Gbps
ports, 2 rear 10 Gbps XFP (can be
used for stacking) ports
2
2
DIR-6400p Director Pro Main Chassis with 10
SFP monitor ports, 2 front XFP 10
Gbps ports, 1 rear 10 Gbps XFP
(can be used for stacking) port.
2
1
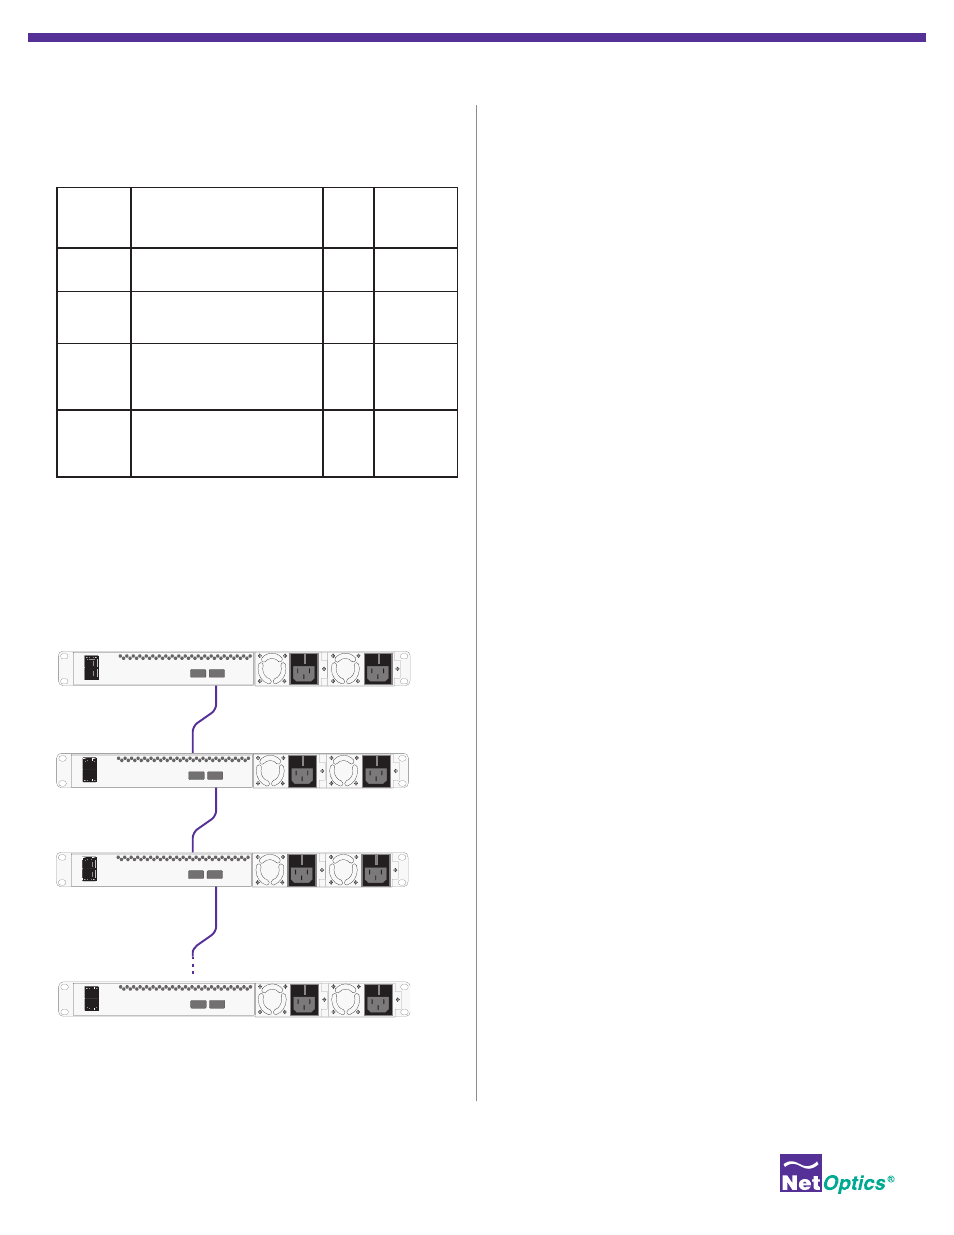
Connect the Daisy Chain
1. Power off all units.
2. Connect the daisy chain cables between them as shown in the
following diagram.
3. Power up the units and ensure all devices are reachable via the
network.
t2.1
t2.2
Master Unit
t2.1
t2.2
t2.2
4
1 0
1 0
Management
Port
Console
Port
10G
4
1 0
1 0
Management
Port
Console
Port
10G
4
1 0
1 0
Management
Port
Console
Port
10G
4
1 0
1 0
Management
Port
Console
Port
10G
t2.1
Configure the Daisy Chain
After connecting all the units for the multi-unit system, do the
following to configure them for master and slaves.
To set the Slave units:
1. SSH and log into the second and following units of the chain and
configure each to be a Slave unit.
2. Enter remote set admin=enable master=disable. The
configuration of the master unit is pending.
3. Enter remote commit.
To set the Master unit:
1. Log into the first unit and configure it to be the Master unit Enter
remote set admin=enable master=enable.
2. Enter remote group topology=1,2,3,4,... Include numbers
for as many units that are in the stack, such as remote group
topology=1,2 for a two-unit system. (The UID list cannot contain
spaces. )
3. Enter remote show. The pending configuration is displayed.
4. Enter remote commit. The master unit initializes the slave units with
the configuration routing information.
5. Enter remote show. Verify that the running configuration is correct
and all units are Up.
Customer Support
If you have questions while your product is under Net Optics Warranty
or you are enrolled in a support plan, please contact the Net Optics
Technical Assurance Center (TAC) via e-mail at support@netoptics.
com or by calling +1.408.737.7777, Monday through Friday, between
the following hours in your region:
• 7:00 - 17:30 Americas (Pacific Time)
• 9:00 - 17:00 EMEA (Frankfurt)
• 9:00 - 17:00 APAC (Hong Kong Time)