Desired function button presses, Menu tree, Starting from the current preset screen) – Crown Audio CDi Series User Manual
Page 9: How to access presets and dsp processes
page 16
CDi Series Power Amplifiers
Operation Manual
CDi Series Power Amplifiers
Operation Manual
page 17
CURRENT PRESET
FLASHING “PRESET” TEXT
FLASHING “PRESET” ICON
Sel
Sel
Sel
Next
USER PRESETS
2-20
DSP OFF
Next
Next
Next or Prev
FLASHING “CONFIG” TEXT
Y
XOV
EQ Ch. 1
EQ Ch. 2
DELAY Ch. 1
DELAY Ch. 2
LIM Ch. 1
LIM Ch. 2
STEREO/BRIDGE MONO
BRIDGE
STEREO
Sel
Sel
Sel
Sel
Sel
Sel
Sel
Sel
Next
Prev
Next
Next
Next
Next
Next
Next
OFF, 90 Hz, 100 Hz, 1200 Hz,
1500 Hz, 2000 Hz, 2-CH SUB,
CUSTOM
EQ OUT
CURRENT OFF, 50, 40, 30,
20,10, 9, 8, 7, 6, 5, 4, 3, 2, 1
OFF, -3dB, -6dB, -12dB
OFF, -3dB, -6dB, -12dB
Sel
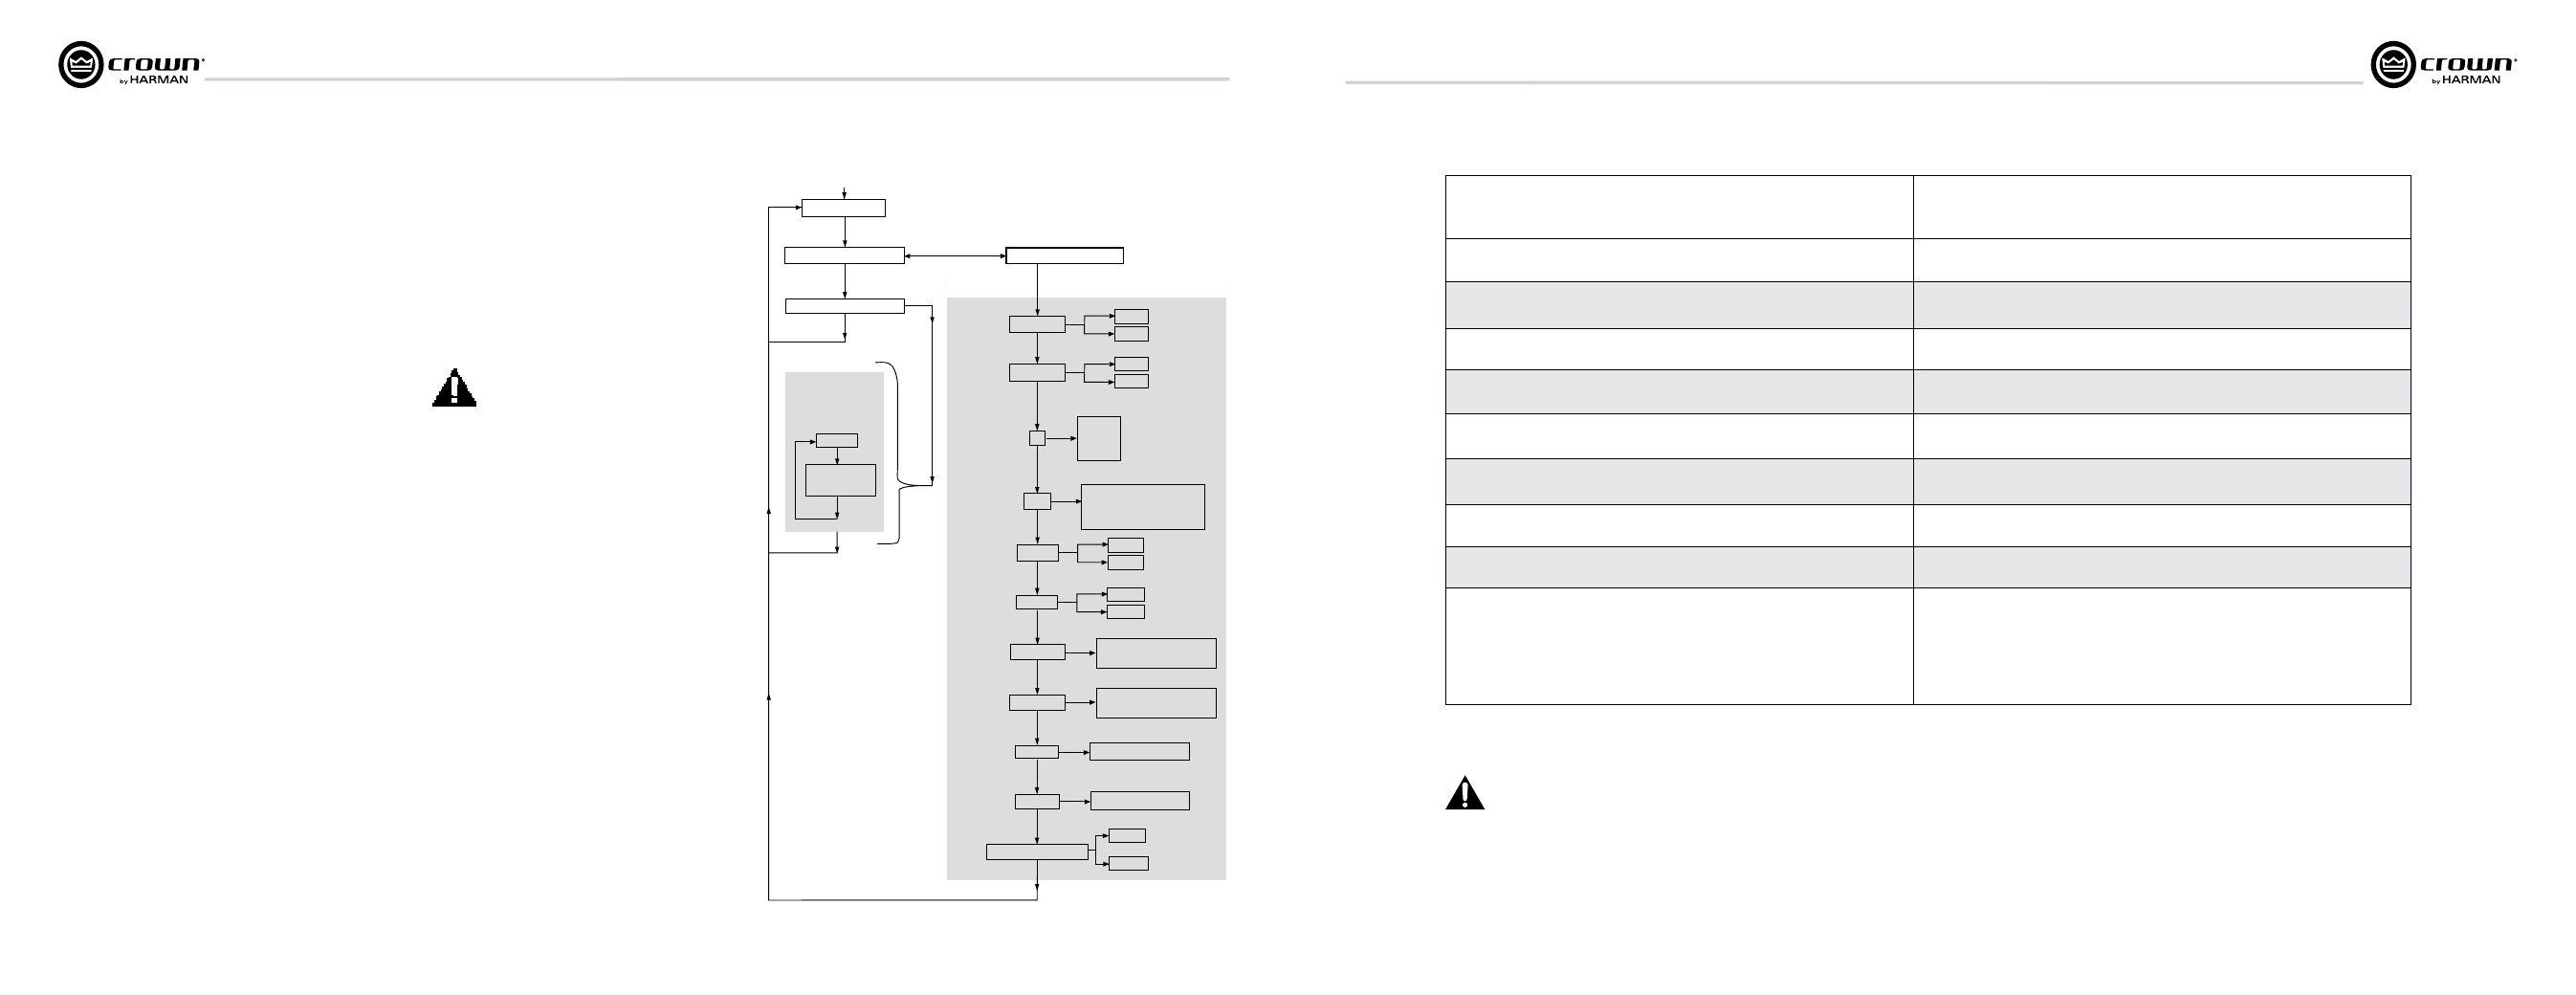
MENU TREE
Press Next to see
each processor’s
options, then press
Sel to select an option.
PRESETS
(TEXT on screen)
DSP PROCESSES
(ICONS on screen)
Doing nothing returns you to the
CURRENT PRESET after a timeout delay.
Sel > Sel > Next goes to presets.
Sel > Next > Sel lets you
configure the DSP processes.
Starting from the CURRENT PRESET,
Power-up
EQ IN
Prev
Next
EQ OUT
EQ IN
Prev
70V Ch. 1
Next
HIGH Z
LOW Z
Prev
70V Ch. 2
Next
Prev
Sel
Sel
HIGH Z
LOW Z
CURRENT OFF, 50, 40, 30,
20,10, 9, 8, 7, 6, 5, 4, 3, 2, 1
Sel
Next CH1+CH2
INPUT Y
STEREO
Next
NAVIgATINg THE LCD SCREEN MENU:
BASICS
To step through the Menu options, press the Sel,
Next or Prev buttons as described in the table
later in this manual.
ICONS illuminated at the top of the screen show
which DSP functions are active with the current
preset.
When you are modifying a preset, its ICON flashes.
You can scroll through its settings with the Prev
and Next buttons. When you see the desired
setting, select it by pressing Sel.
Doing nothing returns you to the CURRENT
PRESET after ten seconds.
In the LCD screen, if the PRESET icon is lit, the
current pre set is unchanged from its stored
settings. If the CUSTOM icon is lit, the current
preset has been changed from its stored settings.
USER PRESETS: The CDi amplifier provides 19
user presets which you can modify. For example,
set up a user preset with a specific crossover
frequency and a specific limiting threshold.
DSP PROCESSES
The CDi amplifier includes a number of DSP
processes, which appear as ICONS on the screen.
They are described below:
Output Mode: The options are:
• 70V (70V/high-Z mode for Ch. 1 or Ch. 2)
• High Z – Channel is configured for 70V/high-Z
loads.
(A 70Hz high-pass filter is automatically enabled
whenever 70V is on.) It is a 24 dB/octave
Linkwitz-Riley filter in the crossover section.
• Low Z – Channel is configured for low-Z loads.
Input Mode: The options are
• CH1+CH2 (Ch.1 input signal and Ch. 2 input
signal are summed and fed to both output
channels.) This provides a 6 dB level boost.
• INPUT Y (Ch. 1 input signal goes to Ch. 1 and
Ch. 2 output. Ch. 2 input signal is ignored.)
• STEREO (Ch. 1 input goes to Ch. 1 output. Ch. 2
input goes to Ch. 2 output.)
XOV (Crossover): The available crossover
frequencies are: OFF, 90 Hz, 100 Hz, 1200 Hz, 1500
Hz, 2000 Hz, 2-CH SUB, CUSTOM.
When you call up the XOV process, Ch.1
will always be set to low frequencies and
Ch. 2 will always be set to high
frequencies. DO NOT con nect high-
frequency drivers to Ch. 1.
EQ (Equalization for Ch. 1 or Ch. 2): The
options are OUT or IN. When set to “IN”,
equalization that you set up in System Architect
software is applied to the signal. When set to
“OUT”, equalization is bypassed.
DEL (Delay for Ch. 1 or Ch. 2): The delay times
are OFF, 1-10 msec, 10-50 msec, and 0 sec. “0
sec” is a placeholder for any delay time set in
System Architect soft ware.
BRg (Bridge-mono or Stereo): Use this
option to set the amplifier to bridge-mono or
stereo mode. When BRIDGE is active, the Ch. 1
input signal is used (unless you made an
alternate setting with the Y processing block).
The tables on the next few pages describe what
button sequence to press in order to achieve
various functions. Four identical tables are
provided, each in a different lan guage, for easy
use in the field.
DESIRED FUNCTION
BUTTON PRESSES
(starting from the current preset screen)
Set up Ch. 1 output for 70V/high-Z mode
Sel > Next. Press Sel. The 70V and Ch. 1 icon flash. Press Next to turn on or off. Choose on or
off by pressing Sel.
Set DUAL or BRIDGE-MONO mode manually
Sel > Next. Press Sel until the BRG icon flashes. Press Next to set the amplifier to Bridge-Mono,
or press Prev to set the amplifier to Stereo. Press Sel to select your choice.
Select a user preset
Sel > Sel. Press Next until you see PRESET 2-20. Press Sel.
Set INPUT Y mode
Sel > Next. Press Sel until the Y icon flashes. Press Next to see the three options.
Choose one by pressing Sel.
Turn EQ on or off for Ch. 1 or Ch. 2
Sel > Next. Press Sel until the EQ icon flashes along with CH1 or CH2.
Press Next to set EQ in or out. Press Sel.
Set DELAY for Ch. 1 or Ch. 2
Sel > Next. Press Sel until the DEL icon flashes along with CH1 or CH2.
Press Next until you see the amount of delay you want, then press Sel to select it.
Set LIMITING for Ch. 1 or Ch. 2
Sel > Next. Press Sel until the LIM icon flashes along with CH1 or CH2.
Press Next until you see the limiting threshold you want, then press Sel to select it.
Turn off all the DSP
Sel > Sel. Press Next until you see DSP OFF. Press Sel.
Configure a USER PRESET
1. Sel > Sel .
2. Press Next until you see the desired preset. Press Sel to select it.
3. Sel > Next.
4. Press Sel until you see the DSP process you want to apply to that preset.
5. Press Next to see the processing options, then press Sel to select an option.
6. Repeat Steps 1–5 for all the processes you wish to apply to that preset. The CUSTOM ICON
will light if a factory preset has been modified.
* When you call up the XOV process, Ch.1 will always be set to low frequencies and Ch. 2
will always be set to high frequencies. DO NOT connect high-frequency drivers to Ch. 1.
HOW TO ACCESS PRESETS AND DSP PROCESSES