7 advanced operation, Menu tree – Crown Audio I-Tech 4x3500HD User Manual
Page 17
I-Tech HD DriveCore Series Power Amplifiers
Operation Manual
page 17
7.1 Introduction
The LCD Control Screen and its controls let you configure the
ampli fier and access many features that before were available only
through a remote computer. Also, you can recall DSP presets via
the front panel. (Some DSP parameters cannot be adjusted with
the LCD Control Screen. That is done in System Architect.)
Figure 7.1 shows the parts of the LCD Control Screen. Its
functions are described below. NOTE: Listed functions can also be
controlled in System Architect.
Here’s how to access the various menus and settings in the LCD
control screen:
7 Advanced Operation
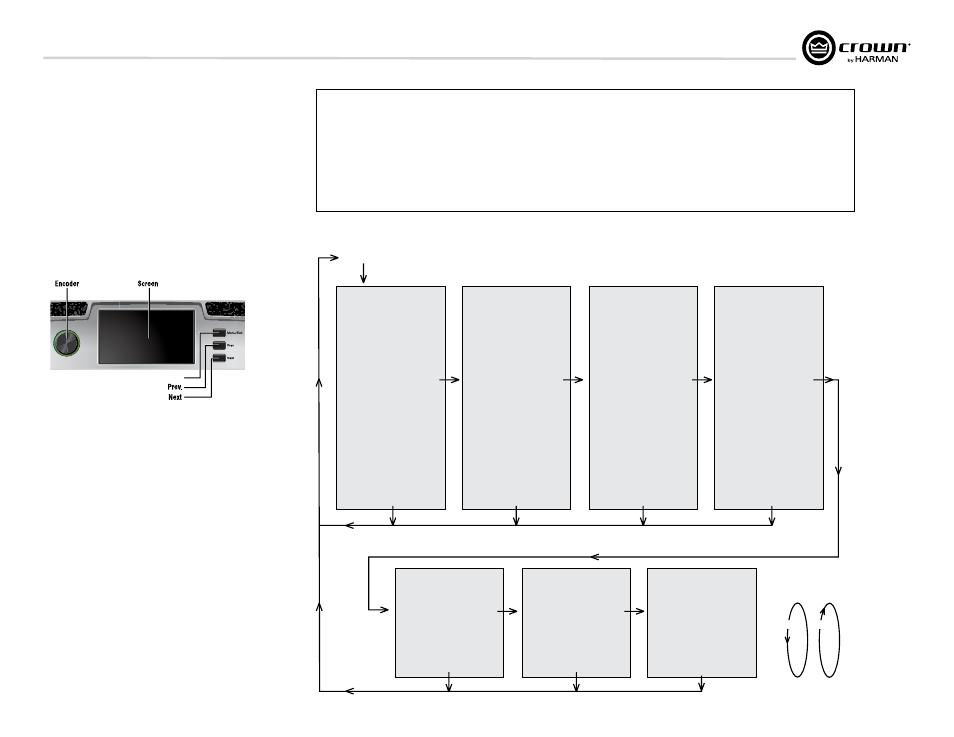
Figure 7.1 Parts of the LCD Control Screen
• Starting from the Attenuation screen, press Menu/exit to go to
the Menu screen.
• Press Next to go to the next item in the menu.
• Press Prev
to go to the previous item in the menu.
• Turn or press the encoder knob to change the value of a
dis played parameter.
• When you see a menu screen, push the knob once to see the
items in that menu. Or press Next to go to the next menu.
• Press Menu/exit to leave the menu and return to the previous
screen at any time.
Some menu items require confirmation: after you request a change,
the display might say “Press and hold.” To confirm a change, press
and hold the encoder knob. If you don’t want the change to occur
during a confirmation, turn the knob or wait five seconds.
The entire front panel or any selected screens can be locked out or
set to read only status using System Architect software. Locked-out
screens will either say “Lockout” or the individual parameter will
say “N/A”. If a change is attempted the screen will say “Changes
Disabled”.
Next
Prev
ALL MENUS:
Next/Previous loops
PRESETS
Attenuation - Mute - Lockout
GENERAL PROPERTIES MENU
Sample Rate
Analog Input Sensitivity
Amp Mode
Locate
Channel Labels
Default Display View
Screen Configuration
LED Meter Display Type
Manufacturing Information
ADVANCED MENU
Attenuator Limits
Attenuator Link
Input Source Priorities Ch 1
Input Source Priorities Ch 2
Input Source Priorities Ch 3
Input Source Priorities Ch 4
Maximum Analog Input
AES Input Trim
AES Input Status
Bandpass Gain
Output Polarity
Input Delay
Driver Delay
Clip Limiter
Pink Noise Generator
Sweep Load Monitoring
LevelMax Suite Menu
Limiter States
Peak Voltage Limiter
RMS Voltage Limiter
Transducer Thermal Limiter
MONITOR MENU
Global Metering
Load Monitoring
Thermal Percentage
Thermal Temperature
AC Line Voltage
Operating Time
Watts Output
ALERTS MENU
Amp Output Clip Errors
Analog Input Clip Errors
Thermal Errors
Low/High Limit Load Errors
Sweep Load Monitoring Errors
Line Voltage Errors
Fan Errors
Clear All Error Logs
NETWORK CONFIGURATION MENU
Network Information
Manufacturing Information
HiQnet Node Address
Network Settings
COBRANET MENU
CobraNet Information
CobraNet Input Ch 1
CobraNet Input Ch 2
CobraNet Input Ch 3
CobraNet Input Ch 4
CobraNet Foldback
CobraNet Conductor Priority
CobraNet Transport Latency
CobraNet Input Trim
MENU TREE
Menu Button
Next
Exit
Exit
Exit
Exit
Exit
Exit
Exit
Next
Next
Next
Next
Next
Next
Figure 7.2 The Menu Tree
Menu Tree
As a handy reference, Figure 7.2 shows the menu structure of the LCD control screen. Starting from any Menu screen,
press an Encoder knob to go to the first selection in the Menu. You can loop through a menu’s selections using the Next
and Prev buttons. The Menu/exit button returns you to the previous screen.
Menu/Exit
Touch Screen Functions
To Navigate:
Method 1
• Press Menu/Exit button to enter menu screen
• Use previous & next buttons to cycle through
menus
• Click with encoder wheel to select menu
Method 2
• Press menu/exit button to enter menu screen
• Press and drag with one finger to scroll through
menus
• Tap with a finger on the menu to select
Shortcuts:
• From the default display view, press and hold the
encoder wheel (with no channels selected) to mute
or unmute all channelss
• From any menu, press and hold the menu exit
button to return to the default display view