Size track & header prepare rough opening, Sliding door hardware - pocket door, Assembly instructions – Knape&Vogt PKF-250A Series User Manual
Page 2
SLIDING DOOR HARDWARE - Pocket Door
1
2
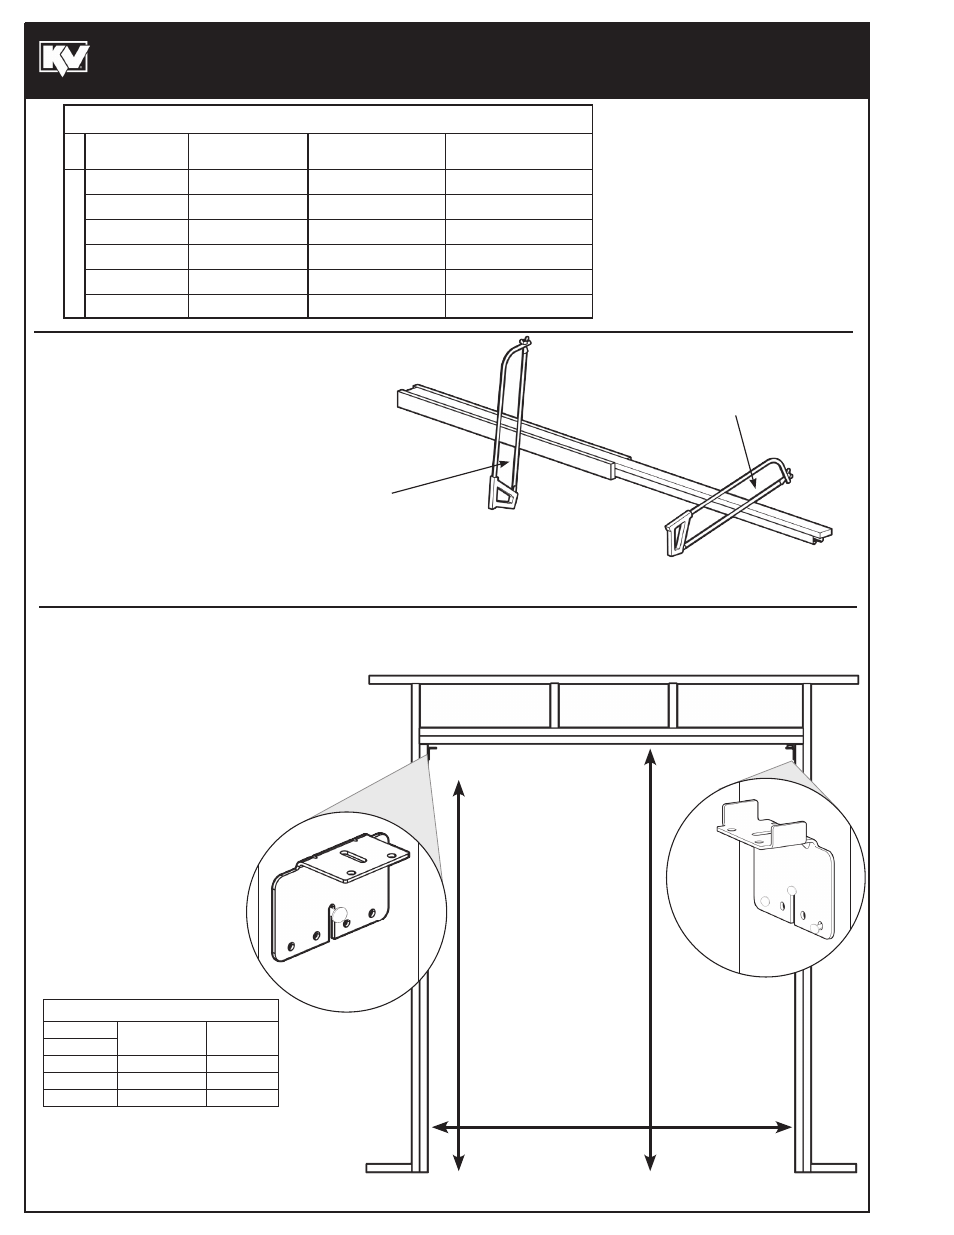
SIZE TRACK & HEADER
PREPARE ROUGH OPENING
• The header assembly comes configured for 4' doors.
• For alternate door widths cut header and nailing
strips to length shown in Table 1.
Assembly
Instructions
#310310_B (0113)
Table 1: Key Dimensions by Door Width (D)
Header Length
Nailing Strip Length
Rough Opening Width
(T)
(H)
(W)
24" [610]
46-5/8"
25"
49"
30" [762]
58-5/8"
31"
61"
36" [914]
72-5/8"
37"
73"
42" [1067]
82-5/8"
43"
85"
48" [1219]
94-5/8"
47"
97"
Custom
(2 x D) - 1-3/8"
D + 1"
(2 x D) + 1" [25]
Door Width
(D)
Note: Track will be 1-1/2" shorter than header.
• Prepare rough opening width based on values
from Table 1 and rough opening height based
on values from Table 2.
• Mark each side of rough opening above finished floor
at bracket nail height dimension in Table 2.
• Slide the slot in the “pocket” end bracket over
nail head, level with doorway bracket and
seat nail. Double check, level and
drive additional nails as shown.
• “Doorway” end bracket
mounts to jamb in
“doorway” level and
secure with additional nails.
(If floor covering to be used is greater than 3/4" thick,
a sole strip of equal thickness must be added
OR an
equal amount can be cut off the bottom of the door.)
Table 2: Dimensions by Door Height
Rough Opening
Bracket
Opening
Height
Nail Height
6'8" door
84.5"
81-7/8"
7' door
88.5"
85-7/8"
8' door
100.5"
97-7/8"
A) If necessary, cut wood header to
required length.
A) Si nécessaire, coupez le linteau en
bois à la longueur requise.
A) Si es necesario, corte la cabecera
de madera a la longitud requerida.
B) If necessary, turn on side to cut nailing boards to required length. Being careful
NOT to cut header board or track.
B) Si nécessaire, tournez sur le côté pour couper les fonds de clouage à la longueur
requise. Faites attention de ne PAS couper le fond de linteau ou le rail.
B) Si es necesario, gire sobre su lado las placas para clavar para cortarlas a la
longitud requerida. Tenga cuidado de NO cortar la placa de la cabecera ni la del carril.
Note: In the following illustrations,
the doorway opening is to the left.
Nota: Dans les illustrations suivantes,
l’ouverture d’entrée de porte est à gauche.
Nota: En las figuras siguientes, la apertura
de la entrada es hacia la izquierda.
C) Turn track assembly over
and cut track 1-1/2" back from
end of wood header.
C) Retournez l’ensemble de rail
et coupez le rail à 3,8 cm de
l’extrémité du linteau en bois.
C) Gire el conjunto del carril y corte el carril a 3,8 cm más
atrás del extremo de la cabecera de madera.
Width (from Table 1)
Largeur (Du Tableau 1)
Anchura (de la Tabla 1)
Opening Height
Hauteur d’Ouverture
Altura de la abertura
Bracket Nail Height
Hauteur de Clou de Support
Altura del clavo del soporte
Pocket
Partie
coulissante
escamotable
Cavidad
Doorway
Entrée de porte
Entrada