American Car Craft Challenger Header Plate Polished 4Pc 2008-2013 User Manual
Page 2
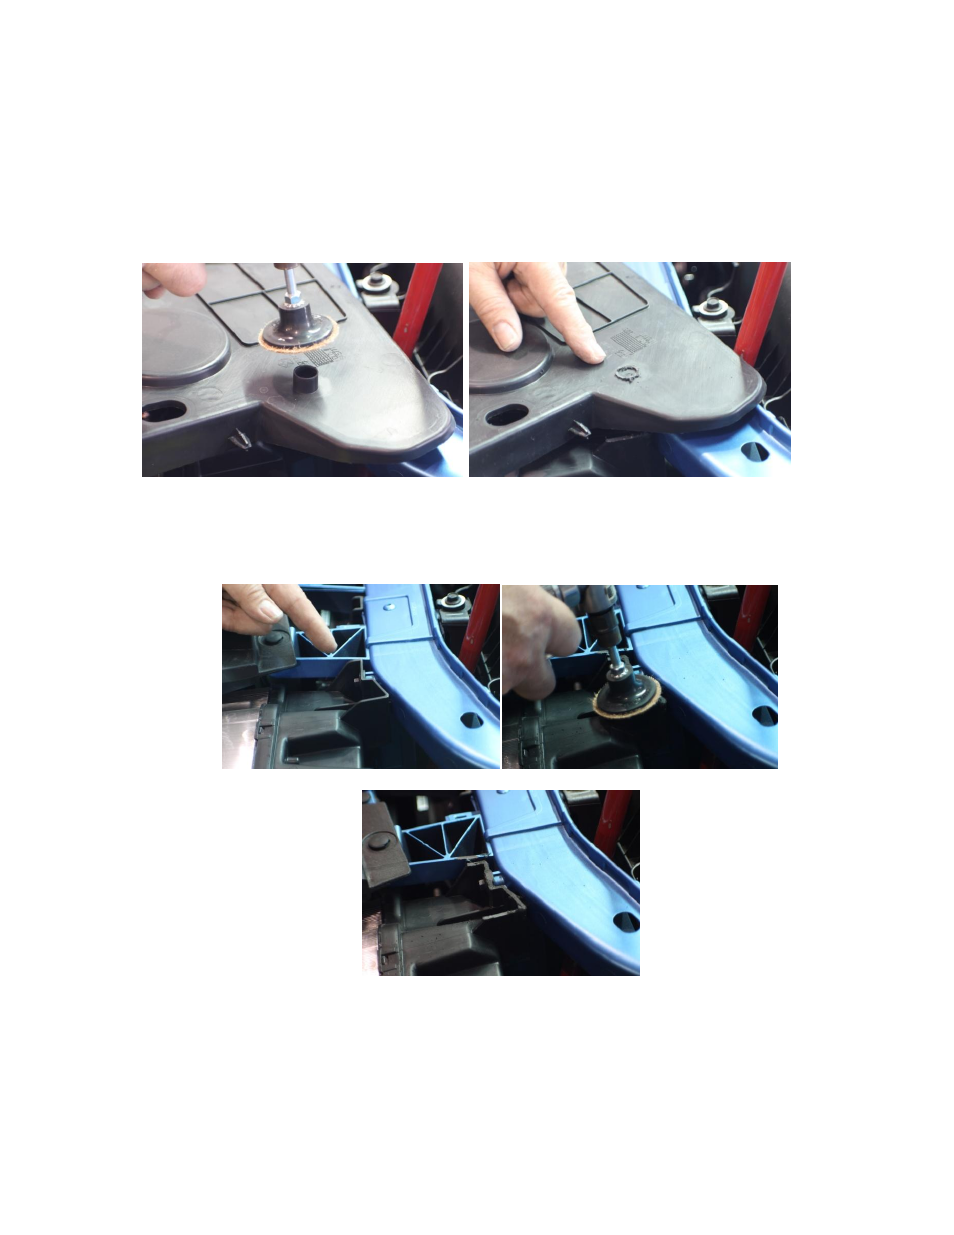
1. The first thing we will need to do is to create some much needed clearance.
Remove the two black plastic header plates. You will notice two studs at the side
of each panel. Trim off the one stud closest to the front of the car and leave the
back one in place. You will need to sand flush the front cylindrical parturition just
under the panel. See pictures below. This will allow the plastic panel to sit closer
the headlight.
2. The next spot to grab some clearance will be at the headlight bracket bolted to the
radiator support rail and the criss cross bracket of the rail itself. These two areas
will need to be sanded down about a quarter inch at both ends of the header area.
See pictures below.
3. Once these modifications have been made reinstall the plastic header filler. You
should not be able to see the modifications you have made. Place the larger section of the
new header plate into position over the black plastic factory header plate. You will notice
four counter sunk holes in the new header closest to the center. Pilot these four holes
- Mustang Fuse Box Cover Polished_Brushed V8 & GT 5.0 2011-2012 (2 pages)
- Corvette Exhaust Filler Panel - NPP+Dual-Mode+Bi-Mode Exhaust Perforated 2005-2013 C6 (5 pages)
- Corvette Fender Caps Polished Illuminated 2005-2013 C6+GS (3 pages)
- Mini Cooper Coupe & Clubman Door Speaker Trim Rings Large 2Pc Polished 2008-2010 (2 pages)
- Ford F150_Raptor Dash Trim Rings Headlight_4WD_12V 3Pc Brushed 2009-2013 (2 pages)
- Challenger 5.7 and SRT 8 Shifter Plate Brushed Auto 2008-2013 (2 pages)
- Corvette Grille Polished Billet Aluminum Front 2005-2013 C6 only (2 pages)
- Camaro Fog Light Trim Kit Polished 8Pc 2012-2013 ZL1 only (2 pages)
- HHR Pinline Body Molding Chrome Upper 2006-2012 (2 pages)
- Mustang Gas Cap Cover "Ford Oval Style Polished 2011-2012" (2 pages)
- Corvette Rear Side Vent Grilles Laser Mesh 2Pc Blakk Stealth 2006-2012 Z06+GS+ZR1 (2 pages)
- Corvette Wiper Cowl Cover 2Pc 1997-2004 C5 & Z06 (3 pages)
- Mustang Door Trim Kit Chrome Vinyl 4Pc V6 & GT 2005-2009 (3 pages)
- Camaro Gas Cap Cover "CAMARO 2010-2013" (2 pages)
- Corvette Taillight Chrome Vinyl Trim Kit 4Pc 2005-2013 C6 all (1 page)
- Corvette Side View Mirror Trim 2Pc - Crossed Flags 2005-2013 C6 Standard Mirror (2 pages)
- Mustang Air Box Covers Polished 2Pc V6 & GT 2005-2009 (2 pages)
- Mustang Speaker Grille Kit Polished Mustang Style V6 & GT 2005-2009 (3 pages)
- Corvette Stock Air Bridge Cover Polished 1997-2004 C5 & Z06 (2 pages)
- Camaro Gas Cap Cover Polished "RS 2010-2013" (2 pages)
- Chrysler 300 _ Dodge Charger_Magnum 5.7 Lower Hood Cowl Polished 2005-2010 (2 pages)
- Dodge Challenger 5.7 and SRT 8 Taillight Insert Trim Plate Brushed 2008-2013 (2 pages)
- Corvette Door Air Vent Cover Driver Side Brushed 1997-2004 C5 & Z06 (2 pages)
- Dodge Challenger Grille Overlay Style Lower Brushed 2008-2010 (2 pages)
- Camaro Rear Quarter Panel Trim Polished 6Pc 2010-2013 (2 pages)
- Mustang Air Box Cover Perforated 2 Pc V8 & GT 5.0 2011-2013 (2 pages)
- Camaro Hood Panel Emblem with Brushed Carbon Fiber "SS 2010-2013" (1 page)
- Mustang Executive Series Fluid Cap Cover 5Pc Set - Carbon Fiber 2005-2009 Auto (2 pages)
- Camaro Front Grille Trim Kit 26Pc Polished Lower 2012-2013 ZL1 only (2 pages)
- Corvette Pillar Vent Covers 2Pc Polished 1997-2004 C5 & Z06 (2 pages)
- Ford Raptor Headlight Carbon Fiber Wrap 2Pc 2010-2013 (2 pages)
- HHR Wiper Cowl Polished 2006-2012 (2 pages)
- Corvette Floor Mats - Diamond Plate 2Pc Red Show 2005-2013 C6 (1 page)
- Mustang False Firewall Polished V6 & GT 2005-2009 (2 pages)
- Hummer H2 Running Light Trim Polished Rear 3Pc 2003-2013 (1 page)
- Corvette Exhaust Filler Panel Corsa 4.0 Quad Tips Laser Mesh Polished 2005-2013 C6 (6 pages)
- Corvette Driving Light Covers Laser Mesh Blakk Stealth 2Pc 2006-2013 Z06+GS+ZR1 (2 pages)
- Corvette Emblem Inserts 8Pc Front and Rear Polished 1997-2004 C5 & Z06 (2 pages)
- Chrysler 300 _ Dodge Charger_Magnum SRT 8 Firewall Brushed 2005-2010 (3 pages)
- Camaro Door Handle Pull _ Switch Deluxe Trim Plate 2Pc 2012-2013 Coupe only (2 pages)
- Camaro Factory Shroud Trim Polished V8 Kit 3Pc 2010-2013 (1 page)
- Hummer H2 Outer Gas Cap Surround Polished 2003-2007 (1 page)
- Ford F150_Raptor Mirror Control Trim Ring Polished 2009-2013 (2 pages)
- Camaro Shifter Plate Brushed fits Standard Equipped with Gauge Cluster only V8 2010-2013 (2 pages)
- Pontiac G8 Side Marker Trim 2Pc Base GT GXP Brushed 2008-2009 (2 pages)