Safety, Warning, Strangulation hazard – BabyTrend 9165TW - EXPEDITION DOUBLE JOGGER - ORANGE OAK User Manual
Page 6: Type 1, 2t ype 1
Copyright © 2007 - 2008, Baby Trend Inc., All Rights Reserved.
Copyright © 2007 - 2008, Baby Trend Inc., All Rights Reserved.
9
10
Type 2 only
Fig. 17a
Fig. 17b
Shoulder Strap
Squeeze
Adjust for a snug fit
Crotch Strap
Waist Strap
Fig. 16a
Fig. 16b
Fig. 16c
Unlock Lock
Lock
Unlock
SAFETY
T
ype 1
&
2
T
ype 1
&
2
WARNING:
Always lock
the front swivel wheel in STRAIGHT
position before placing or removing
your children from the jogger.
The type 2 swivel jogger come equipped with a
front wheel locking device. Fig. 16a is a remote
release lever located under the right side handle.
Pull to disengage the wheel and push to engage
the locking device located under the footrest.
Fig. 16b front wheel lock works in a horizontal
motion from left to right, locking and unlocking
the wheel. Fig. 16c front wheel lock works in a
vertical motion from top to bottom, locking and
unlocking the wheel.
WARNING:
Avoid serious
injury from falling or sliding out.
Always use the safety harness.
STRANGULATION
HAZARD:
Child can strangle
in loose straps. Never leave child in seat
when straps are loose or undone.
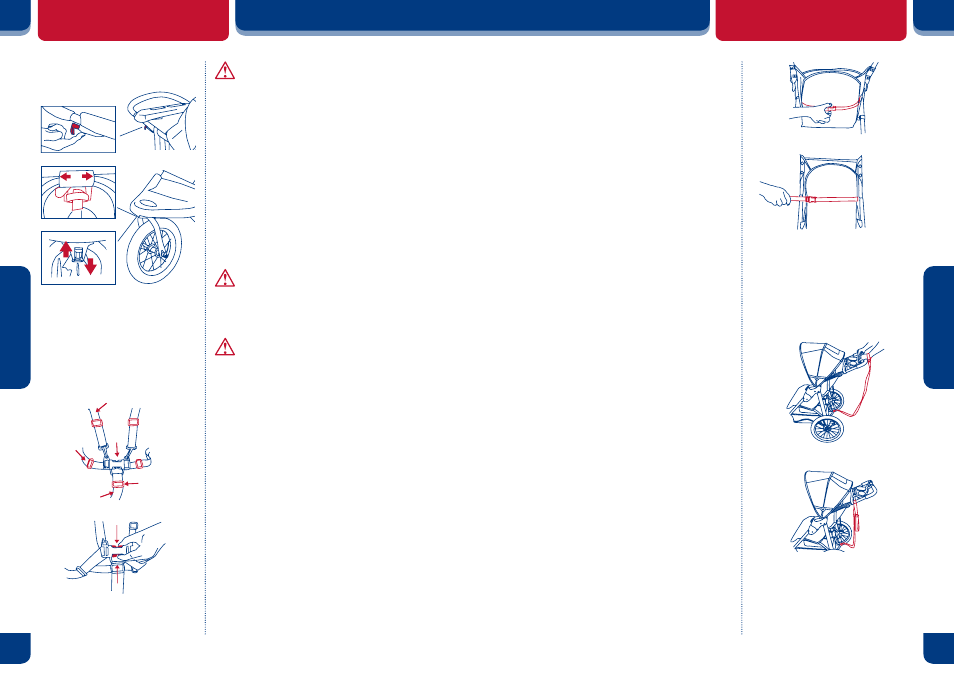
TO SECURE THE CHILD
The shoulder straps of the 5-point harness have
2 attachment positions. Select the position that
places the shoulder strap level with, or below the
top of the child's shoulder.
• Carefully place the child in the stroller seat
and bring the safety harness around the child's
waist and over the shoulders. Place the crotch
strap between the child's legs. Insert the male
end of each shoulder/waist belt into the buckle
on the crotch strap. Tighten the harness to
be snug around the child's waist and over the
child's shoulders Please see figure 17a.
• To release, apply pressure to both sides of
each male clip until the clip is released. See
figure 17b. This process requires a moderate
amount of effort so as to prevent an accidental
release by your child.
SAFETY
Fig. 20
Fig. 21
Fig. 19
Fig. 18
SEATBACK POSITIONING
The seat has a multiple position recline that is
controlled by a strap and buckle assembly behind
the seat. (Fig. 18) To recline the seat, loosen the
strap through the buckle and adjust to the required
recline position. (Fig. 19) To place the seat back
in a more upright position, press upward on the
seat back with one hand while pulling the strap
through the buckle with the other. The strap will
lock automatically.
The upright position should be used only for a
child that is at least 6 months old. Always re-
adjust the safety harness, including the shoulder
belts, when repositioning the seatback.
JOGGING WITH YOUR STROLLER
When you are jogging with your child, use the
following safety features:
• LOCK THE FRONT SWIVEL WHEEL IN
STRAIGHT POSITION (Type 2 only)
• SAFETY WRIST STRAP: Always connect
the safety strap to either wrist when jogging.
This strap will keep the stroller from rolling
away in the event that you trip while running.
(Fig. 20) The safety strap must remain
connected to the rear lower frame cross
member at all times. This location is intended
to prevent the stroller being tipped backward
in the event that you do fall to the ground.
The safety strap includes a Velcro attachment
for storage, on the left side of the stroller,
when not in use.
(Fig. 21)
• CALIPER BRAKE SYSTEM: Squeeze
the brake handle to slow the stroller. (Fig.
15)
NEVER
use the hand brake as a parking
brake. This feature is only available on Type 1
stroller.
TIRES
Tires are shipped un-inflated. The tires should
be inflated on a regular basis to between 20 to 25
pounds of air pressure. Always use a bicycle style
hand air pump to inflate the tires.