Assembly, Important, Warning – BabyTrend 9165TW - EXPEDITION DOUBLE JOGGER - ORANGE OAK User Manual
Page 3: Type 1
T
ype 1
Copyright © 2007 - 2008, Baby Trend Inc., All Rights Reserved.
T
ype 1
Copyright © 2007 - 2008, Baby Trend Inc., All Rights Reserved.
IMPORTANT!
To ensure safe operation of your stroller,
please follow these instructions carefully. Please keep these
instructions for future reference.
IMPORTANT!
Before assembly and each use, inspect this
product for damaged hardware, loose joints, missing parts or sharp
edges. NEVER use if any parts are mssing or broken.
IMPORTANT!
Adult assembly is required.
ASSEMBLY
Skip to page 5 if you have Type 2
Swivel Front Wheel
Type 1: Fixed Front Wheel
Remove stroller from box. The front wheel, rear
wheels, fender, and parent tray need to be installed
prior to use.
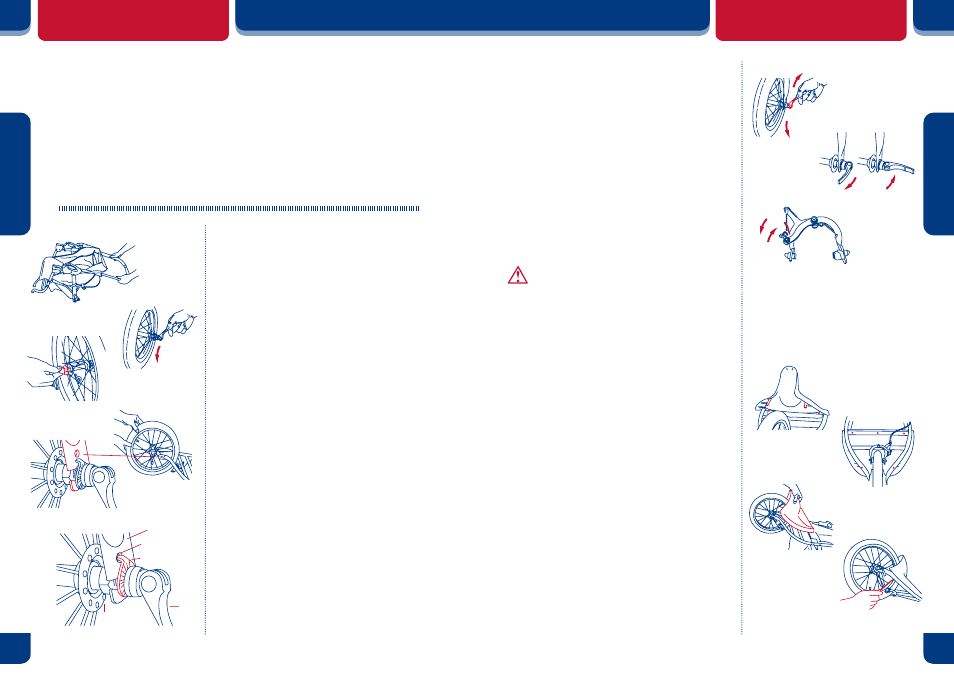
FRONT WHEEL
To attach the front wheel, unfold stroller as
described in the section following:
• Lean the stroller backwards so that it rests on
the handle and rear axle frame and the front
wheel forks are pointing upward. (Fig. 1)
• The brake release lever must be in the open
position. (Fig. 6)
• The front wheel features a quick release
attachment system. The quick release must be
open enough for the wheel to slide on the forks.
Rotate the lever forward to loosen one side
(Fig. 2a) and loosen the finger nut on the other
side. (Fig. 2b)
• Slide the front wheel onto the front forks.
(Fig. 3a) Make sure the front forks are in the
position as shown on Fig. 3b.
• Line up the tab on the Retainer Plate with the
Slot on both sides of the forks. (Fig. 3c)
3
4
Close
Open
Fig. 5
Open
Close
Fig. 6
Fig. 7a
Fig. 7b
Fig. 7c
Fig. 7d
Tighten
Loosen
Fig. 4
IMPORTANT! The tab on the Retainer Plate
must be lined up with the slot before tighten
the wheel.
• With the wheel in position, tighten the
finger nut on the axle until it is very close
to contacting the fork and rotate the lever to
tighten it as shown in Fig. 4.
• Close the lever (Fig. 5) and you should feel
significant resistance and the wheel should
be held tightly. If you do not, open the lever
and tighten the finger nut a bit more and close
the lever again. Continue to do this until the
wheel is held tightly in the fork.
DO NOT OVER TIGHTEN
.
WARNING:
Always make
sure the lever is in closed postion
before use. Leaving the lever in opened
postion can cause the wheel to fall off.
• Close the brake release lever by rotating it
toward the front of the stroller. (Fig. 6).
FENDER
To secure the fender to the frame, use the 4 screws
provided.
• Examine the bottom of the front fender. You
will notice four 1/4 inch diameter plastic
tubes protruding from the bottom (Fig. 7a).
• These tubes must be lined up with the holes in
the front frame assembly (Fig. 7b).
• Line up the front fender and press onto the
front frame assembly (Fig. 7c).
• Insert the 4 screws through the underside
of the front frame assembly into the front
fender's plastic tubes. Tighten the screws
only until snug (Fig. 7d).
NO NOT OVER-TIGHTEN
.
ASSEMBLY
Fig. 1
Fig. 3a
Fig. 3b
Fig. 2b
Loosen
Fig. 2a
Lever
Slot
Retainer Plate
Fork Plate
Ring
Fig. 3c