Setting levels, Digging in – Moog Music MF-104M Analog Delay User Manual
Page 5
8
9
SETTING LEVELS
1. Turn your amp or monitor on, then, turn its volume control
down but not off.
2. On the MF-104M, turn all controls except the
MIX and
OUTPUT LEVEL to their far left position. Turn the MIX knob to
12:00 and the
OUTPUT LEVEL to 9:00 as shown in Figure 1.
3. Press the
BYPASS switch so the BYPASS LED turns green
(
Figure 2). This means the effect is ON. If you press and hold
the
BYPASS switch, you’ll see the LED change from red to
orange or green. Orange or green indicate that the effect
is on but in different modes. For now we’ll focus on Normal.
•NORMAL MODE – Green LED
•SPILLOVER MODE – Orange LED
•
OFF – Red LED
4. While playing your instrument (or signal source) turn the
DRIVE control clockwise as in Figure 3 until the LEVEL
LED stays green with occasional orange flashes on peaks.
Note: Red indicates clipping - this is OK if you want to use the Drive
control to add some distortion.
5. Tap the
BYPASS switch until the BYPASS indicator is red.
This means the effect is
OFF (bypassed).
6. Play your instrument or source again. Then adjust the
OUTPUT LEVEL control until the overall volume with the
effect on and with the effect bypassed is the same. You may
have to switch the effect off and on a few times and make
small adjustments. Once you find the sweet spot keep those
knobs set to maximize fidelity and signal-to-noise ratio.
Since we know you are eager to start hearing what your Analog
Delay can do, let’s dig in, learn a little, and hear how the Delay
Line and LFO work together to create some amazing sounds.
If you really need some instant gratification skip to page 13
for some great setups.
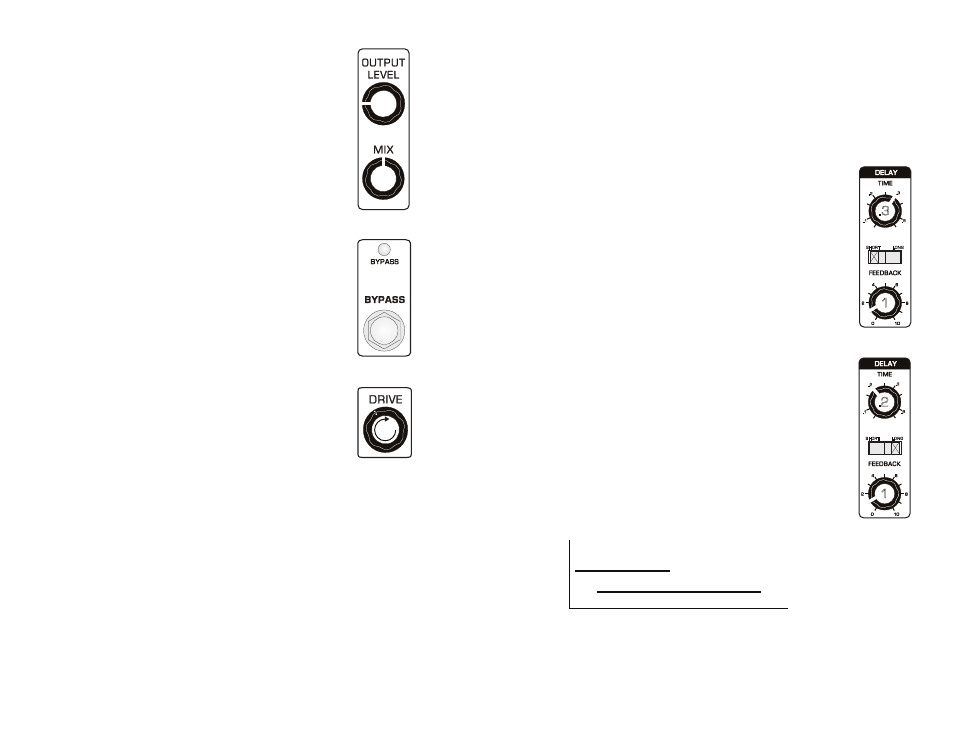
GETTING TO KNOW THE DELAY LINE
As you go through this section, adjust controls as shown in
the illustrations on the right side of the page to hear how dif-
ferent Delay Line settings affect the audio output.
Adjust the Delay Line settings as shown in
Figure 4 then
play your instrument. That’s the classic “slapback” echo.
Now increase the
FEEDBACK control to 5 and play your
instrument again. You’ll hear a fast series of decaying echoes.
As you increase the
FEEDBACK more of the delayed
signal gets sent back through the Bucket Brigade Device
which means a longer series of repeats.
Adjust the settings again as shown in
Figure 5 and start
jamming. There’s that slapback again but the delayed sound
is darker (has less treble). Now increase the
FEEDBACK to 5.
Play while listening to the echoes and you’ll really notice the
difference, even if your ears are a little cooked from a recent
overdose of decibels.
Your Analog Delay was designed with an area of overlap in
the
SHORT and LONG delay ranges, with the SHORT range
having a higher frequency response. This provides the ability
to fine tune the tonal characteristics of the delayed sound
(see
Figure 6).
FIGURE 1
FIGURE 2
FIGURE 3
DIGGING IN
As you already know by now the MF-104M has a Delay Line and a LFO.
To demonstrate how they work we’ll first check out the Delay Line with
the LFO off. Next, we’ll go over the LFO with the Delay Line at the
minimum setting. Then, we’ll put them together to create some magic.
NOTE: It only seems like magic. In actuality it’s some serious know how on the part
of Moog’s product design team.
FIGURE 4
SHORT
LONG
.2
.1
.6
.3
.3
1
FIGURE 5
SHORT
LONG
.2
.1
.6
.3
.2
1
FIGURE 6
3.0 KHz)
(
)
(
40
80
400
800 msec
1.7 KHz
SHORT
LONG