High Lifter DynoJet Jet Kit for Yamaha Warrior 350 (93-04) User Manual
Page 2
Q406.002
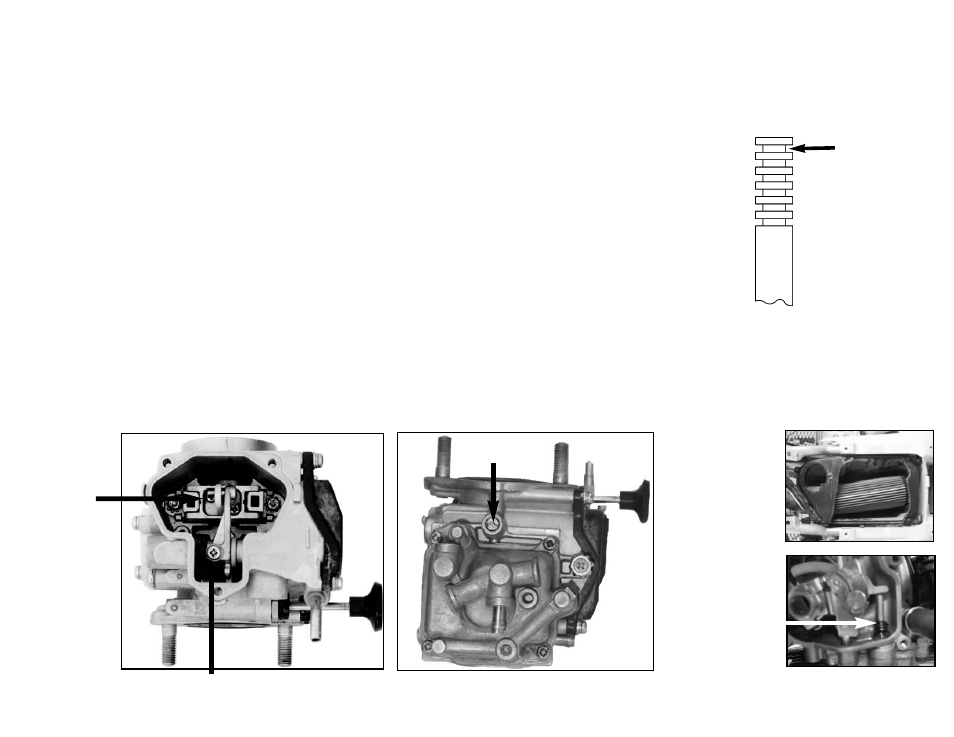
This is Groove # 1
Fig. A
Fig. B
Mixture Screw
Remove Slide
Plate Screws
Remove The
Lift Arm Screw
1. Remove top carb plate. Remove the slide lift arm screw
and the two needle plate screws. Flip the linkage forward and
remove the slide (Fig. A).
2. Install Dynojet needle on groove #4 for applications
below 5000 feet, groove #3 for above 5000 feet,
using all stock spacers.
3. Remove the stock main jet and replace with the Dynojet
main jet provided. If you are running the stock exhaust, use the
DJ134 below 3000 feet, DJ130 from 3000 to 6000 feet and
DJ126 above 6000 feet. If you are running an aftermarket
exhaust, use the DJ136 below 3000 feet, DJ132 from 3000 to
6000 feet and DJ128 above 6000 feet. Be sure that the jet you
are changing is the main jet. Discard the plastic cup that is on
the stock main jet.
4. Locate the Fuel Mixture Screw (Fig.B). Using a flat blade
screwdriver, turn the mixture screw clockwise until it seats, then
turn out 2 1/2 turns.
STAGE ONE INSTRUCTIONS
1. Remove top carb plate. Remove the slide lift arm screw and
the two needle plate screws. Flip the linkage forward and
remove the slide (Fig. A).
2. Install Dynojet needle on groove #4 for applications
below 5000 feet, groove #3 for above 5000 feet,
using all stock spacers.
3. Remove the stock main jet and replace with the Dynojet
main jet provided. If you are running the stock exhaust, use the
DJ146 below 3000 feet, DJ142 from 3000 to 6000 feet and
DJ138 above 6000 feet. If you are running an aftermarket
exhaust, use the DJ148 below 3000 feet, DJ144 from 3000 to
6000 feet and DJ140 above 6000 feet. Be sure that the jet you
are changing is the main jet. Discard the plastic cup that is on
the stock main jet.
4. Locate the Fuel Mixture Screw (Fig.B). Using a flat blade
screwdriver, turn the mixture screw clockwise until it seats,
then turn out 2 1/2 turn.
STAGE TWO INSTRUCTIONS
You must modify your airbox lid to run stage two settings.
Your airbox cover should
look like this when properly
modified. Make sure not to
cut the airfilter retainer
groove. Remove stock
snorkel.
NOTE: Make sure that your
accelerator pump is working
properly. If it is not, check the
rubber boot on the accelerator
shaft to make sure it is pushed
down below the ridge.
This boot is located under the
cover on the left hand side of
the carburetor.