Stage 2 instructions – High Lifter DynoJet Jet Kit for Yamaha Raptor 660 (01-05) User Manual
Page 2
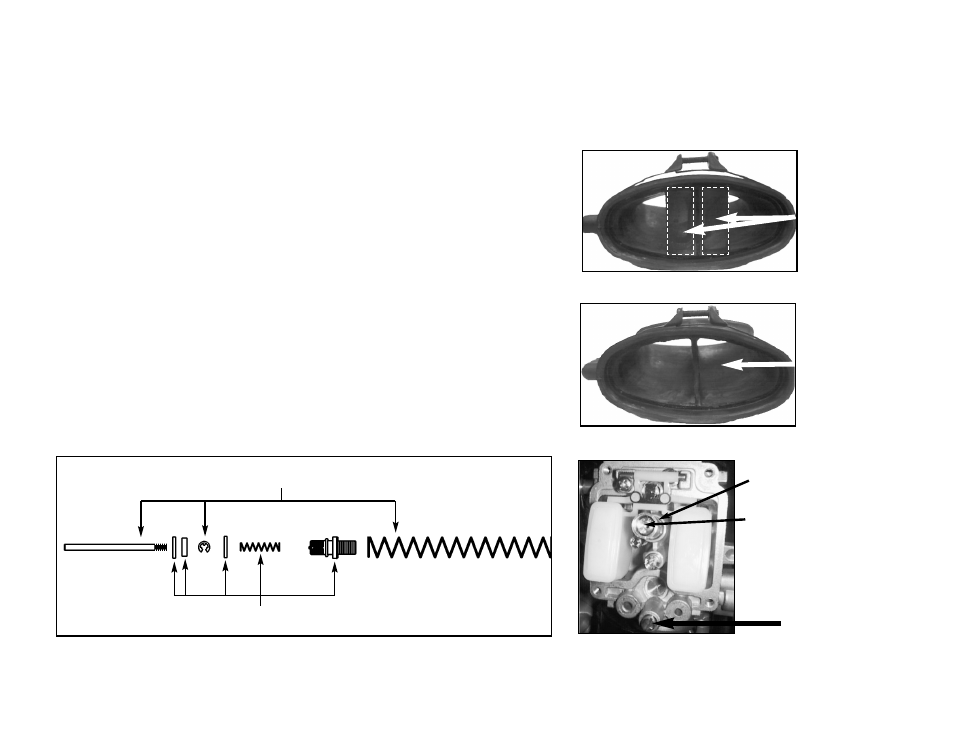
STAGE 2 INSTRUCTIONS
1. Remove the intake snorkle from the air box lid. With a sharp knife remove the two flaps shown in Fig.C.
The intake snorkle should look like Fig.D after the flaps are removed. NOTE: This step must be performed
in-order for the jet kit to function properly.
2. Remove the vacuum slides from the carbs. Remove the stock needles & spacers, noting the order of
assembly(Fig.A).
3. Install the Dynojet needles on groove #4 from the top, using all stock spacers. Install the Dynojet slide
springs (DSP026) in place of the stock slide springs . NOTE: The DSP77 springs do not have to be used,
they are supplied in case the stock springs are misplaced. After installing the slides in the carbs be sure to
check slide movement manually before air box installation.
4. Remove the stock main jets. Replace with the Dynojet main jets provided. If you are running the stock
exhaust use the DJ142 in the left carb and the DJ144 in the right carb below 3000 feet, DJ140 in the left
carb and DJ142 in the right carb from 3000 to 6000 feet and DJ138 in the left carb and DJ140 in the right
carb above 6000Feet. If you are running an aftermarket slip-on exhaust with a high flow baffle, use the
DJ144 in the left carb and the DJ146 in the right carb below 3000 feet, DJ142 in the left carb and DJ144 in
the right carb from 3000 to 6000 feet and DJ140 in the left carb and DJ142 in the right carb above 6000
feet. If you are running a full aftermarket exhaust with a high flow baffle, use the DJ146 in the left carb
and the DJ148 in the right carb below 3000 feet, DJ144 in the left carb and DJ146 in the right carb from
3000 to 6000 feet and DJ142 in the left carb and DJ144 in the right carb above 6000 feet. Be sure that
the jet you are changing is the main jet.
5. Locate the fuel mixture screws (Fig. B). Carefully turn mixture screws clockwise until seated, then back
out 3 turns.
Main Jet Location
Mixture Screw Location
Fig.B
Q414.001
Remove these flaps
from the snorkle.
The jet kit will not
work properly with
these in place.
Your snorkle should
look like this after
modification.
Fig.C
Fig.D
The cup around the main
jet must be reinstalled.
Dynojet Parts
Stock parts
Fig.A