Stage one instructions, Stage two instructions – High Lifter DynoJet Jet Kit for Honda 400 EX (99-08) User Manual
Page 2
STAGE ONE INSTRUCTIONS
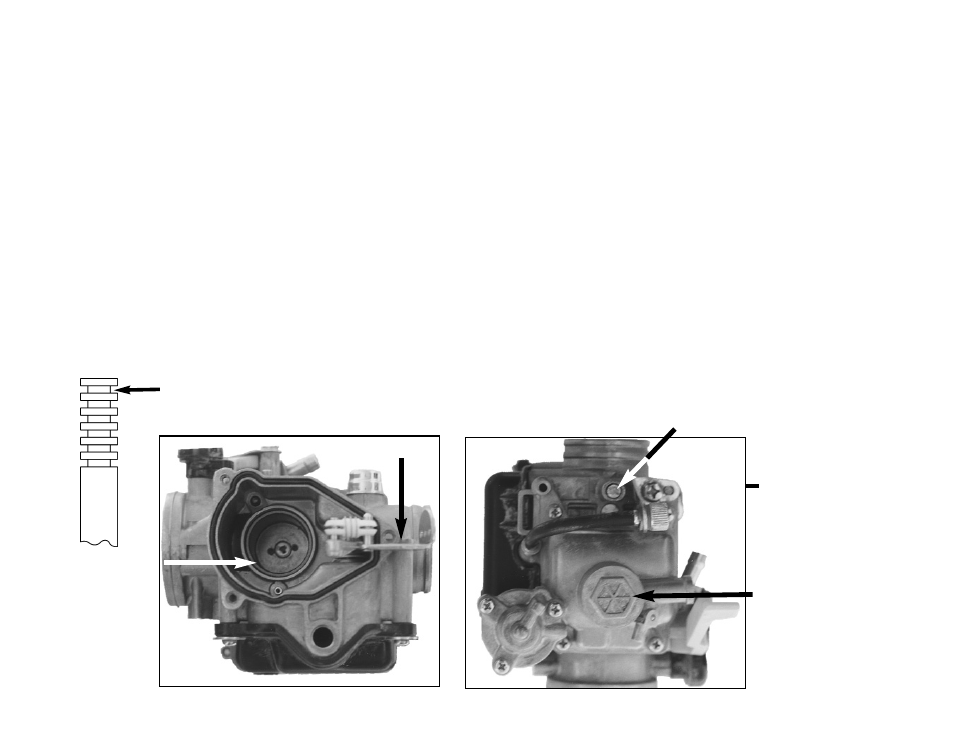
1. Remove top carb plate. Remove the slide lift arm screw and the two
needle plate screws. Flip the linkage forward and remove the slide
(Fig. A).
2. Install Dynojet needle on groove# 3 for applications below 5000 feet,
groove #2 for above 5000 feet, using all stock spacers. Install the Dynojet
washer above the E-clip.
3. Remove stock main jet. Replace with the Dynojet Main Jet Adapter
(DJA001). Screw the Dynojet main jet provided into the Main Jet Adapter.
If you are running the stock exhaust use the DJ142 below 3000 feet,
DJ138 from 3000 to 6000 feet and DJ134 above 6000 feet. If you are
running an aftermarket exhaust, use the DJ146 below 3000 feet, DJ142
from 3000 to 6000 feet and DJ138 above 6000 feet. Be sure that the jet
you are changing is the main jet.
4. Locate the Fuel Mixture Screw (Fig.B). For 2005 models ONLY use the
tool provided (DT008) to adjust the mixture screw. For 1999-2004
models, use a flat blade screwdriver. Turn the mixture screw clockwise
until it seats, then turn out 3.5 turns below 5000 feet or 3 above 5000 feet.
Q107.002
This is Groove # 1
1. Remove the airbox lid.
2. Remove top carb plate. Remove the slide lift arm screw and the two
needle plate screws. Flip the linkage forward and remove the slide
(Fig. A).
3. Install Dynojet needle on groove# 3 for applications below 5000 feet,
groove #2 for above 5000 feet, using all stock spacers. Install the Dynojet
washer above the E-clip.
4. Remove stock main jet. Replace with the Dynojet Main Jet Adapter
(DJA001). Screw the Dynojet main jet provided into the Main Jet Adapter.
If you are running the stock exhaust use the DJ165 below 3000 feet,
DJ160 from 3000 to 6000 feet and DJ155 above 6000 feet. If you are
running an aftermarket exhaust, use the DJ170 below 3000 feet, DJ165
from 3000 to 6000 feet and DJ160 above 6000 feet. Be sure that the jet
you are changing is the main jet.
5.Locate the Fuel Mixture Screw (Fig.B). For 2005 models ONLY use the
tool provided (DT008) to adjust the mixture screw. For 1999-2004
models, use a flat blade screwdriver. Turn the mixture screw clockwise
until it seats, then turn out 3.5 turns below 5000 feet or 3 above 5000 feet.
STAGE TWO INSTRUCTIONS
Fuel Mixture Screw
Remove this nut to
access the main jet.
This is a bottom
view of the
Carburetor.
Slide Lift Arm
This is the Slide
Fig.B
Fig.A