High Lifter DynoJet Jet Kit for Yamaha Wolverine 350 (94-95) User Manual
Page 2
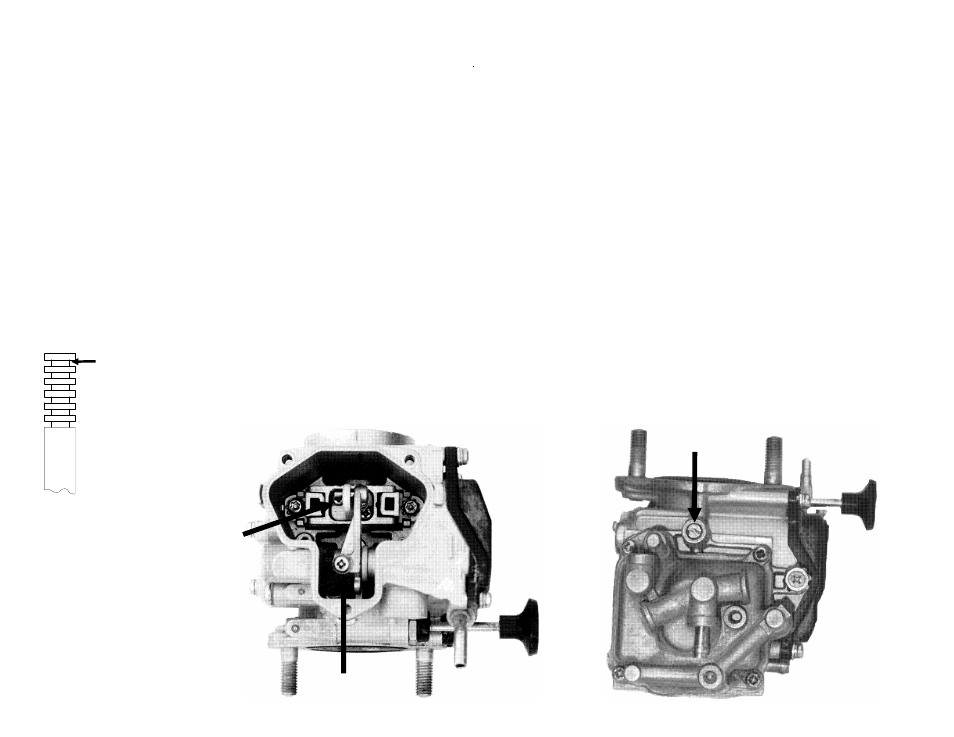
1. Remove top carb plate. Remove the slide lift arm screw and the two needle plate screws. Flip the linkage forward and remove the slide (Fig. A).
2. Install Dynojet needle on groove#3 for applications below 5000 feet, groove #2 for above 5000 feet, using all stock spacers. Install the Dynojet
washer above the E-clip.
3. Remove stock main jet and replace with Dynojet main provided. If you are running the stock exhaust use the DJ120 below 3000 feet, DJ116 from
3000 to 6000 feet and DJ112 above 6000Feet. If you are running an aftermarket exhaust, use the DJ122 below 3000 feet, DJ118 from 3000 to
6000 feet and DJ114 above 6000 feet. Be sure that the jet you are changing is the main jet.
4. Locate the Fuel Mixture Screw. Using a flat blade screwdriver, turn the mixture screw clockwise until it seats, then turn out 2 turns below 5000 feet
or 1 1/2 above 5000 feet.
STAGE ONE INSTRUCTIONS
This is Groove #1.
Q402.001
Fig.B
Fig. A
Remove slide
plate screws
Remove
screw and lift
arm
Fuel Mixture Screw
NOTE: If you have a bike with serial number 4KB-000101 ~ 002802, you must
have the carburetor update installed prior to installing this kit. Your local
Yamaha dealer will have this update on file as Bulletin MF94-004.
- Fender Kit for Honda Rubicon 500 (00-04) (2 pages)
- Looney Tuned Dual Exhaust for Kawasaki Teryx (08-10) (3 pages)
- Outlaw Clutch Kit for Suzuki Vinson 500 (02-06) (2 pages)
- Outlaw Clutch Kit for Yamaha 450 Rhino (06-09) (2 pages)
- DynoJet Jet Kit for Kawasaki Prairie 650 (2002) (2 pages)
- Lift Kit for Honda Foreman 450 (98-01) (9 pages)
- DynoJet Jet Kit for Polaris Scrambler (98-09) (2 pages)
- Outlaw Clutch Kit for Arctic Cat 550 H1 EFI 4x4 (2009) (2 pages)
- Outlaw Clutch Kit for Yamaha 700X Big Horn Crew (10-14) (2 pages)
- Outlaw Clutch Kit for Polaris 800 RZR "S, RZR "4" (10-13)" (2 pages)
- Lift Kit for Arctic Cat 1000 ATVs (8 pages)
- Dalton Pro Mudrunner Clutch Kit for Can-Am Outlander_Renegade 800 HO, 800 R (06-12) (5 pages)
- DynoJet Jet Kit for Yamaha YFZ 450 (04-05) (2 pages)
- Crushlok Wheels 12” & 14” Installation (5 pages)
- Outlaw Clutch Kit for Honda 500 Rubicon Springs Only (2 pages)
- Outlaw Super Duty Extreme Clutch Kit for Arctic Cat 650 Mud Pro H1 4x4 (10-11) (2 pages)
- Lift Kit for Kawasaki Bayou 400 2x4, 4x4 (93-99) (5 pages)
- DynoJet Jet Kit for Yamaha Rhino 660 (04-07) (2 pages)
- Lift Kit for Yamaha Grizzly 660 (02-07) (3 pages)
- Lift Kit for Yamaha Grizzly 660 (02-07) (6 pages)
- Outlaw Clutch Kit for Polaris 700 Sportmsan Non-EFI (05-06) (2 pages)
- Outlaw Clutch Kit for Arctic Cat 500i Auto (06-09) (2 pages)
- DynoJet Jet Kit for Suzuki Vinson 500 (02-07) (2 pages)
- Lift Kit for Polaris Mid-Size RANGER - Signature Series (9 pages)
- DynoJet Jet Kit for Yamaha Big Bear 400 (07-12) (2 pages)
- DynoJet Jet Kit for Can-Am Outlander 400 HO (04-08) (2 pages)
- Outlaw Clutch Kit for Honda 500 Foreman 2x4_4x4 (05-11) (2 pages)
- Outlaw Super Duty Extreme Clutch Kit for Arctic Cat 700 EFI (06-08) (2 pages)
- Outlaw Clutch Kit for Polaris 500 Sportsman HO (01-05) (2 pages)
- Outlaw Clutch Kit for Arctic Cat 500i Auto (01-05) (2 pages)
- Outlaw Super Duty Extreme Clutch Kit for Can-Am Bennche Spire 800 (10-14) (2 pages)
- Lift Kit for Polaris Ranger 700 (3 pages)
- Outlaw Clutch Kit for Polaris 800 RZR "S (2009)" (2 pages)
- Max Clearance Lower Arched Radius Bars for Arctic Cat 1000 Wildcat (6 pages)
- Outlaw Clutch Kit for Yamaha 700 Rhino (2008) (2 pages)
- DynoJet Jet Kit for Suzuki King Quad 300 (92-99) (2 pages)
- Lift Kit for Yamaha Timberwolf 250 (95-99) (4 pages)
- Radiator Relocation Kit for Polaris Rangers - Black Color Hood (19 pages)
- Lift Kit for Honda Rancher 420 SRA Only (07-13) (5 pages)
- Outlaw Clutch Kit for Arctic Cat 550 H1 Prowler EFI 4x4 (09-11) (2 pages)
- Outlaw Super Duty Extreme Clutch Kit for Polaris 800 RZR (08-09) (2 pages)
- DynoJet Jet Kit for Arctic Cat 400 2x4 (99-01) (2 pages)
- Outlaw Clutch Kit for Polaris 500 Sportsman HO Carb (06) & (08-12) Non-EBS (2 pages)
- Lift Kit for Arctic Cat 500i (02-04) (3 pages)
- DynoJet Jet Kit for Yamaha Grizzly 350 Auto IRS (07-11) (2 pages)