Installation / hooking up, Figure 2 figure 3 – Blue Ox BX4322 User Manual
Page 3
292-1190 7/96 2 of 6
INSTALLATION / HOOKING UP
Figure 1
3.
Fold the tow bar for storage. (See Unhooking /
Folding section) Check for retainer pin and receiver
tube alignment. NOTE: If adjustment is required,
the retainer pin can be adjusted by loosening the
bolts labeled "D". Be sure to tighten the bolts when
finished.
4.
DEALER OR INSTALLER: BE CERTAIN USER
RECEIVES INSTRUCTION SHEETS.
Hooking up:
1.
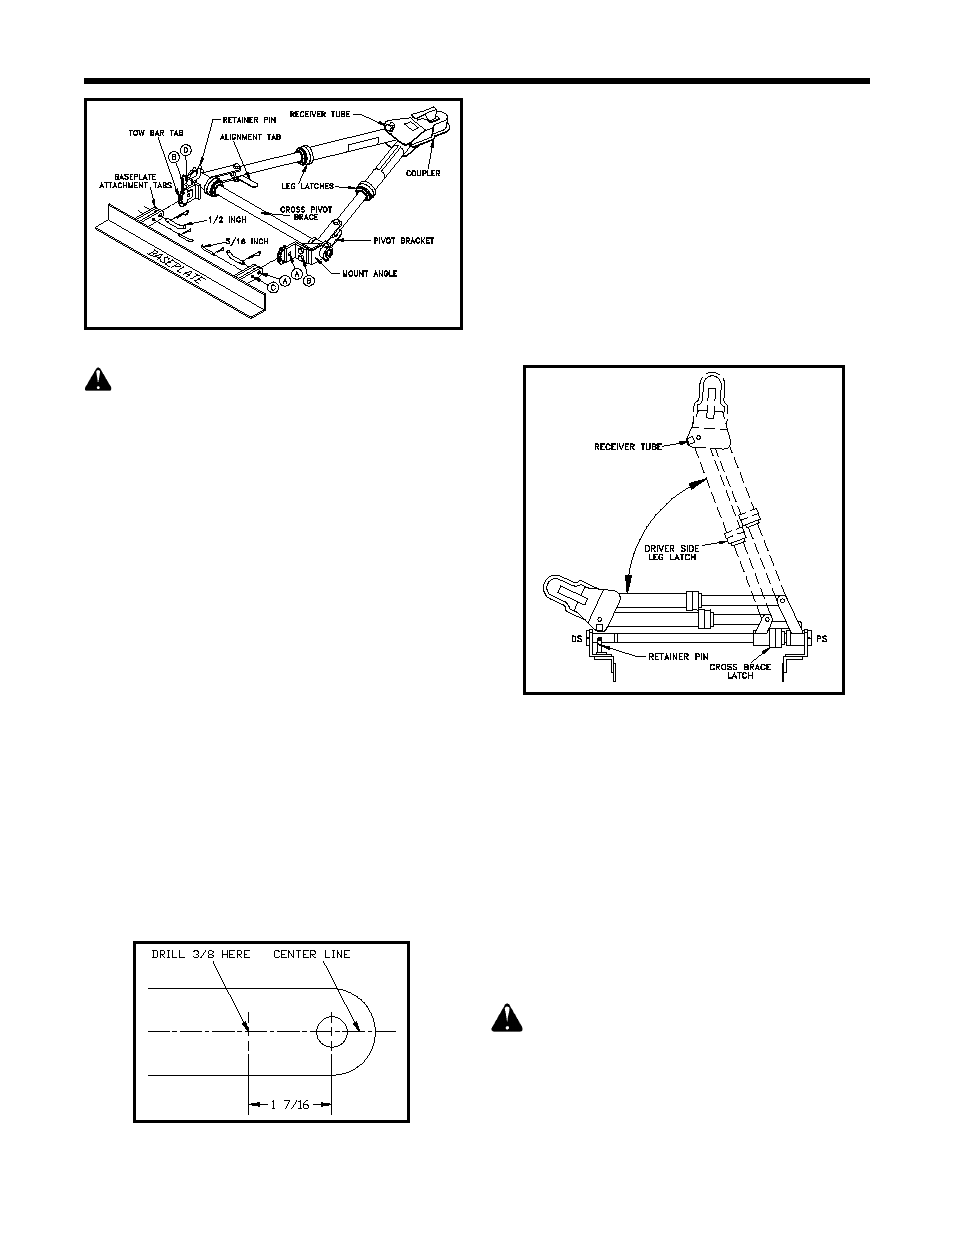
Refer to figure 1 for part names.
Engage the
towing vehicle parking brake. Position the towed
vehicle behind the towing vehicle in the approximate
towing position and engage the parking brake.
2.
Refer to figures 3 & 4.
Face the folded tow bar on
the front of the towed vehicle. Remove the hair pin
clip from the tow bar retainer pin. Swing the coupler
up and away towards the passenger side until the
driver side leg latch locks in place. (Latch is locked
when rubber seal is not exposed. Figure 5) Slide the
driver side leg towards the driver side until the cross
brace latch locks. (Figure 4)
3.
Unlock the driver and passenger side leg latches and
compress the tow bar.
NOTE: Leg latches are
unlocked by sliding the collar back to expose the
rubber seal under the collar. (Figure 5)
Attach the
coupler to the towing vehicle's 2 inch ball and lock in
place. (See Coupler Fit Adjustment On Page 1)
Caution: It is possible to extend the tow bar by
driving away with the towing vehicle. As you drive
away, the towed vehicle will wander around until,
eventually, both sides may lock. Even though they
may lock this way, we DO NOT recommend towing
any vehicle until the operator has confirmed that
the leg latches have been properly locked as
outlined in the following step.
CAUTION: As with any mechanical product, care
should be taken during installation and operation, to
prevent your fingers from being pinched.
Installation
1.
Refer to figure 1 while installing the tow bar.
Hold
the Rangefinder II in position with its tabs aligned
inside the baseplate tabs. Insert the 1/2 in. diameter
pins, provided with the baseplate, through the holes
labeled "A". Be sure to secure the pins with the
hairpin clips provided.
NOTE: If the tabs do not line up, the mount angles
on the tow bar can be adjusted by loosening the
bolts labeled "B". Be sure to tighten the bolts when
finished.
2.
Fully extend the tow bar. (See Operating Instruc-
tions) Hold the coupler parallel to the ground and
rotate the tow bar up or down until the top surfaces
of the mount angles are parallel with the coupler.
Insert the 5/16 in. diameter pins through holes
labeled "C" in the baseplate and the nearest hole in
the tow bar tab.
NOTE: On baseplates manufactured prior to 1991,
these holes "C" must be drilled. Using a 3/8 drill bit,
drill holes on the center line of the baseplate tabs, 1
7/16 inches from the center of the existing hole.
(Figure 2) Be sure to secure the pins with the hairpin
clips provided.
Figure 2
Figure 3