Weed Eater WELRVBA30 User Manual
Page 22
22
TO LEVEL MOWER HOUSING
Adjust the mower while riding mower is
parked on level ground or driveway. Ensure
tires are properly inflated. If tires are over or
underinflated, you will not properly adjust
your mower.
SIDE-TO-SIDE ADJUSTMENT
• Raise mower to its highest position.
• Measure dis
tance "A" from bot tom edge
of mower to ground level at front corners
of mower.
A
A
Bottom Edge of
Mower to Ground
Bottom Edge of
Mower to Ground
• To raise the right side of the mower, tighten
lift link adjustment nut.
• To lower the right side of the mower, loosen
lift link adjustment nut.
NOTE: Each full turn of adjustment nut will
change mower height about 3/16".
• Recheck measurements after ad just ing.
F
F
FRONT-TO-BACK ADJUSTMENT
IMPORTANT: Deck must be level side-to
side.
To obtain the best cutting results, the mower
housing should be adjusted so that the front
is approximately 1/8" to 1/2" lower than the
rear when the mower is in its highest position.
Check adjustment on right side of riding
mower. Measure dis tance “F” directly in front
and behind the mandrel at bottom edge of
mower housing as shown.
Nut
"G"
Nut
"H"
Trunnion
• To lower front of mower housing turn nuts
“G” and “H” clockwise.
• When distance “F” is 1/8" to 1/2" lower
at front than rear, tighten nut “H” against
trunnion on front link.
• To raise front of mower housing turn nuts
“G” and “H” counter clockwise.
• When distance “F” is 1/8" to 1/2" lower
at front than rear, tighten nut “H” against
trun nion on front link.
NOTE: Each full turn of "G" will change "F"
by approximately about 3/8".
• Recheck side-to-side adjustment.
Turn nut right
to lower mower
Turn nut left
to raise mower
Adjustment Nut
35
NOTA: Ahora puede sacar la cortadora de césped
de la tarima. Observe las siguientes instrucciones
ap ro pi adas para retirar la cortadora de césped
de la tarima.
ADVERTENCIA: Antes de empezar, lea,
en tien da y siga todas las in struc ciones de la
sección de Operación de este manual. Asegúrese
de que la cortadora de césped esté en un área
bien ventilada. Asegúrese de que el área de
enfrente de la cortadora de césped esté libre de
gente y objetos.
PARA SACAR LA CORTADORA DE CÉS-
PED DE LA TARIMA (Consulte la sección
de Op er a ción para ver la ubicación y
función de los con troles)
1. Eleve la palanca del elevador de la plataforma
hasta su posición máxima.
2. Suelte el freno de estacionamiento al liberar
el ped al del embrague/freno.
3. Cambie unidad a la posición de neutro.
4. Saque la cortadora de césped de la tarima.
PARA AJUSTAR EL ASIENTO
DEL FRENTE HACIA ATRÁS -
1. Siéntese en el asiento.
2. Levante la palanca de ajuste y deslice el
asiento hasta que logre una posición cómo-
da, lo que le permitirá presionar el pedal del
embrague/freno hasta el fondo.
3. Libere la palanca para bloquear el asiento en
su posición.
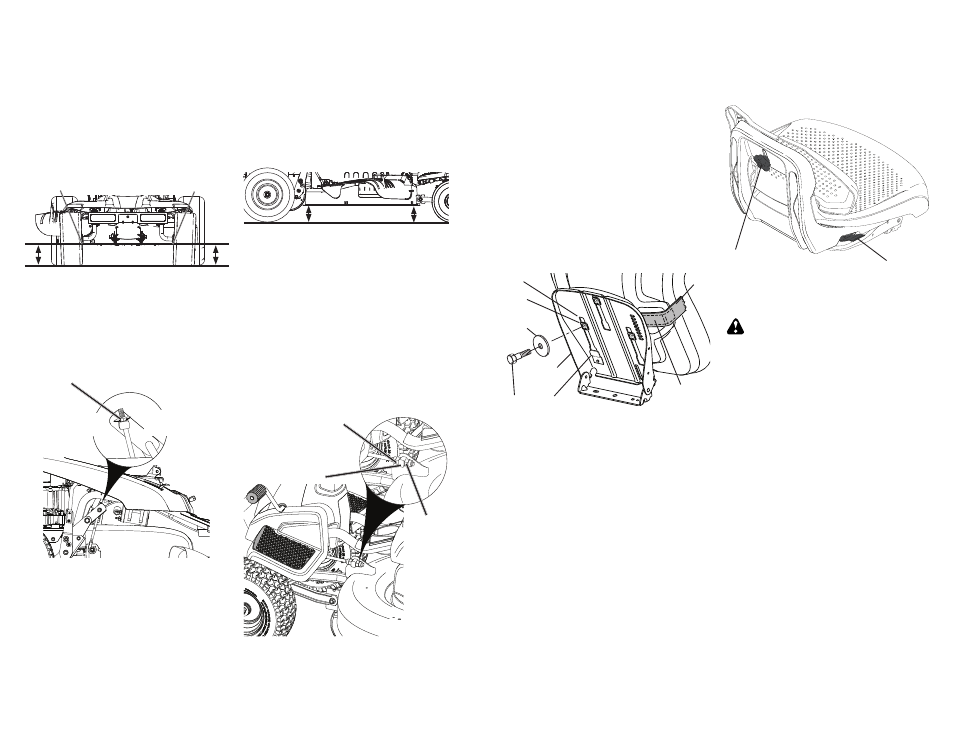
PARA INSTALACIÓN DEL ASIENTO
1. Retire el perno y la arandela plana asegurando
el asiento en el empaque de cartón y póngalo
aparte para ensamblar el asiento a la cortadora
de césped. Retire el empaque de cartón y
deséchelo.
2. Coloque el asiento en la tabla del asiento
de manera que las tres (3) almohadillas de
la parte inferior estén colocadas sobre los
orificios ranurados grandes de la tabla.
3. Presione hacia abajo el asiento para colocar
las almohadillas en las ranuras y jale el asiento
hacia la parte posterior de la cortadora de
césped.
4. Levante el asiento y apriete bien el perno y
la arandela plana.
5. Retire la cinta y deséchela.
6. Baje el asiento a la posición de operación
siéntese sobre él. Presione el pedal de em-
brague/freno completamente hasta abajo. Si
la posición de operación no es cómoda, ajuste
el asiento.
Palanca de
ajuste
Perno
Arandela
plana
Base del
Asiento
Cojín
Cinta
Ranurado
Lengüeta
SOPORTE LUMBAR -
• Afloje la perilla de ajuste lumbar.
• Deslice el respaldo del asiento hacia arriba o
hacia abajo a la posición más cómoda para
bajar el soporte de la espalda.
• Apriete la perilla de ajuste lumbar.
Palanca de ajuste
Perilla de ajuste
lumbar