Weed Eater WELRVBA30 User Manual
Page 14
14
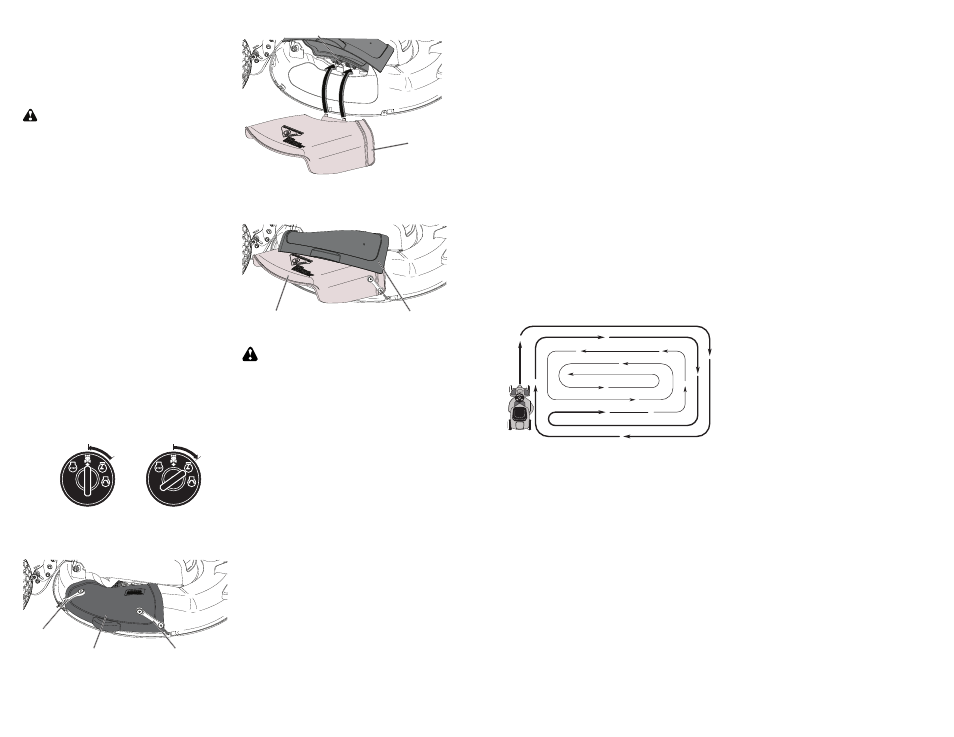
TO ATTACH DEFLECTOR
1. Unhook the 2 bungees from deck to the
mulch cover.
REVERSE OPERATION SYSTEM (ROS)
Your riding mower is equipped with a Reverse
Operation System (ROS). Any attempt by
the operator to travel in the reverse direc-
tion with the deck clutch engaged will shut
off the engine unless ignition key is placed
in the ROS "ON" position.
WARNING: Backing up with the deck
clutch engaged while mowing is strongly
discouraged. Turning the ROS "ON", to al-
low reverse operation with the deck clutch
engaged, should only be done when the
operator decides it is necessary to reposition
the machine with the attachment engaged.
Do not mow in reverse unless absolutely
necessary.
USING THE REVERSE OPERATION
SYSTEM -
Only use if you are certain no children or
other bystanders will enter the mowing
area.
1. Move motion control lever to neutral (N)
position.
2. With engine running, turn ignition key
counterclockwise to ROS "ON" position.
3. Look down and behind before and while
backing.
4. Slowly move motion control lever to
reverse (R) po si tion to start movement.
5. When use of the ROS is no longer
needed, turn the ignition key clockwise
to engine "ON" position.
ROS "ON" Position
Engine "ON" Position
(Normal Operating)
Mulch Cover
Bungee
Bungee
Mulch Cover
Deflector Shield
2. Lift the mulch cover.
3. Attach the deflector to the hinge bracket.
4. Rest the mulch cover on the deflector.
5. Attach the 1 bungee from the deflector
to the deck.
Deflector
Shield
Hinge Bracket
TO TRANSPORT
When pushing or towing your riding mower,
be sure to disengage transmission by placing
shifter in neutral.
• Raise mower height adjustment to its high-
est position with mower height adjustment
lever.
• To reengage transmission, press brake
and shift out of neutral.
TO OPERATE ON HILLS
WARNING: Do not drive up or down
hills with slopes great er than 15° and do not
drive across any slope. Use the slope guide
at the back of this manual.
• Choose the slowest speed before starting
up or down hills.
• Avoid stopping or changing speed on
hills.
• If stopping is absolutely necessary, push
clutch/brake pedal quickly to brake posi-
tion and engage parking brake.
• Move motion control lever to neutral (N)
position.
• To restart movement, slowly re lease
parking brake and clutch/brake pedal.
• Make all turns slowly.
43
CONSEJOS PARA CORTAR EL CÉSPED
• La cortadora de césped debe estar bien
nivelada para que su desempeño sea el
mejor. Consulte la parte de “NIVELACIÓN
DE LA CARCASA DE LA CORTADORA DE
CÉSPED” en la sección de Servicio y Ajustes
de este manual.
• El lado izquierdo de la cortadora de césped
se debe usar para po dar.
• Conduzca de manera que los recortes de des-
carguen sobre el área que ya se ha cortado.
El área de corte debe estar del lado derecho
de la cortadora de césped. Esto creará una
dis tri bu ción más uniforme de los recortes y
un corte más uniforme.
• Cuando corte áreas grandes, comience
girando hacia la derecha, de modo que los
recortes se descarguen lejos de los arbustos,
bardas, caminos, etc. Después de una o dos
vueltas, corte en la dirección opuesta, dando
vueltas hacia la izquierda hasta que termine.
• Si el césped está demasiado alto, se deberá
cortar dos veces para reducir la carga y la
posibilidad de un peligro de incendio por los
recor tes secos. Haga el primer corte relativa-
mente alto; el segundo deberá ser a la altura
deseada.
• No corte el césped cuando esté húmedo. El
césped húmedo taponará la cortadora de
césped y dejará matas indeseables. Permita
que el césped se seque antes de podarlo.
• Reg
u le la velocidad terrestre al se lecc ionar un
avance lo suficientemente lento para ajustar
el des empeño de co rt e de la cortadora de
césped así como la calidad del corte deseada.
• Cuando utilice accesorios, se leccione una
velocidad terrestre que se adapte al terreno
y obtenga el mejor desempeño del ac ceso rio
que esté usando.
ARRANQUE CON TIEMPO FRÍO
(50° F/10°C Y MENOS)
• Al hacer arrancar el motor, mantenga el
control de la aceleración a la posición de es-
trangulación hasta que el motor se caliente y
empieze funcionar mal. Una vez que empieze
a funcionar mal, mueva inmediatamente el
control de la aceleración a la posición rápida.
El calentamiento del motor puede tomar a
partir de varios segundos a varios minutos
(cuanto más fría es la temperatura, más largo
es el calentamiento).