86038510pg4-1, Maintenance, Warning – Windsor Wave WAV 10125050 User Manual
Page 11
MAINTENANCE
WAV 86038510 05/15/07
4-1
NOTE: T
HE FOLLOWING SERVICE ITEMS SHOULD BE PERFORMED BY
AN AUTHORIZED SERVICE FACILITY OR AUTHORIZED SERVICE
PERSONNEL
. A
LL PARTS REFERRED TO IN THESE INSTRUCTIONS CAN
BE IDENTIFIED BY USING THE PARTS LISTS AND ILLUSTRATIONS ON THE
FOLLOWING PAGES
.
REMOVE MACHINE POWER CORD FROM ELECTRICAL
SOURCE BEFORE MAKING ANY REPAIRS OR
ADJUSTMENTS TO THE MACHINE.
TO ACCESS BELT/BRUSH MOTOR
1. Place machine in the upright storage position.
2. Remove (3) screws holding belt cover to chassis.
3. Loosen brush motor and roll belt off brush pulley.
4. Remove (5) screws holding brush housing to
chassis- (3) Located on front of housing,
(2) Located rear of housing.
5. Remove (2) screws from each end of brush housing
and remove brush assembly.
6. Inspect/replace brush and bearings as required. The
brush is equipped with a yellow wear indicator
bristles. The brush should be replaced when it wears
down to the height of the yellow bristles.
7. When installing belt push down on motor for proper
tension.
8. When reinstalling brush, check belt for proper
tension.
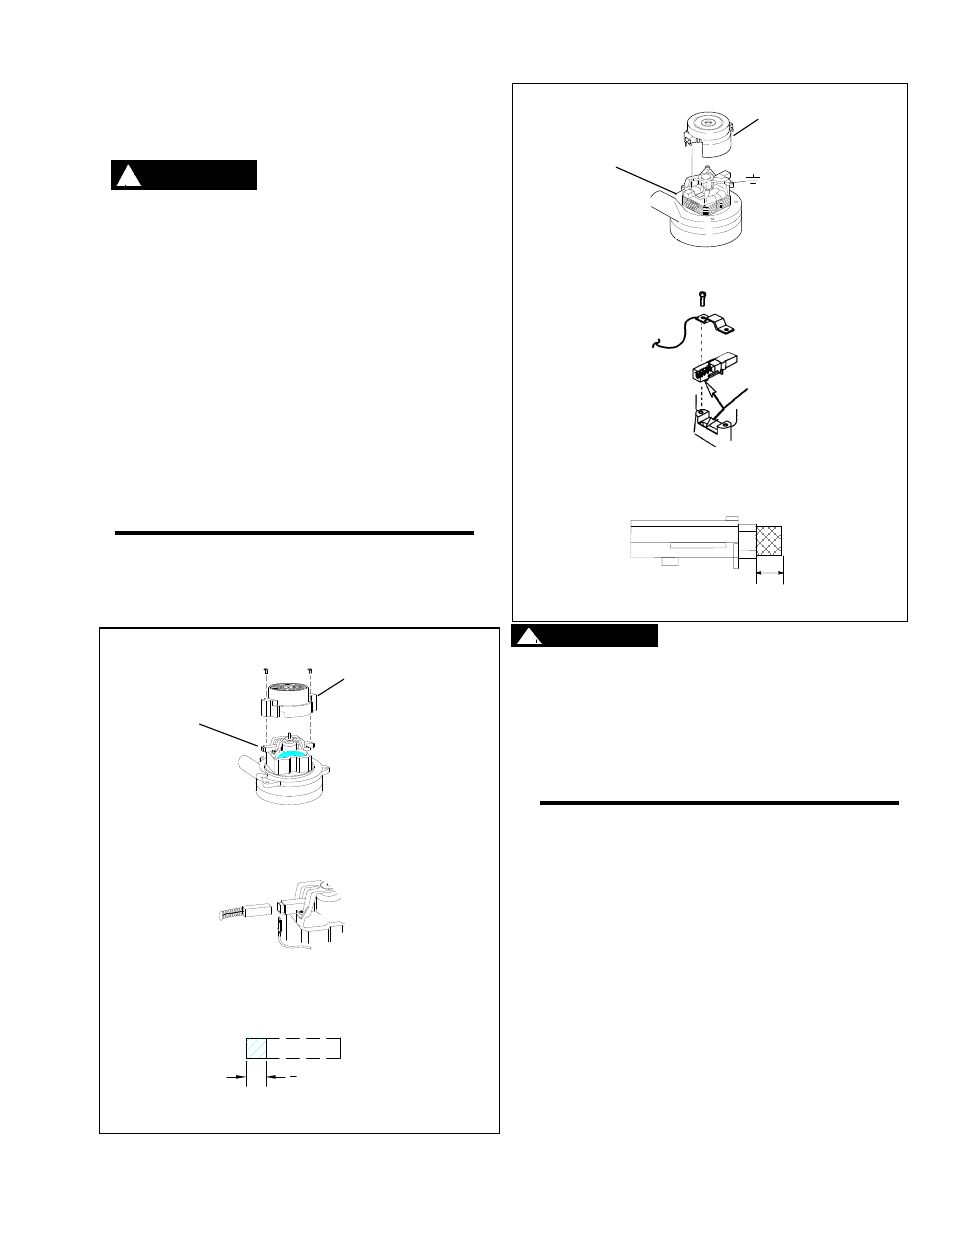
TO ACCESS AND REMOVE VAC MOTOR
AND FILTERS
.
1. Open lid cover.
2. Remove (2) screws from each/both vac motor
brackets.
THE GREEN GROUND WIRE MUST ATTACH THE MOTOR TO
THE POWER CORD FOR SAFE OPERATION. SEE THE
WIRING DIAGRAM.
NOTE: WHEN REPLACING ELECTRICAL COMPONENT
PARTS REFER TO WIRING DIAGRAM FOR PROPER
CONNECTION.
NOTE: THE VAC MOTOR IS PROTECTED BY A CIRCUIT
BREAKER LOCATED IN THE SWITCH PANEL. THE BREAKER
WILL ONLY TRIP UNDER CONDITIONS OF ABUSE.
BRUSH MOTOR
1.
Access belt and brush as described above.
2. Disconnect spring holding frame to brush motor
housing.
3.
Remove (4) bolts holding motor housing to the
chassis and lift out motor asm.
4.
Remove brush motor pulley and (2) bolts holding
motor to bracket, lift out brush motor.
CARBON BRUSH
1. Access belt and brush as described above.
2. Remove brush caps. NOTE: BRUSHES SHOULD BE
REPLACED WHEN WORN TO 3/8” OR LESS.
NOTE: BEFORE REINSTALLING BRUSH MOTOR BRACKET
ASSEMBLY IT’S RECOMMENDED THAT THE REAR SPRING
BE RECONNECTED TO THE FLAPPER ASSEMBLY.
NOTE: PART NO. 86001250 – PRV NO. 140212 IF YOU HAVE
A MOTOR MARKED “LEESON.” PART NO. 86135360 – PRV
NO. 14340 IF YOU HAVE A MOTOR MARKED “86247470 – PRV
NO. 53617.”
!
WARNING
!
W A R N I N G
Vacuum Motor Carbon Brushes Replacement (Windsor)
End Cap
Carbon
Brushes
If armature commutator is grooved, extremely pitted or not
concentric, the motor will need to be replaced or sent to a qualified
service center.
Important:
These brushes wear quicker as the length shortens due to
increased heat. Spring inside brush housing will damage motor if
brushes are allowed to wear away completely.
Periodically check the length of the carbon brushes. Replace both
carbon brushes when either is less than 3/8" (9.5mm) long.
3
8
[9.5mm]
Vacuum Motor Carbon Brushes Replacement (Ametek)
End Cap
Carbon
Brushes
If armature commutator is grooved, extremely pitted or not
concentric, the motor will need to be replaced or sent to a qualified
service center.
Note:
Place
stop in
groove.
Important:
These brushes wear quicker as the length shortens due to
increased heat. Spring inside brush housing will damage motor if
brushes are allowed to wear away completely.
Periodically check the length of the carbon brushes. Replace both
carbon brushes when either is less than 3/8" (9.5mm) long.
3/8 (9.5mm)