Assembly instructions, A membrane switch – Tanita BC-41 User Manual
Page 5
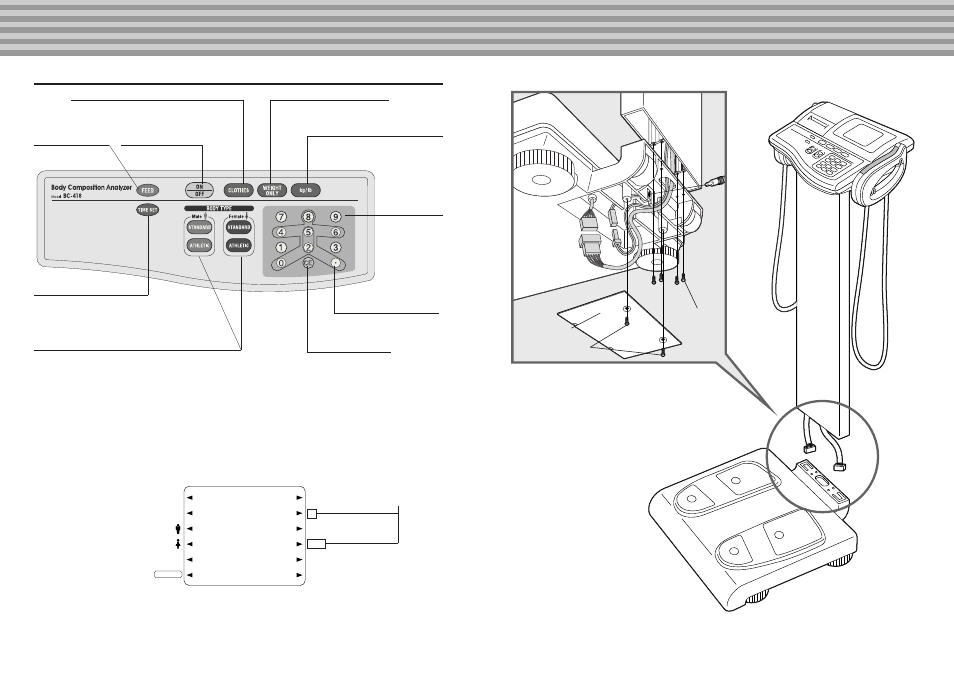
a Membrane Switch
R
R
L
L
%Body Fat Range : 1%~75%
%Body Fat Increments : 0.1%
Max 200kg / 440lb
e=d= 0.1kg / 0.2lb
Min 2kg / 4lb
T= -200kg /-440lb
Operation Temperature Range 0 / +35 C
Feed Key
Advances the print paper.
ON/OFF Key
Turns the power on or off.
Clothes Weight Setting Key
Sets the clothes weight.
Even if the user is dressed, weight minus the weight of
clothes can be measured.
(Body Composition Analysis mode)
Weight Only Key
Measures body weight only.
kg/lb Key
Measures changing kg/lb only.
Not available on analyzers with “kg only”
specifications
CE Key
Clears entries.
Body part data display keys
Used to display the measurement
results for the right arm, left arm,
right leg, left leg and trunk
Body Type Keys
To select the appropriate body type
Tanita defines “athlete” as a person involved in intense physical activity of at least 10
hours per week and who has a resting heart rate of approximately 60 beats per minute
or less. Tanita’s athlete definition includes “lifetime of fitness” individuals who have
been fit for years but currently exercise less than 10 hours per week.
Tanita’s athlete definition does not include “enthusiastic beginners” who are making a
real commitment to exercising at least 10 hours per week but whose bodies have not yet
changed to require the Athlete mode.
Please see Technical Notes booklet for further explanation.
Numerical Keys
Inputs numerical values.
Time Set Key
Sets the date and time.
CLOTHES
ATHLETIC
MALE
WEIGHT
FEMALE
STEP ON
kg
cm
ft.in
AGE
% FAT
lb
Digital display
These marks are not present
on models having no display
switch key.
2.Assembly Instructions
Bottom Cover
Column
Attachment
Screws
Bottom Cover
Attachment Screws
ቢRemove the Bottom Cover.
ባInsert the two cables from the column into the holes on
the Weighing Platform.
ቤTighten the four Column Attachment Screws and attach
the column to the Weighing Platform.
ብConnect the two cables from the column to the Weighing
Platform as shown in the illustration and replace the
Bottom Cover using the two Bottom
Cover Attachment Screws. When
replacing the Bottom Cover, please
place the cables in the right position
so that they will not get caught
between the cover and the Weighing
Platform. This may damage the
cables.
a How to Attach the Column to the Weighting Platform