Orion SKYQUEST XT10 CLASSIC User Manual
Page 5
5
Once in the cradle, the tube should pivot freely up and
down with gentle hand pressure. Note that the tube will
not yet be properly balanced, since the eyepiece and EZ
Finder II are not in place, and the CorrecTension system
has not been installed.
9. The rubber bumper (L) provides a convenient “stop” for the
telescope’s altitude motion; it prevents the telescope mir-
ror cell from being knocked against the hard surface of the
base’s front brace. Remove the backing from the rubber
bumper and position the bumper so it is positioned in the
spot where the optical tube (mirror cell) contacts the front
base as shown in Figure 4a and 4b. Press firmly so the
adhesive holds the bumper securely in place.
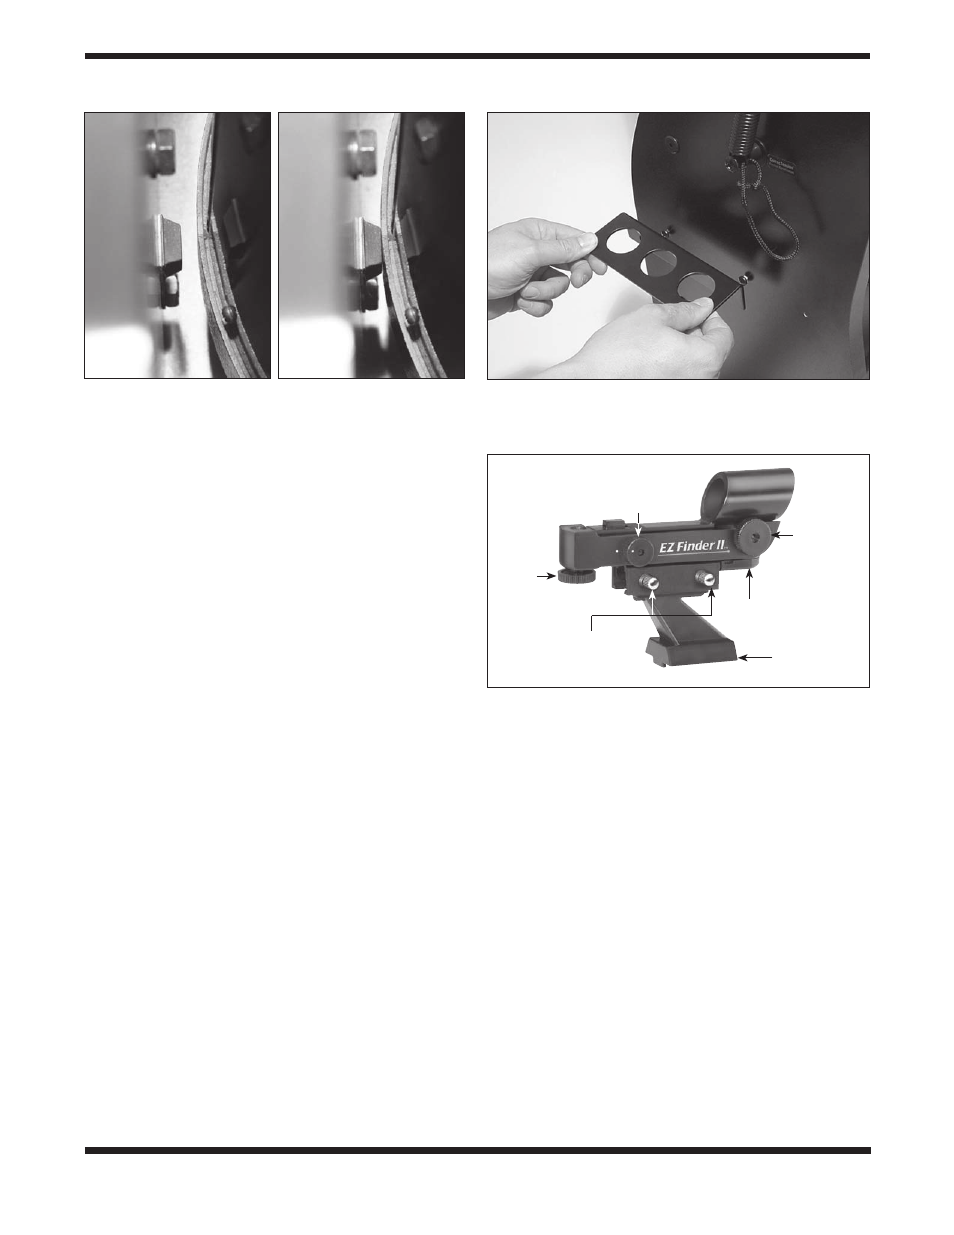
installing the optional Eyepiece rack
The aluminum eyepiece rack is an optional accessory for
SkyQuest Dobsonians. On the XT6 it holds three 1.25" eye-
pieces in a convenient place on the base; on the XT8 and
XT10 it holds three 1.25" eyepieces and one 2" eyepiece.
These eyepieces will be within easy reach while you’re
observing. About halfway down the left side panel of the base
you will notice two predrilled starter holes, about 6" apart.
Take the black wood screws and thread them into the starter
holes with a Phillips screwdriver. Then you can “keyhole” the
eyepiece rack onto the wood screws and continue tightening
the screws (Figure 5). If you want to be able to remove the
rack, do not tighten the screws too tightly. Be certain that the
screws are loose enough that you can lift the rack and remove
it from the screws through the larger part of the keyhole. If
you want to have the rack permanently attached, thread the
screws tightly.
installing the EZ Finder ii
Using the included dovetail mounting bracket, the EZ Finder
II will slip neatly into the dovetail base preinstalled on your
SkyQuest optical tube. To attach the dovetail mounting bracket
to the EZ Finder II, loosen the two thumbscrews on the bottom
rail of the EZ Finder II. Slide the EZ Finder II onto the bracket
and tighten the two thumbscrews (See Figure 6). Then simply
slide the dovetail mounting bracket into the telescope’s dove-
tail mounting base and tighten the thumbscrew on the base to
secure the mounting bracket.
operation
The EZ Finder II works by projecting a tiny red dot (it’s not a
laser beam) onto a lens mounted in the front of the unit. When
you look through the EZ Finder II, the red dot will appear to
float in space, helping you locate even the faintest of deep
space objects. The red dot is produced by a light-emitting
diode (LED) near the rear of the sight. A 3-volt lithium battery
provides the power for the diode.
Turn the power knob (see Figure 6) clockwise until you hear
the “click” indicating that power has been turned on. Look
through the back of the reflex sight with both eyes open to
see the red dot. Position your eye at a comfortable distance
from the back of the sight. In daylight you may need to cover
the front of the sight with your hand to be able to see the
dot, which is purposefully quite dim. The intensity of the dot
is adjusted by turning the power knob. For best results when
stargazing, use the dimmest possible setting that allows you
to see the dot without difficulty. Typically a dimmer setting is
Figure 4.
Position the tube on the mount pointed vertical. Place
the rubber bumper “stop” where the mirror cell contacts the front
base to cushion the impact.
a.
b.
Figure 5.
Using the two supplied screws, install the optional
aluminum eyepiece rack in the predrilled holes about halfway down
the left side panel of the base. (XT6 eyepiece rack shown)
Figure 6.
The EZ Finder II
Power
knob
Altitude
adjustment
knob
Thumbscrews
Dovetail
mounting
bracket
Battery
casing
Azimuth
adjustment
knob