Oregon Scientific Mirror Weather Station MR238 User Manual
Page 6
EN
6
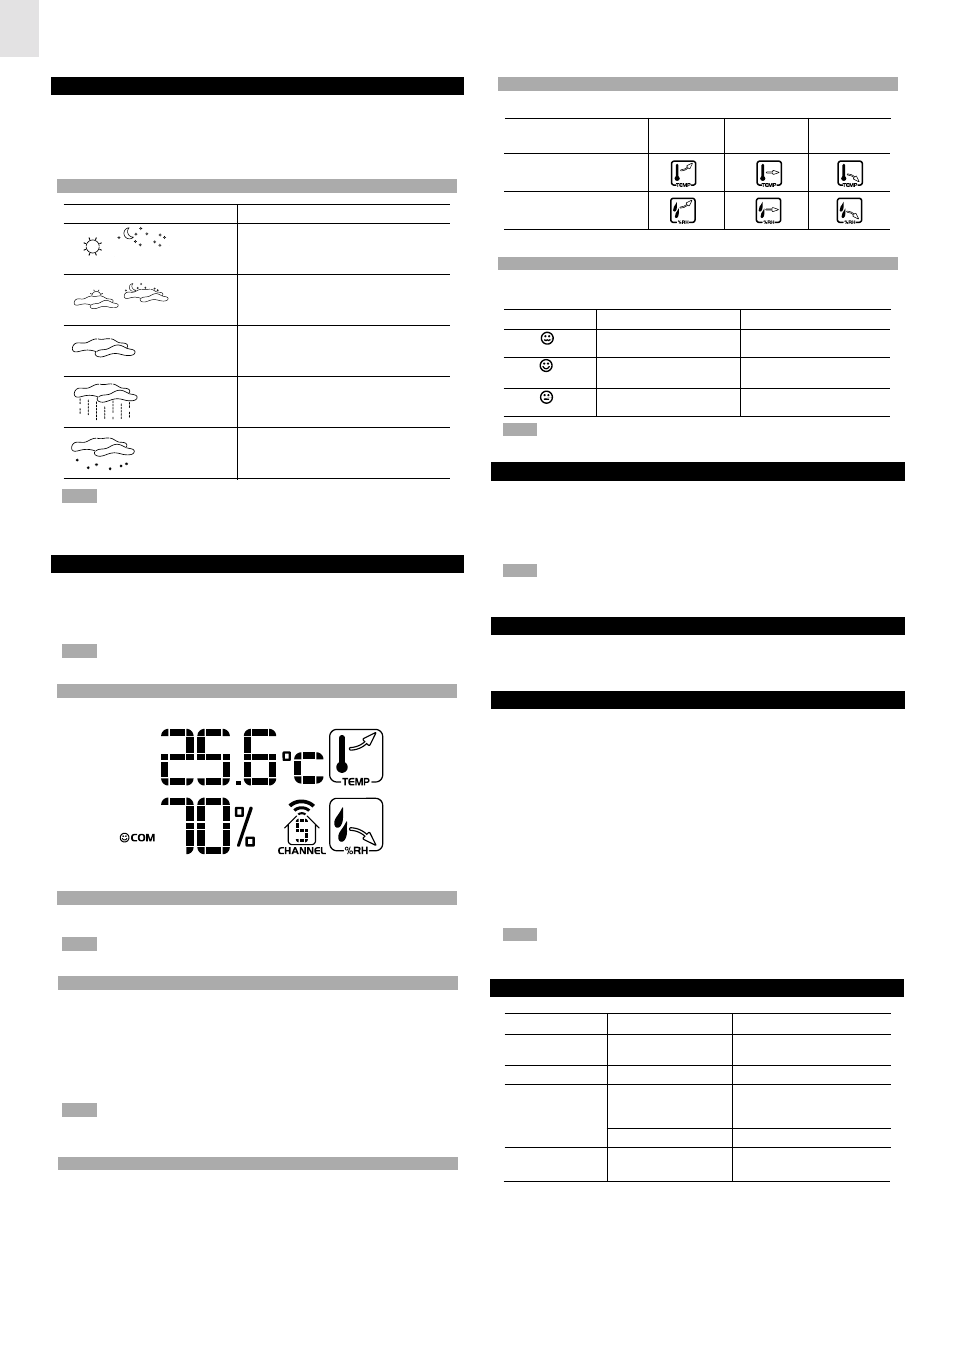
TEMPERATURE AND HUMIDITY TREND LINES
The trend lines are shown next to the temperature and humidity readings.
COMFORT ZONE
The Comfort Zone indicates how comfortable the climate is, based on current
temperature and humidity measurements.
NOTE This information is shown just beside the humidity reading.
RESET SYSTEM
The RESET button is located at the back of the unit.
Press RESET whenever performance is not behaving as expected, (for example,
unable to establish radio frequency link with remote unit or radio-controlled
clock).
NOTE When you press RESET, all settings will return to the default settings so
you will lose all stored information.
SAFTY AND CARE
Clean the product with a slightly damp cloth and alcohol-free, mild detergent.
Avoid dropping the product or placing it in a high-traffic location.
WARNINGS
This product is designed to give you years of service if handled properly. Oregon
Scientific will not be responsible for any deviations in the usage of the device from
those specified in the user instructions or any unapproved alterations or repairs
of the product.
Please observe the following guidelines:
•
Never immerse the product in water. (This can cause electrical shock and
damage the product).
•
Do not subject the main unit to extreme force, shock, or fluctuations in
temperature or humidity.
•
Do not tamper with the internal components.
•
Do not mix new and old batteries or batteries of different types.
•
Do not use rechargeable batteries with this product.
•
Remove the batteries if storing this product for a long period of time.
•
Do not scratch the display.
NOTE The technical specification of this product and contents of this user guide
are subject to change without notice. Also images not drawn to scale.
TROUBLESHOOTING
WEATHER FORECAST
This product forecasts the next 12 to 24 hours of weather within a 30-50 km (19-
31 mile) radius. The forecast is based on barometric pressure trend readings.
The top area shows an animated icon indicating the forecasted weather.
WEATHER FORECAST ICONS
NOTE The nighttime icon displays from 6 PM to 6 AM. When the Channel 1
sensor records a temperature of 2
°
C (35.6
°
F) or lower, the Rainy icon becomes
Snowy.
TEMPERATURE AND HUMIDITY
The weather station can display the following information:
•
Current, minimum and maximum temperatures and relative humidity
percentages.
•
Comfort level indicator and trend line (rising, falling, or steady).
NOTE Data is collected and displayed approximately every 60 seconds.
VIEW TEMPERATURE AND HUMIDITY AREA
Temperature data is given at the top; humidity is below.
SELECT MEASUREMENT UNIT
Press the
°
C /
°
F button to the desired setting.
NOTE The button is located at the back of the unit.
SELECT SENSOR CHANNEL
Press CHANNEL to switch between sensors 1-5. (The house icon shows the
selected remote sensor).
To auto-scan between sensors, press and hold CHANNEL for 2 seconds. (Each
sensor’s data will be displayed for 3 seconds).
To end auto-scan, press CHANNEL or MEMORY.
NOTE If you select a sensor that collects only temperature data, the humidity will
not be shown.
MINIMUM / MAXIMUM RECORDS
Press MEMORY repeatedly to view current, maximum and minimum records for
the selected sensor.
To clear the records, press and hold MEMORY for 2 seconds. A beep will sound
to confirm that the memory has been cleared.
ICON
DESCRIPTION
Clear
Day / Night
Partly cloudy
Day / Night
Cloudy
Rainy
Snowy
TREND
RISING
STEADY
FALLING
TEMPERATURE
HUMIDITY
ZONE
TEMPERATURE
HUMIDITY
WET
Any
>70%
COM
20-25
°
C
40-70%
(68-77
°
F)
DRY
Any
<40%
PROBLEM
SYMPTOM
REMEDY
Calendar
Strange date /
Change language
month
Clock
Cannot adjust clock
Disable radio-controlled clock
Temp
Cannot auto-synch
1.Press RESET
2.Manually activate
radio-controlled clock
Shows "LLL" or "HHH"
Temperature is out-of-range
Remote
Cannot locate
Check batteries
sensor
remote sensor