Pg. 9 . . operating instructions, Operating instructions – Napoleon Fireplaces OS10-3 User Manual
Page 9
OPERATING INSTRUCTIONS
Understanding your oil stove
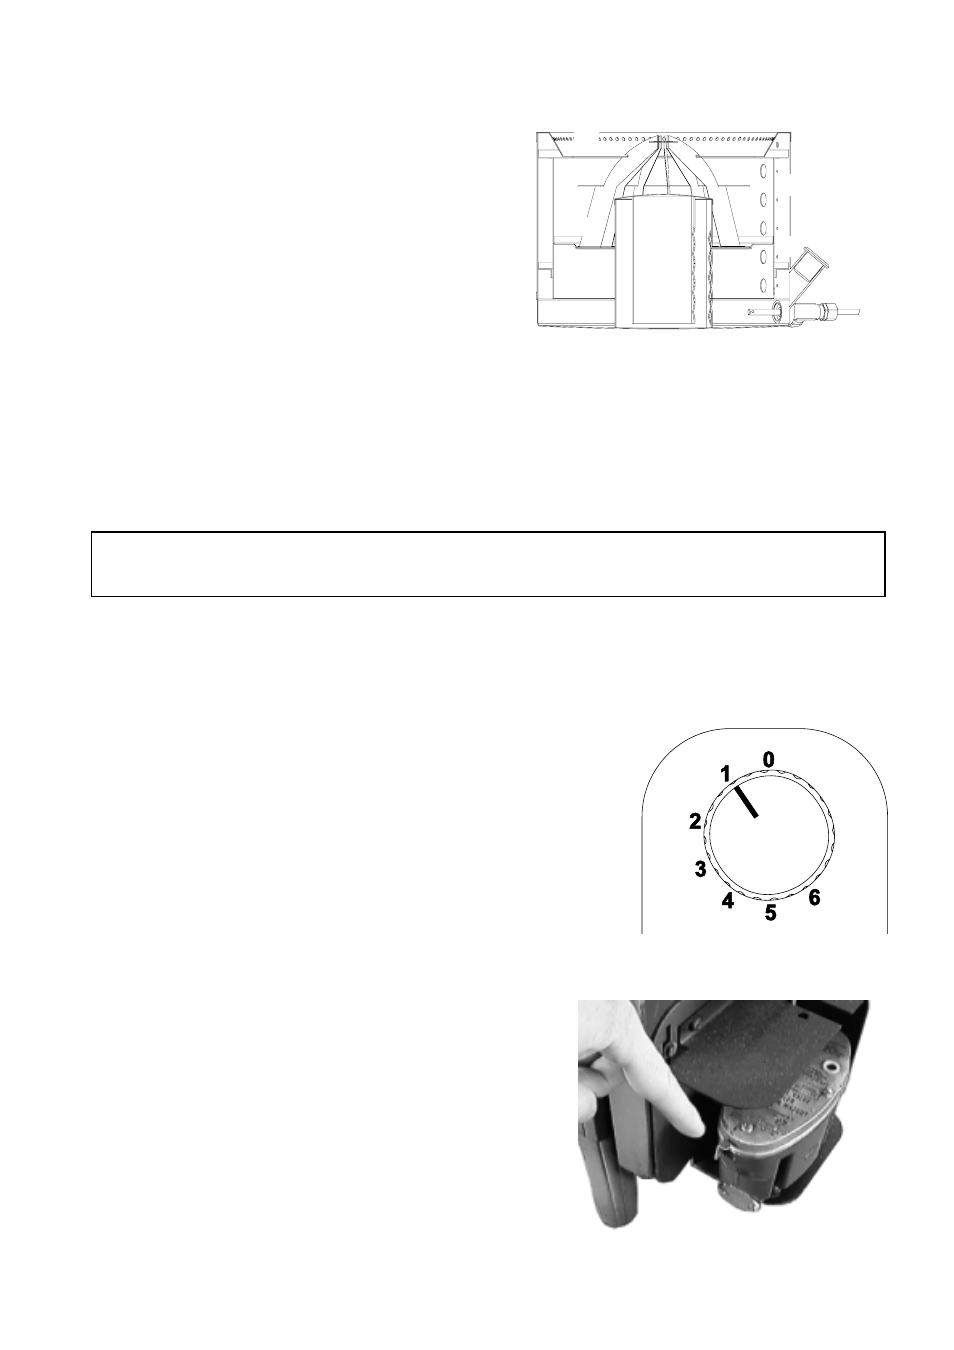
Furnace oil is fed from the tank to the burner floor ‘A’ where is it
ignited by means of a firestarter. The heat produced by this
flame brings the burner temperature to the required level to
vaporize the fuel. Oil will only burn as a vapour not a liquid.
Room combustion air enters the burner through the air inlet
holes ‘B’.
The stove carburetor contains a filter to trap impurities. This
filter must be cleaned periodically with the frequency
depending on the fuel purity. A safety lever controls fuel flow.
Oil can only enter the float chamber when the safety lever is
depressed. Oil temperature variations will affect the oil flow into
the float chamber. A float in the chamber raises the fuel level
available to the burner. The carburetor is also controlled by a
control knob which turns from “0" (off) to ”6" (high setting)
(figure 14).
In the center of the burner is the catalyser ‘C’ which aids in the good combustion. When the stove is operation, the catalyser
glows red. The stove should not be used with out both the catalyser, catalyser top ‘D’ and ring ‘E’.
To the right of the unit, just below the side panel is a small push rod called a de-scaling lever ‘F’, that should be pushed and
pulled in and out as well as turning slightly at the same time to keep the inlet pipe clear of carbon buildup. This should be
done on a weekly basis.
Because the draft from the chimney is never uniform, a draft regulator has been added to ensure a constant air intake to the
burner regardless of external factors.
Never light the burner if any oil is in the burner pot. The burner pot must be cleaned thoroughly prior to lighting or
relighting.
Keep the door of the oil stove closed when it is in operation except during lighting procedures.
Proceed once installation is complete and all necessary instructions have been followed.
When lit for the first time, the stove will emit a slight odour for a few hours. This is a normal temporary condition caused by
the curing and the “burn-in” of internal paints and lubricants used in the manufacturing process and will not occur again.
After extended periods of non-operation such as following a vacation or a warm weather season, the stove may emit a
slight odour for a few hours. This is caused by dust particles burning off. In both cases, open a window to sufficiently
ventilate the room.
Lighting instructions
1. Through the open door, remove the catalyser components (C, D and E,
figure 13) from the burner.
2. Closed the door and ensure that the burner pot is dry, and clean with no oil
remaining.
3. Place a piece of thumb nail size firestarter gel (methane pellet or paraffin paper
or 2 tablespoons of methylated spirits) into the burner pot.
NEVER USE ALCOHOL OR GASOLINE AS A FIRESTARTER.
Light with a long taper or wadded piece of paper. Immediately replace the
catalyser components (figure 13). Ensure that the top is centred.
4. Set the control knob to “0" (figure 14). Depress safety lever to allow oil flow into
the carburetor (figure 15).
5. Turn the carburetor control knob to the ”1" dial setting.
6. Allow 10 to 15 minutes of low burn for the flames and chimney draft to
stabilize. The catalyser should glow red before changing to a higher
setting.
7. The stove may now be adjusted to the desired heat setting, usually
between “2" and ”4". Nevers switch straight from “1” to “6". A longer burner
life will be achieved if the control knob is moved one setting at a time
leaving approx. 5 minutes between settings.
If the fire goes out, return the carburetor control knob to the “0" setting. Let
the burner cool off completely before repeating the lighting procedure.
Clean out any oil before relighting.
NEVER OPERATE THE STOVE WITH THE DOOR OPEN OR AJAR.
Document n° 1092-1 EN ~ 04/02/2002
9
Figure 13
A
B
C
D
E
B
B
F
Figure 14
Figure 15