Supplied accessories / contr ol guide, Rear panel remote control, Bef ore use – Panasonic RQT9223 User Manual
Page 7: Batteries, Caution, Press on the tab to open, When you set the unit in a cabinet
7
RQT9223
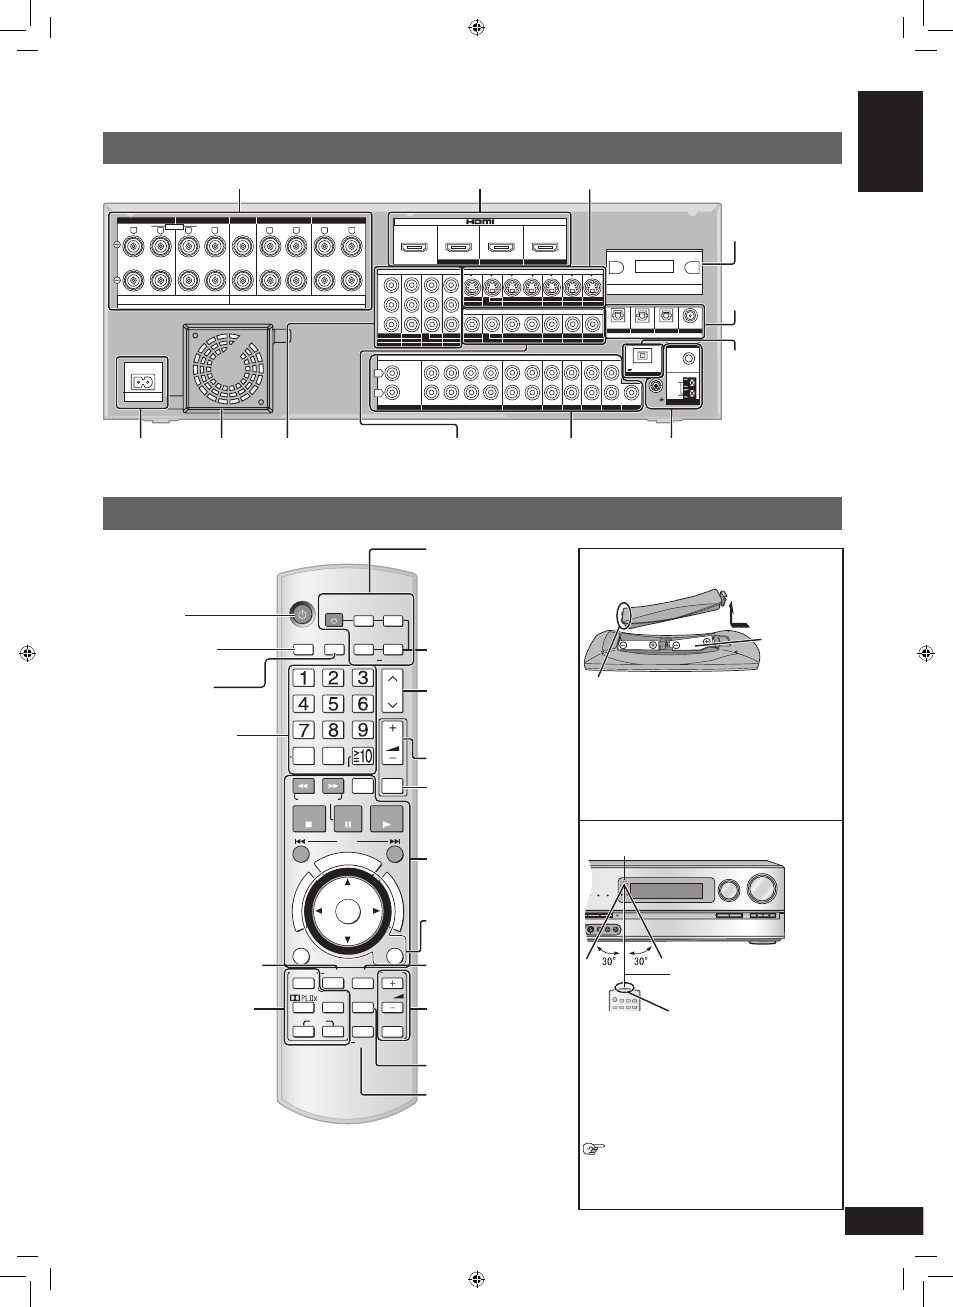
Rear Panel
Remote control
Batteries
Press on the tab to open.
• Insert so the poles (( and )) match those in the
remote control.
• Do not use rechargeable type batteries.
• Do not heat or expose to flame.
• Do not leave the batteries in an automobile
exposed to direct sunlight for a long period of
time with doors and windows closed.
Use
WIRELESS READY
SURROUND M.ROOM
INPUT SELECTOR
VOLUME
+
_
DTS-HD
MULTI CH
LPCM
BI-AMP
AUX
TUNE
RETURN
AUTO SPEAKER SETUP
-SETUP
OK
SPEAKERS A
SPEAKERS B
S VIDEO
VIDEO L - AUDIO - R
About 7 meters (23 feet) or less
when you sit directly in front of
the signal sensor (Exact distance
depends on angles).
Remote control signal sensor
Transmission window
Caution
• Do not place an object between the signal
sensor and the remote control.
• Do not place the signal sensor under direct
sunlight or the strong light of an inverter
fluorescent lamp.
• Keep the transmission window and the unit’s
sensor free from dust.
When you set the unit in a cabinet
The remote controlling range may decrease
depending on the thickness or colors of glass
cabinet doors.
Supplied accessories / Contr
ol guide
Bef
ore
use
ONE T
O
TT UCH PLA
LLAY
Y
Y
AA
ONE T
OUCH PLAY
DIR
EC
TN
AV
IGA
TO
R
TO
P
M
EN
U
FU
NC
TIO
NS
0
AV
SYSTEM
TV
RECORDER
DVD
BD/DVD
PLAYER
CABLE
ANALOG 8CH
SAT
OPTION
PORT
FM/AM
CH
VOL
SKIP
SEARCH/SLOW
STOP
PAUSE
PLAY
DRIVE
SELECT
MUTING
OK
RETURN
OFF
SURROUND
SOUND
TV
VOL
NEO : 6
SFC
MUSIC
MOVIE
MENU
DISPLAY
DISC
DIRECT
TUNING
TEST
AUTO
SETUP
INPUT
SELECTOR
ENTER
SUB MENU
S
TV/VIDEO
Power button
For selecting input
sources (➔ pages 26
and 41)
For inputting channels
TV, cable box and satellite
receiver (➔ page 42)
DVD recorder
(➔ page 43)
Radio (➔ page 48)
For selecting a track or
chapter
DVD recorder (➔ page 43)
Blu-ray Disc/DVD player
(➔ page 44)
For inputting frequencies
(➔ page 49)
For confirming speaker
output (➔ page 14)/For auto
speaker setup (➔ pages
24 and 25)/For adjusting
speaker level (➔ page 31)
For listening to surround
sounds (➔ pages 28 to 30)
For switching an input
source on and off/
Source switching/
Switching remote control
modes (➔ pages 42 to 46)
For playing 8 channels
sources (➔ page 27)
For selecting a channel
TV, cable box and satellite
receiver (➔ page 42)
DVD recorder (➔ page 43)
Radio (➔ page 48)
For adjusting volumes
(➔ pages 14, 15, 26 and
41)
For silencing speakers
temporarily (➔ page 31)
For operating other
equipment
(➔ pages 33 and 42 to 44)
For operating SOUND
MENU (➔ pages 34 and
35)/SETUP (➔ page 36)
For operating a TV
(➔ page 42)
For selecting SOUND
MENU (➔ pages 34 and
35)
For changing the display
(➔ pages 31 and 48)
For playing an iPod (➔
page 47)/For entering
SETUP menu items
(➔ page 36)
For switching FM or
AM (➔ pages 48 and 49)
BI-WIRE
LF
HF
L
R
FRONT A
FRONT B
CENTER
SURROUND
SURROUND BACK
OUT
IN
IN
CD
BD/DVD PLAYER / ANALOG 8CH IN
DVD RECORDER
VCR
CABLE/SAT
GAME
TV
AUDIO
SURROUND BACK SURROUND
FRONT
SUBWOOFER
OUT
IN
IN
IN
(DVD RECORDER)
(BD/DVD PLAYER)
(CABLE/SAT)
HDMI 1
HDMI 2
HDMI 3
FRONT A
FRONT B
CENTER
SURROUND
SURROUND BACK
S VIDEO
COMPONENT VIDEO
L
R
IN
IN
IN
IN
AC IN~
OUT
IN
IN
OUT
OUT
IN
IN
IN
IN
TV MONITOR
TV MONITOR
DVD RECORDER
VCR
CABLE/SAT
GAME
DVD PLAYER
BD/
(BD/
DVD PLAYER)
(DVD RECORDER)
(CABLE/SAT)
1
2
3
DIGITAL IN
(DVD RECORDER) (BD/DVD PLAYER)
(TV)
(CD)
OPTICAL 1
OPTICAL 2
OPTICAL 3
COAXIAL
SUBWOOFER
Y
P
B
P
R
IN
OUT
OUT
IN
IN
IN
IN
TV MONITOR
DVD RECORDER
VCR
CABLE/SAT GAME
DVD PLAYER
BD/
OUT
CENTER
IN
IN
FM ANT
AM ANT
OPTION V.1
LOOP
EXT
DC OUT/SORTIE C.C.
5V 500mA MAX
75
Ω
R
L
R
R
L
L
LOOP ANT
GND
VIDEO
SPEAKERS
HAUT-PARLEURS
Class2 wiring
A OR B/BI-WIRE : 4-8
Ω / EACH SPEAKER (CHAQUE)
A AND B : 6-8
Ω / EACH SPEAKER (CHAQUE)
6-8
Ω / EACH SPEAKER (CHAQUE)
Speaker terminals (➔ pages 10, 11 and 22) HDMI terminals (➔ pages 12, 13, 16 and 32)
S video terminals (➔ pages 18 and 21)
Digital input terminals
(➔ pages 12, 13, 16
to 20 and 32)
Option port terminal
(➔ page 47)
AC inlet
(➔ page 12)
Exhaust hole
(Cooling fan)
Component Video
terminals (➔ page 19)
Video terminals
(➔ pages 17 and
21)
Antenna terminal
(➔ page 23)
Digital transmitter
terminal
(➔ page 23)
Audio terminals
(➔ pages 11, 16 to
21)
(R6/LR6, AA)
Place this side in before the other side
when you close.
SA-BX500-PP (RQT9223-Y)_En.indd 7
6/27/2008 4:05:05 PM