Phono r cd in in cdr/t ape l r in out, Coax – Philips CDR796 User Manual
Page 8
3-3
BRIEF OPERATING INSTRUCTIONS
Dir
ect digital optical connection
This connection is required f
o
r direct recording from an
y
digital audio equipment with a digital optical output (e
.g.
CD pla
yer or D
VD pla
yer).
1
Remo
ve the dust caps from the digital optical input of the
CD pla
yer/recorder and from the digital optical output of
the exter
nal appliance
.Keep the caps in a saf
e place
.
2
Use a digital optical cab
le to connect the optical output of
the exter
nal appliance with OPTIC
A
L
IN on the
CD
pla
yer/recorder
.Mak
e sure y
ou inser
t both plugs full
y,
until a click is heard.
0
Recording can be done no
w via the digital optical input.
Press INPUT repeatedl
y on the CD pla
yer/recorder to
select the digital optical input.
OPTICAL IN
is displa
yed.
Digital coaxial connections via a digital r
eceiv
e
r
If y
ou ha
ve
a receiv
er with digital coaxial in- and outputs,
these connections allo
w y
ou to mak
e digital recordings
from var
ious sources connected to the receiv
er
.
Use a c
oaxial cab
le t
o
c
onnect t
he digital c
oaxial i
nput of
the re
ceiv
er w
ith D
IGIT
A
L
OUT on t
he C
D
pla
ye
r/r
ecord
er
.
Use another c
oaxial cab
le t
o
c
onnect t
he digital coaxial
output of the re
ceiv
er w
ith D
IGIT
A
L
IN on t
he
CD
pla
ye
r/re
cord
er
.
0
Recording can be done no
w with an
y digital appliance
connected to a digital input of the digital receiv
er (e
.g.
CD
pla
yer or D
VD pla
yer).
Press INPUT on the
CD
pla
yer/recorder repeatedl
y to select the digital coaxial
input.
DIGITAL IN
is displa
yed.
Digital optical connections via a digital r
eceiv
e
r
If y
ou ha
ve
a receiv
er with digital optical in- and outputs,
these connections allo
w y
ou to mak
e digital recordings
from var
ious sources connected to the receiv
er
.
1
Remo
ve the dust caps from the digital optical in- and
outputs of the CD pla
yer/recorder and from the digital
optical output of the receiv
er
.Keep the caps in a saf
e place
.
2
Use a digital optical cab
le to connect the optical input of
the receiv
er with OPTIC
A
L
OUT on the
CD
pla
yer/recorder
.Use another digital optical cab
le to
connect the optical output of the receiv
er with
OPTIC
A
L
IN on the CD pla
yer/recorder
.Mak
e sure y
o
u
inser
t the plugs full
y,
until a click is heard.
0
Recording can be done no
w with an
y digital appliance
connected to a digital input of the digital receiv
er (e
.g.
CD
pla
yer or D
VD pla
yer).
Press INPUT on the
CD
pla
yer/recorder repeatedl
y to select the digital optical
input.
OPTICAL IN
is displa
yed.
Po
w
e
r
The type plate is located on the r
ear of the unit.
1
Check whether the po
w
er v
o
ltage as sho
wn on the type
plate cor
responds to y
our local po
w
er v
o
ltage
.If it does
not,
consult y
our dealer or ser
vice or
ganization.
2
Mak
e sur
e all connections hav
e been made befor
e
sw
itching on the po
wer supply
.
3
Connect the po
w
er cab
le supplied to
A
C
MAINS ~ and to
the po
w
er outlet.
This switches on the po
w
er suppl
y.
When the unit is switched to standb
y,
it is still consuming
some po
w
er
.T
o
disconnect the unit fr
om the po
wer
completely
,r
emo
ve
the po
wer plug fr
om the po
wer
outlet.
Installations
11
English
CD PL
A
YER/
RECORDER
CD PL
A
YER
OUT
IN
OPTICAL
DIGIT
A
L
AN
A
L
O
G
L
R
IN
OUT
OUT
IN
OPTICAL
DIGIT
A
L OUTPUT
AN
ALOG OU
TPU
T
L
R
COAX
“CLICK!
”
CD PL
A
YER/
RECORDER
DIGIT
A
L
RECEIVER
OUT
IN
OPTICA
L
DI
G
IT
A
L
A
NALOG
L
R
IN
OUT
OUT
IN
OPTICAL
OUT
IN
AUX
CD IN
DVD IN
CD PL
A
YER/
RECORDER
DIGI
T
A
L
RECEIVER
OUT
IN
OPTICAL
DI
G
IT
A
L
A
NALOG
L
R
IN
OUT
OUT
IN
OPTICAL
OUT
IN
AUX
CD IN
DVD IN
“CLICK!
”
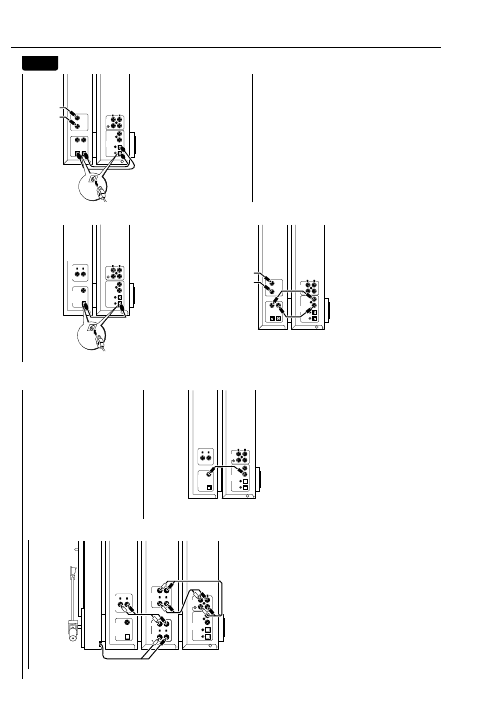
Analo
g
connections
These connections ar
e r
equir
ed f
o
r pla
yback and r
ecor
ding
via an amplifier/r
eceiv
er
, equipped with analog in- and
outputs.
1
Connect the r
ed plug of the supplied audio cable (cinch) to
the r
ed jack
ANALOG IN R and the white plug to the
white jack
ANALOG IN L on the CD pla
yer
/r
ecor
de
.r
:
2
Connect the other end of the audio cable to the analog
outputs of the amplifier/r
eceiv
er (CDR OU
T,
T
APE OU
T,
A
UX OU
T,
REC OU
T,
et
c.).
3
Connect the r
ed plug of the supplied audio cable (cinch) to
the r
ed jack
ANALOG OUT R and the white plug to the
white jack
ANALOG OUT L on the CD pla
yer/r
ecor
der
:
4
Connect the other end of the audio cable to the analog
inputs of the amplifier/r
eceiv
er (CD-R
,T
APE IN
,A
UX,
PL
A
Y
IN
,e
tc
.).
5
Connect all other components of
your system (ta
pe deck,
CD pl
ay
er
,t
une
r,
tu
rn
ta
bl
e,
et
c.) via their analog outputs to
the a
ppr
op
ri
ate analog inputs of the amplifier/r
eceiv
er
(C
D
IN
,TUNER IN
,A
UX IN
,PHONO IN
,e
tc
.).
0
Recor
ding can be done no
w with
an
y a
ppliance connected
to an analog input of the amplifier/r
eceiv
er
:Pr
ess INPUT on
the CD pl
ay
er/r
ecor
der r
epeatedl
y to select the analog
input.
ANALOG IN
is displ
ay
ed.
Ho
w to connect if the analo
g
output on the
amplifier/r
eceiv
er is alr
eady being used (occupied)
Most amplifie
rs/r
ecei
ve
rs
h
av
e m
ultiple analog output
connections (
TAPE
,VCR,…)
,b
ut some amplifiers/r
eceiv
ers
ha
ve
on
ly
1 analog output
.I
n case
you h
av
e alr
eady hook
ed
up a ta
pe deck (
D
A
T
r
ecor
der or MD r
ecor
der) to this
output
you will h
av
e to change the existing connections.
1
Disconnect the analog connections fr
om the ta
pe deck to
the amplifier/r
eceiv
er
.
2
Connect the CD pla
yer/r
ecor
der (see steps 1–4 in the
pr
ev
ious cha
pter).
3
Connect the analog outputs of the ta
pe deck to an
y fr
ee
analog inputs (
A
UX,
CD) on the amplifier/r
eceiv
er
: Y
ou can
no
w pl
ayback
your ta
pe or r
ecor
d fr
om y
our ta
pe deck on
C
D
.H
ow
ev
er
,it is no longer possible to r
ecor
d on ta
pe
.
Digital connections
Dir
ect digital coaxial connection
This connection is r
equir
ed f
or dir
ect r
ecor
ding fr
om an
y
digital audio equipment with a digital coaxial output (e
.g.
CD pl
ay
er or
D
VD pl
ay
er).
Use a digital coaxial cable to connect the coaxial output of
the exte
rnal a
ppliance with DIGIT
AL IN on the
C
D
pl
ay
er/r
ecor
der
:
0
Recor
ding can be done no
w via the digital coaxial input.
Pr
ess INPUT on the CD pl
ay
er/r
ecor
der r
epeatedl
y to
select the digital coaxial input.
DIGITAL IN
is displ
ay
ed.
Installations
10
OUT
IN
OPTICAL
DIGIT
A
L
A
N
ALOG
L
R
IN
OUT
OUT
IN
OPTICAL
D
IGIT
A
L OUTPUT
AN
A
LOG OUTPUT
L
R
P
HONO
L
R
CD
IN
IN
CD PL
A
YER/
RECORDER
AMPLIFIER/
RECEIVER
P
HONO
R
CD
IN
IN
CDR/T
APE
L
R
IN
OUT
CD PL
A
YER
COAX
TURN
T
ABLE
L
CD PL
A
YER/
RECORDER
CD PL
A
YER
OUT
IN
OPTICA
L
DIGIT
A
L
AN
A
L
O
G
L
R
IN
OUT
OUT
IN
OPTICA
L
D
IGIT
A
L OUTPUT
AN
ALOG OU
TPUT
R
COAX
L
CDR82x only