Mixer section, Adjusting the sound quality, Monitoring sound with headphones – Pioneer XDJ-AERO User Manual
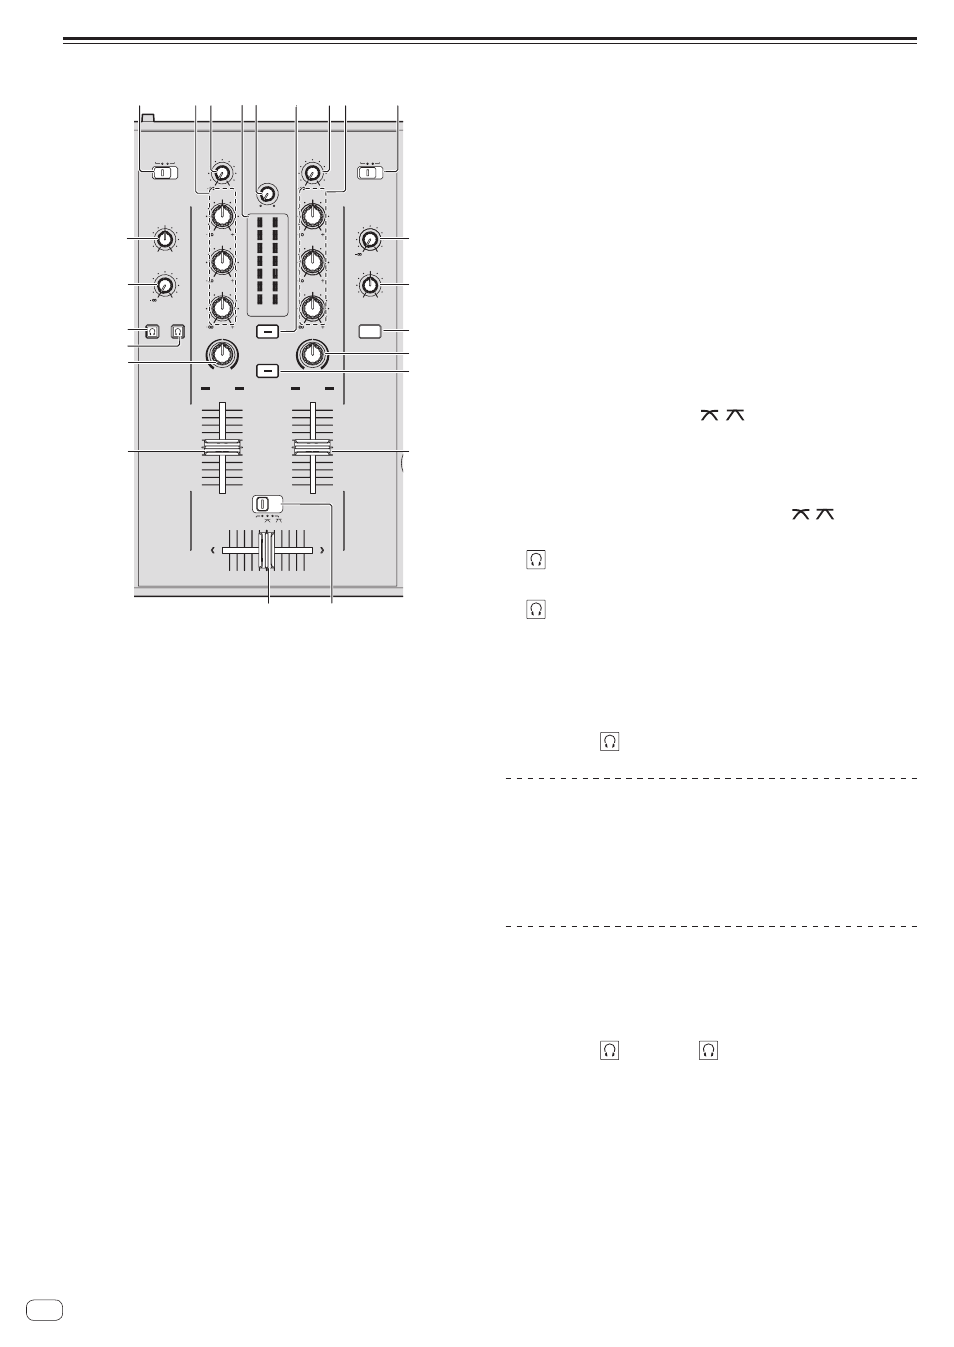
Page 20: 2eq (hi, mid, low) controls, 3trim control, 4level indicator, 5master level control, 6master button, 7deck2/phono2/line2 selector switch, 8mic level control
20
En
Mixer section
9
9
9
AUTO MIX
CROSS F.
CURVE
LOW
HI
PHONO1/
DECK1
HEADPHONES
MASTER
LEVEL
LEVEL
MASTER
MIXING
TRIM
HI
MID
LOW
FILTER
LEVEL
CUE
0
1
2
3
4
5
6
7
8
9
10
0
1
2
3
4
5
6
7
8
9
10
MASTER
LINE1
CH1
CH1
TRIM
HI
MID
LOW
FILTER
CH2
THRU
CH2
PHONO2/
DECK2
MIC
LEVEL
EQ
LINE2
ON/OFF
MIC
0
9
9
9
9
9
0
1
3 45
f
e
2
2
3
7
8
9
a
b
c
d
j
i
h
g
b
d
6
1
DECK1/PHONO1/LINE1 selector switch
This selects the [CH 1] input source from among the devices con-
nected to this unit.
! When set to [PHONO/LINE], the mixer section can be used as a
DJ mixer. In this case, the effect sections of the respective decks
can be used.
2
EQ (HI, MID, LOW) controls
These adjust the sound quality of the respective channels.
These adjust the [HI] (high range), [MID] (middle range) and [LOW]
(low range), respectively.
3
TRIM control
Adjusts the level of audio signals input in each channel.
4
LEVEL indicator
This displays the audio levels of the respective channels.
! Press the [MASTER] button to switch the channel whose audio
level is displayed.
5
MASTER LEVEL control
Adjusts the audio level output from the [MASTER OUT 1] and
[MASTER OUT 2] terminals.
6
MASTER button
This switches the channel indicated on the [LEVEL] indicator.
— When off: The audio level input to [CH 1] (channel 1) and [CH 2]
(channel 2) is displayed on the [LEVEL] indicator.
— When lit: The audio level output from the [MASTER OUT 1] and
[MASTER OUT 2] terminals is displayed on the [LEVEL] indicator.
7
DECK2/PHONO2/LINE2 selector switch
This selects the [CH 2] input source from among the devices con-
nected to this unit.
! When set to [PHONO/LINE], the mixer section can be used as a
DJ mixer. In this case, the effect sections of the respective decks
can be used.
8
MIC LEVEL control
Adjusts the audio level input to the [MIC] terminal.
! Use the [MIC ATT.] control on this unit’s rear panel to adjust the
audio level before DJ performances.
9
MIC EQ control
This adjusts the microphone’s sound quality.
a
MIC (ON/OFF) button
Turns the microphone on/off.
b
FILTER control
— Turn clockwise to apply the high pass filter.
— Turn counterclockwise to apply the low pass filter.
= Using the filter function (p.21)
c
AUTO MIX button
This turns the auto mix function on and off.
d
Channel fader
Adjusts the level of audio signals output in each channel.
e
CROSS F. CURVE (THRU, , ) (crossfader curve
selector switch)
This switches the crossfader curve characteristics.
f
Crossfader
The sound of the respective channels is output according to the
curve characteristics selected with the [THRU,
,
] selector
switch.
g
(CH2) button
The sound of [CH 2] is monitored.
h
(CH1) button
The sound of [CH 1] is monitored.
i
HEADPHONES LEVEL control
Adjusts the audio level output from the [PHONES] terminal.
j
HEADPHONES MIXING control
Adjusts the balance of the monitor volume between the sound of the
deck whose [
] button is pressed and the master sound.
Adjusting the sound quality
Turn the [HI], [MID], [LOW] controls for the respective
channels.
! The sound for that range can be turned completely off by turning the
control all the way counterclockwise (isolator function).
Monitoring sound with headphones
1 Connect headphones to the [PHONES] terminal.
For instructions on connections, see Connecting the input/output termi-
nals on page 10.
2 Press the [ (CH1)] or [ (CH2)] button.
Select the channel you want to monitor.
! This operation is not necessary to monitor the sound output from the
[MASTER OUT 1] and [MASTER OUT 2] terminals (the sound of the
master channel).
3 Turn the [HEADPHONES MIXING] control.
— When turned counterclockwise: The volume of [CH 1] and [CH 2]
becomes relatively louder.
— At the center position: The volume of the [CH 1] and [CH 2]
sound is the same as the volume of the sound output from the
[MASTER OUT 1] and [MASTER OUT 2] terminals (the sound of
the master channel).