Recording – Panasonic AG-EZ50UP User Manual
Page 20
20
2
4
RECORD
REC
PAUSE
PAUSE
3
9
¥
°
ø
x
1
2, 3
1
CAMERA
CARD P.B.
VCR
6
7
SEARCH
SEARCH
8
AUTO
MANUAL
AE LOCK
5
MODE
ON
OFF
POWER
Recording
1
Set the [OFF/ON/MODE] Switch to [ON].
≥The [CAMERA] Lamp lights up.
1
2
Press the Recording Start/Stop Button.
≥Recording starts.
≥After the [RECORD] is displayed, it changes to [REC].
2
≥The Tally Lamp (LED Lamp)
3
lights up during recording and alerts
those being recorded that recording is in progress. The Tally Lamp
does not light up if the [TALLY LED] on the [OTHER FUNCTIONS]
Sub-menu is set to [OFF].
3
Press the Recording Start/Stop Button again to pause the
recording.
≥[PAUSE] is displayed.
4
≥If the Recording Pause Mode continues for more than 5 minutes, the power
is turned off automatically for tape protection and power conservation.
To resume recording from this condition, turn on the power again.
≥When recording while the Mode Selector Switch is set to [AUTO]
5
, the
Camera/Recorder automatically adjusts the focus and white balance. (In
some cases, they cannot be adjusted automatically and need to be adjusted
manually.) (
l 23, 24, 25)
≥For other notes, see page 46.
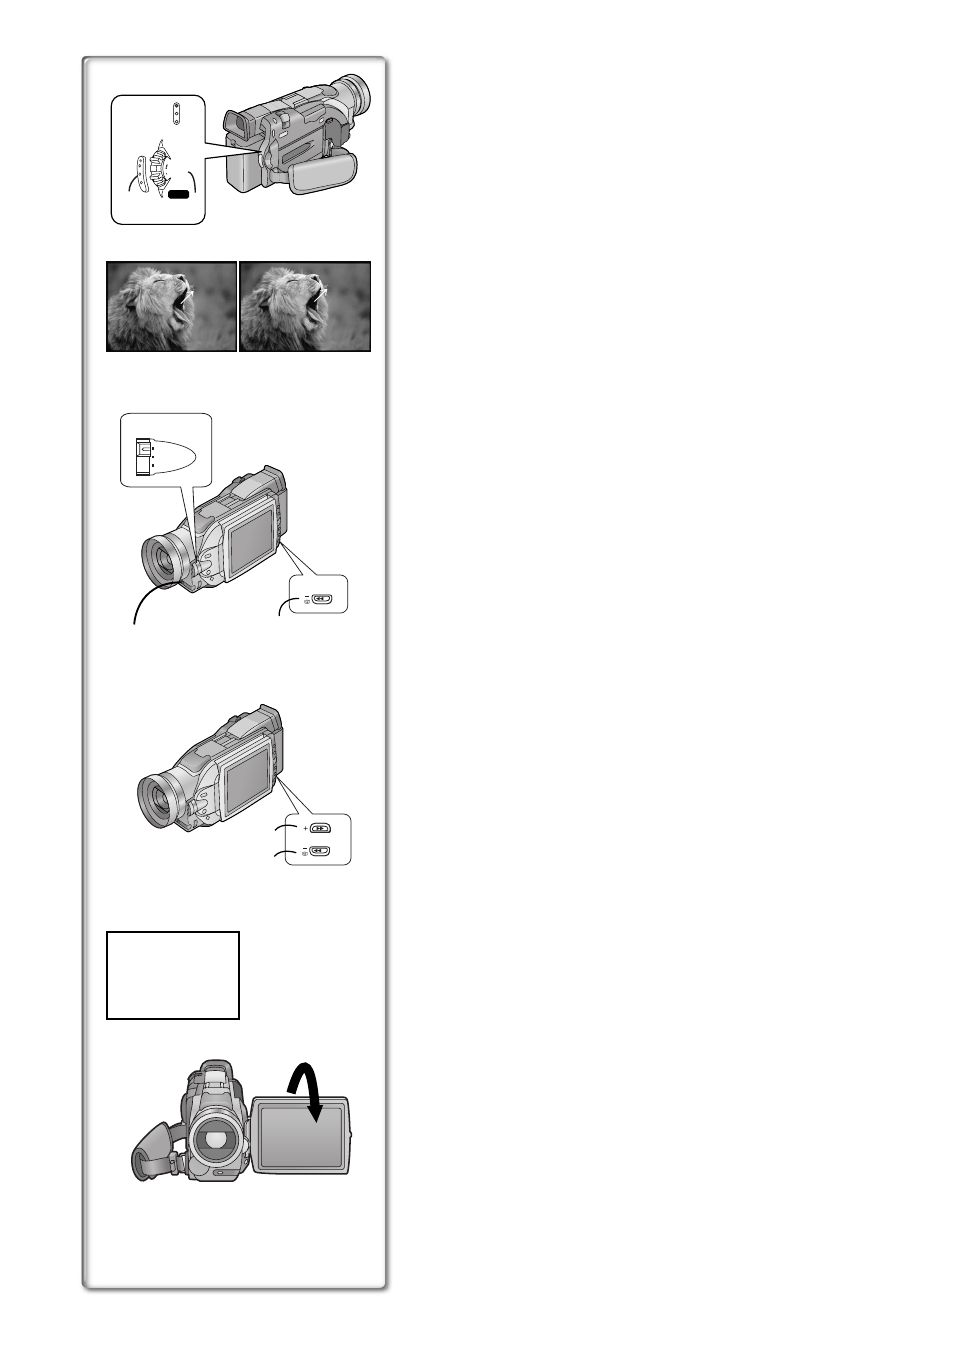
ª To Check the Recording
By pressing the [
S] Button
6
in the Recording Pause Mode, you can play
back the last few seconds of the recorded scene.
≥[CHK] is displayed. After checking, the Camera/Recorder resumes the
Recording Pause Mode.
≥For other notes, see page 46.
ª To View the recorded scene while the Recording is
paused (Camera Search)
The recorded scene can be viewed by holding down the [
sSEARCH] Button
7
or [
rSEARCH] Button
8
in the Recording Pause Mode.
The Camera Search function is useful for finding the starting point of a new
scene to create a smooth transition from one scene to another.
≥When the [sSEARCH] Button is pressed, pictures are played back in the
reverse direction.
≥When the [rSEARCH] Button is pressed, pictures are played back in the
forward direction.
≥For other notes, see page 46.
ª Self-Recording
By opening the LCD Monitor and turning it so that it faces forward (to the lens
side)
9
, you can let the subject in front of the Camera/Recorder monitor the
shot while shooting is in progress.
≥When the LCD Monitor is opened, the Viewfinder is disabled automatically.
However, when the LCD Monitor is rotated forward, the image is also
shown in the Viewfinder.
≥If you prefer to have the image on the LCD Monitor to look like an image in
a mirror, set [SELF-REC] on the [OTHER FUNCTIONS] Sub-Menu to
[MIRROR]. (Mirror Mode)
Images are recorded normally and no left and right reversal occurs.
≥If [MIRROR] is selected, only recording Indication [¥], recording pause
Indication [
¥;], Card PhotoShot Indication [
ø] and Remaining Battery
Power Indication [
x] are displayed. If a general Warning/Alarm
Indication [
°] appears, return the LCD Monitor to the original position in
order to check the specific content of the Warning/Alarm Indication.
ª To Finish the Recording
Set the [OFF/ON/MODE] Switch to [OFF].