Hitch assembly, Wing axle assembly to center axle, Hitch assembly wing axle assembly to center axle – Land Pride RC5020 User Manual
Page 15: Warning, Table of contents hitch assembly
13
Section 1: Assembly & Set-up
5/29/13
RC5020 (540 RPM) and RCM5020 (1000 RPM) Rotary Cutters 318-474M
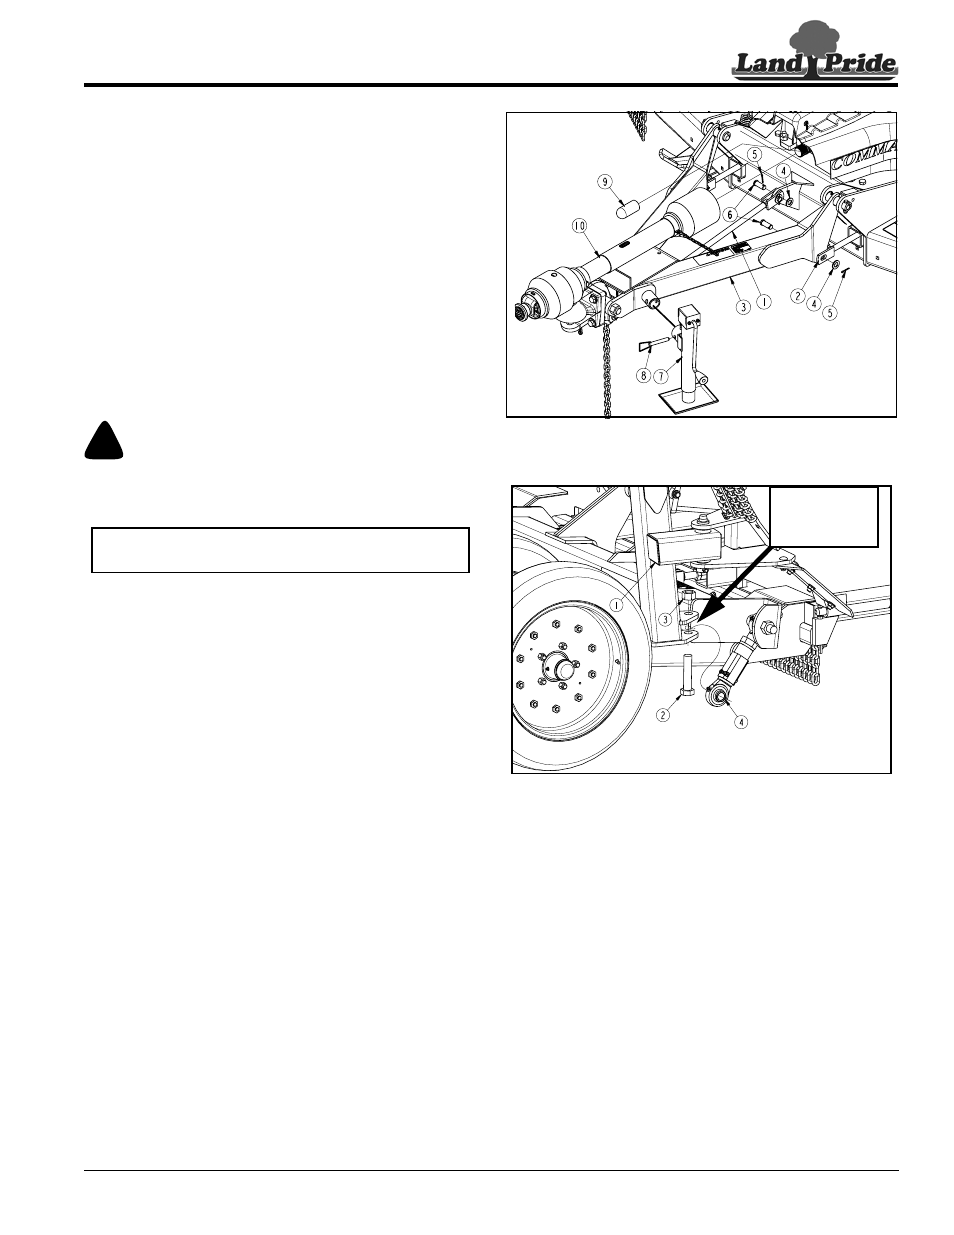
Hitch Assembly
Refer to Figure 1-3:
1.
Install clevis rod (#1) to the deck center lug using
3/4" x 1 1/2" clevis pin (#6), 3/4" flat washer (#4), and
5/32" x 1 1/4" cotter pin (#5).
2.
Install left and right leveling rods (#2) to hitch frame
(#3) with 3/4" x 1 1/2" clevis pins (#6), 3/4" flat
washes (#4), and 5/32" x 1 1/4" cotter pins (#5). Final
adjustment should be made when the cutter is
attached to the tractor.
3.
Install parking jack (#7) to hitch frame (#1) and
secure with attached pin (#8). Adjust parking jack to
preferred drawbar height.
Wing Axle Assembly to Center Axle
Refer to Figure 1-4:
!
WARNING
Connect turnbuckle to wing axles before lowering wings.
Otherwise, personal injury and/or damage to the turnbuckle
can occur.
Wing axles are secured folded backing for shipping
purposes.
1.
Remove ties securing left and right wing axles (#1)
and rotate axles to install turnbuckles (#4).
2.
Remove locknuts (#3) and cap screws (#2).
3.
Attach left and right turnbuckles (#4) to wing axles
with existing 1"-8 Gr8 cap screws (#2) and 1" lock
nuts (#3). Make sure grease zerks are facing up
when wings are folded down.
4.
Tighten locknuts (#3) to the correct torque.
NOTE: Do not tighten hardware until wing axle
assembly is complete.
Hitch Assembly Illustration
Figure 1-3
Wing Axle - Turnbuckle Assembly
Figure 1-4
24847
15336
Turnbuckle (#3)
to be secured
between the two
flanges.